.png)
This Tropical XPA pours like sunshine in a glass! Loaded with Mosaic, Astra, and Superdelic hops over a smooth oat-and-wheat malt bill, it delivers punchy tropical aroma without a ton of bitterness. It's light, juicy, and super crushable, making it the kind of crisp, refreshing, and dangerously drinkable beer you need on a summer afternoon!
Stats
- Style: Tropical XPA / American Pale Ale
- ABV: 4.9%
- OG: 1.047
- FG: 1.007 (measured 1.010)
- IBU: 23
- Colour: 7 EBC
- Carbonation: 2.5 vols CO₂
- Batch Size: 23 L (6.1 gal)
- Boil Time: 60 min
- Brewhouse Efficiency: 80%
- System: BrewZilla Gen 4- 65 L
Ingredients
Grain Bill (4.54 kg / 10 lb total)
- 3.632 kg (8 lb) Golden Promise Pale Ale Malt — 80%
- 454 g (1 lb) Rolled Oats — 10%
- 454 g (1 lb) Flaked Wheat — 10%
Hops (230.5 g / 8.1 oz total)
Boil Additions
- 5.5 g (0.19 oz) Cascade @ 60 min — 3 IBU
- 25 g (0.88 oz) Mosaic @ 5 min — 9 IBU
Hop Stand — 20 min @ 75 °C (167 °F)
- 50 g (1.76 oz) Mosaic — 6 IBU
- 30 g (1.05 oz) Astra — 3 IBU
- 20 g (0.7 oz) Superdelic — 2 IBU
Dry Hop — Day 7
- 50 g (1.76 oz) Mosaic
- 30 g (1.05 oz) Astra
- 20 g (0.7 oz) Superdelic
Yeast
- 2 packs LalBrew Pomona
Water Profile (NEIPA Style)
- Ca 128 ppm
- Mg 9 ppm
- Na 6 ppm
- Cl 163 ppm
- SO₄ 99 ppm
- HCO₃ 43 ppm
- SO₄/Cl ratio: 0.6
- Mash pH: 5.56
Mash Additions
- 6.34 g Calcium Chloride
- 1.83 g Epsom Salt
- 2 g Gypsum
Sparge Additions
- 4.76 g Calcium Chloride
- 1.37 g Epsom Salt
- 1.5 g Gypsum
- 0.72 ml Phosphoric Acid (80%)
Boil
- Whirlfloc @ 15 min
Mash Schedule
- 65 °C (149 °F) — 60 min
- 75 °C (167 °F) — 10 min mash out
Mash water: 20 L (5.3 gal)
Sparge water: 15 L (4 gal)
Fermentation Schedule
- Primary: 19 °C (66 °F) — 4 days
- Secondary: 19 °C (66 °F) — 6 days
- Cold Crash: 1 °C (34 °F) — 3 days
- Carbonation: 2.5 vols CO₂
Step-by-Step Brewing Method
1. Mash In
Mash all grains in 20 L (5.3 gal) of water at 65 °C (149 °F). Hold for 60 minutes to create a clean, highly fermentable wort with a soft mouthfeel.
2. Mash Out & Sparge
Raise mash to 75 °C (167 °F) for 10 minutes. Sparge with 15 L (4 gal) of water to collect roughly 32 L (8.5 gal) pre-boil wort.
3. Boil – 60 Minutes
- Add Cascade hops at 60 minutes
- Add Whirlfloc at 15 minutes
- Add Mosaic hops at 5 minutes
Boil hard on 2500–3500 W for strong hop utilisation and clarity.
4. Hop Stand
After flameout, cool wort to 75 °C (167 °F). Add Mosaic, Astra, and Superdelic hops and hold for 20 minutes.
5. Chill & Transfer
Chill wort to 19 °C (66 °F), transfer to fermenter, and pitch LalBrew Pomona yeast.
6. Fermentation & Dry Hopping
Ferment at 19 °C (66 °F). Add dry hops during the last few gravity points of fermentation (around day 7) to maximise hop biotransformation and aroma.
7. Cold Crash & Package
Cold crash at 1 °C (34 °F) for 3 days. Package and carbonate to 2.5 vols CO₂.

.png)
ANZAC Biscuit Ale (48 L / 12.7 gal)
A tribute brew for the diggers, the brave ANZAC soldiers who gave their lives so we may live, and the ANZAC biscuits that they created! This ale combines oats, golden syrup, coconut, and rich biscuit malt to recreate those familiar flavours in liquid form. Smooth, lightly sweet, and rich in biscuit character, this beer honours tradition while bringing a uniquely Australian twist to homebrewing.
Stats
- Style: Historical / Specialty Ale
- ABV: 5.9%
- OG: 1.049 (measured 1.054)
- FG: 1.006 (measured 1.009)
- IBU: 22
- Colour: 12 EBC
- Carbonation: 2.4 vols CO₂
- Batch Size: 48 L (12.7 gal)
- Boil Time: 60 min
- Brewhouse Efficiency: 80%
- System: BrewZilla Gen 4 - 65 L
Ingredients
Grain Bill (8.43 kg / 18.6 lb total)
- 6.07 kg (13.4 lb) Golden Promise Pale Ale Malt — 72%
- 1.012 kg (2.23 lb) Rolled Oats — 12%
- 506 g (1.12 lb) Biscuit Malt — 6%
- 506 g (1.12 lb) Light Munich Malt — 6%
- 337 g (0.74 lb) Honey Malt — 4%
Adjuncts & Flavour Additions
- 1.2 kg (2.65 lb) Golden Syrup @ 5 min
- 500 g (1.1 lb) Toasted Coconut (secondary, toast ~8 min @ 180 °C / 356 °F)
Hops — Pride of Ringwood (125 g / 4.4 oz total)
- 25 g (0.88 oz) @ 60 min — 13 IBU
- 100 g (3.5 oz) @ 5 min — 9 IBU
Yeast
- 24 g Fermentis US-05 (with 2 L starter)
Water Profile (Amber Malty)
- Ca 50 ppm • Mg 5 ppm • Na 15 ppm
- Cl 65 ppm • SO₄ 51 ppm • HCO₃ 57 ppm
- SO₄/Cl ratio: 0.8
- Mash pH: 5.45
Additions
- Mash: 2.16 g CaCl₂, 2.3 g Gypsum, 2.4 ml Phosphoric Acid
- Sparge: 2.34 g CaCl₂, 2.5 g Gypsum, 1.88 ml Phosphoric Acid
- Boil: 1.67 g Whirlfloc @ 15 min
Mash Schedule
- 65 °C (149 °F) — 60 min (high fermentability)
Mash water: 30 L (7.9 gal)
Sparge water: 33 L (8.7 gal)
Fermentation Schedule
- Primary: 18 °C (64 °F) for 14 days
- Carbonation: 2.4 vols CO₂
Step-by-Step Brewing Method
1. Mash In
Mash all grains and oats in 30 L (7.9 gal) of water at 65 °C (149 °F). Hold for 60 minutes to produce a clean, fermentable wort.
2. Lauter & Sparge
Sparge with 33 L (8.7 gal) at ~77 °C (170 °F) to collect around 56–58 L (14.8–15.3 gal) pre-boil wort.
3. Boil – 60 Minutes
- Add 25 g Pride of Ringwood at 60 minutes
- Add Whirlfloc at 15 minutes
- Add 1.2 kg golden syrup at 5 minutes
- Add 100 g Pride of Ringwood at 5 minutes
Boil hard to integrate sugars and develop light colour.
4. Chill & Transfer
Chill wort to 18 °C (64 °F) and transfer to fermenter.
5. Fermentation
Pitch 24 g US-05 yeast. Ferment at 18 °C (64 °F) for 14 days.
6. Secondary Addition
Add 500 g toasted coconut and allow to steep for several days until flavour is achieved.
7. Package
Bottle or keg and carbonate to 2.4 vols CO₂. Condition briefly before serving.
.png)
Plum & Blackberry Barrel Aged Mead! (24 L / 6.3 gal)
A rich, fruit-driven melomel built on a blend of stringybark, floral, and orange blossom honey, then layered with blackberry and plum before being backsweetened and barrel aged. The result is a big, complex mead with deep berry character, stone fruit richness, and a rounded honey finish.
Stats
- Style: Melomel / Fruit Mead
- Batch Size: 24 L (6.3 gal)
- Original Gravity: 1.115
- FG before fruit: 1.010
- Final Gravity after fruit fermentation: 1.000
- Estimated Final ABV: Aprox ~13%
- Primary fermentation: 4–6 weeks
- Fruit refermentation: 2 weeks
Ingredients
Honey Base
- 3 kg (6.6 lb) Archibalds Stringybark Honey
- 1.5 kg (3.3 lb) Archibalds Floral Honey
- 4.5 kg (9.9 lb) Archibalds Orange Blossom Honey
- 18 L (4.8 gal) water
- 28 g (0.99 oz) Yeast-O-Life yeast nutrient
- 15 g Lalvin yeast for primary fermentation
Fruit Addition
- 6 kg (13.2 lb) pureed blackberries
- 3.4 kg (7.5 lb) pureed plums
- 2 tablespoons pectinase
- 20 g (0.7 oz) Lalvin EC-1118 yeast
Stabilisers
- 2.25 g (0.08 oz) Potassium metabisulfite
- 18 g (0.63 oz) Potassium sorbate
Backsweetening
- Planned: 575 g (1.27 lb) Archibalds Floral Honey
- Actual used: 630 g (1.39 lb) Archibalds Floral Honey
Step-by-Step Method
1. Make the base mead
Combine the 9 kg (19.8 lb) of honey with 18 L (4.8 gal) of water and mix thoroughly. Add 28 g of Yeast-O-Life nutrient and pitch 15 g of Lalvin yeast. Ferment until the mead reaches around 1.010 gravity. This took roughly 4–6 weeks.
2. Prepare the fruit fermenter
Sanitise a second fermenter and purge with CO₂ if possible. Add 6 kg of pureed blackberries and 3.4 kg of pureed plums. Add 2 tablespoons of pectinase to help break down fruit pectins and release fermentable sugars.
3. Rack the mead onto fruit
Rack 20 L (5.3 gal) of the fermented mead onto the fruit puree. This is optional, but transferring onto fruit in a clean secondary fermenter helps reduce the amount of trub interacting with the fruit.
4. Add EC-1118 to finish fermentation
Because the original yeast had likely reached its alcohol tolerance, add 20 g of Lalvin EC-1118 after the fruit is added. The fruit-fermented mead finished dry at 1.000 over about 2 weeks.
5. Stabilise after fruit fermentation
Once fruit fermentation is complete, add:
- 2.25 g potassium metabisulfite
- 18 g potassium sorbate
These were added at the same time as the backsweetening honey to prevent renewed fermentation.
6. Backsweeten
Add floral honey to taste. The original plan was 575 g, but the final amount used was 630 g (1.39 lb).
7. Barrel age
After stabilising and backsweetening, transfer the mead for barrel ageing. This helps round out the alcohol, integrate the fruit, and build extra complexity.
Brew Notes
This mead started as a traditional honey ferment and then shifted into a fruit-driven melomel once the blackberry and plum puree were introduced. The second yeast pitch with EC-1118 was a smart move, allowing the fruit sugars to ferment fully dry before stabilising and backsweetening. Barrel ageing should add depth and help tie the fruit, honey, and alcohol together.
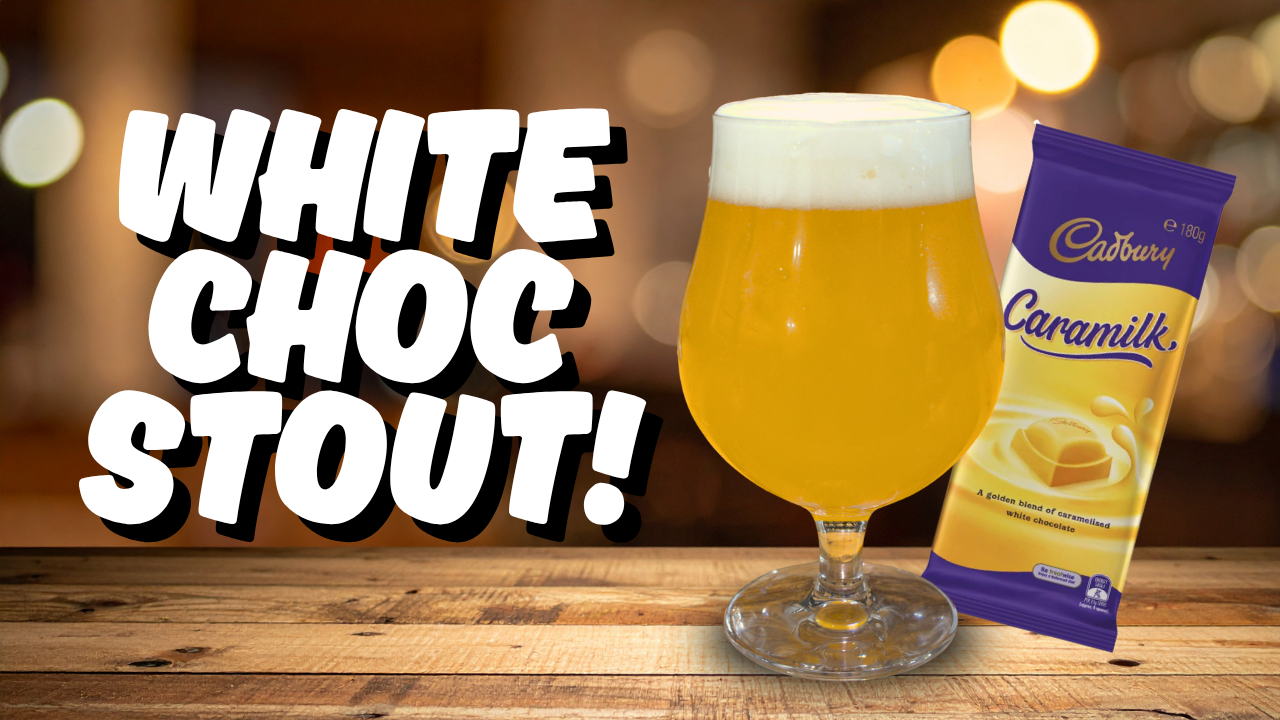
White Chocolate Stout – Easter Beer (25 L / 6.6 gal)
A decadent twist on a stout — this “white stout” delivers all the flavours of a traditional stout without the dark colour. Built on a pale malt base with oats, wheat, coffee, lactose, and Cadbury Caramilk white chocolate, this beer brings creamy body, espresso notes, and dessert-like sweetness in a light golden pour.
Stats
- Style: White Stout / Specialty Blonde Ale
- ABV: 5.4%
- OG: 1.057 (measured 1.062)
- FG: 1.020 (measured 1.021)
- IBU: 16
- Colour: 10 EBC
- Carbonation: 2.4 vols CO₂
- Batch Size: 25 L (6.6 gal)
- Boil Time: 60 min
- Efficiency: 72%
Ingredients
Grain & Adjuncts (4.91 kg / 10.8 lb base + additions)
- 3.928 kg (8.66 lb) Pale Ale Malt — 80%
- 344 g (0.76 lb) Rolled Oats — 7%
- 245 g (0.54 lb) Rolled Wheat — 5%
- 245 g (0.54 lb) Wheat Malt — 5%
- 147 g (0.32 lb) Gladiator Malt — 3%
- 250 g (0.55 lb) Rice Hulls
Flavour Additions
- 1.08 kg (2.38 lb) Cadbury Caramilk white chocolate (boil)
- 350 g (0.77 lb) Lactose @ 10 min
- 400 g (0.88 lb) Coffee beans (secondary)
- 60 ml vanilla extract (secondary)
Hops (72 g / 2.5 oz total)
- 22 g (0.78 oz) Fuggle @ 60 min — 9 IBU
- 50 g (1.76 oz) Spalt @ 15 min — 7 IBU
Yeast
- 2 packs Fermentis SafAle S-04
Water Profile (NEIPA-style for softness)
- Ca 62 ppm • Mg 9 ppm • Na 15 ppm
- Cl 98 ppm • SO₄ 49 ppm • HCO₃ 57 ppm
- SO₄/Cl ratio: 0.5
- Mash pH: 5.41
Mash Schedule
- 69 °C (156 °F) — 60 min (medium body)
Mash water: 20 L (5.3 gal)
Sparge water: 15 L (4 gal)
Fermentation Schedule
- Primary: 25 °C (77 °F) — 7 days
- Secondary: 21 °C (70 °F) — 7 days
- Cold crash: 1 °C (34 °F) — 2 days
- Carbonation: 2.4 vols CO₂
Step-by-Step Brewing Method
1. Mash In
Mash grains, oats, wheat, and rice hulls in 20 L (5.3 gal) at 69 °C (156 °F). Hold for 60 minutes to build body and mouthfeel.
2. Lauter & Sparge
Sparge with 15 L (4 gal) at ~77–80 °C (170–176 °F) to collect ~30 L (7.9 gal) pre-boil wort.
3. Boil – 60 Minutes
- Add Fuggle hops at 60 minutes
- Add Spalt hops at 15 minutes
- Add lactose and Whirlfloc at 10–15 minutes
- Add Cadbury Caramilk white chocolate during the boil to fully dissolve
4. Chill & Transfer
Cool wort to 25 °C (77 °F) and transfer to fermenter. Pitch S-04 yeast.
5. Primary Fermentation
Ferment at 25 °C (77 °F) for 7 days.
6. Secondary Additions
Add coffee beans, and vanilla extract. Hold at 21 °C (70 °F) for another 7 days.
7. Cold Crash & Package
Cold crash at 1 °C (34 °F) for 2 days. Package and carbonate to 2.4 vols CO₂.
Brew Notes
- Brewed: 20 March 2026
- Bottled: 5 April 2026
- OG: 1.062
- FG: 1.021
- Result: creamy, dessert-like beer with coffee, vanilla, and white chocolate character

Guinness Clone – Irish Stout (21 L / 5.5 gal)
Few beers are as recognizable as Guinness, the unequivical king of beers, the black gold! This clone captures the essential character of Ireland’s famous stout, roasted barley bitterness, creamy texture from flaked barley, a clean dry finish, and of course poured on Nitro! Brewed with traditional English hops and served with low carbonation, it’s a simple recipe that produces a deeply satisfying pint.
Stats
- Style: Irish Dry Stout
- ABV: 5.6%
- OG: 1.047
- FG: 1.004
- IBU: 45
- Colour: 69 EBC
- Carbonation: 1.5 vols CO₂
- Batch Size: 21 L (5.5 gal)
- Boil Time: 60 min
- Brewhouse Efficiency: 75.7%
- System: BrewZilla 65L Gen4
Ingredients
Grain Bill (3.9 kg / 8.6 lb total)
- 2.535 kg (5.59 lb) Golden Promise Pale Ale Malt — 65%
- 975 g (2.15 lb) Flaked Barley — 25%
- 390 g (0.86 lb) Roasted Barley — 10%
Hops — East Kent Goldings (100 g / 3.5 oz total)
- 50 g (1.76 oz) @ 60 min
- 50 g (1.76 oz) @ 10 min
Yeast
- 2 packs Lallemand LalBrew Windsor Ale Yeast
Water Profile (Inspired by Wicklow Mountain Water)
- Ca 18 ppm
- Mg 5 ppm
- Na 16 ppm
- Cl 32 ppm
- SO₄ 22 ppm
- HCO₃ 57 ppm
- SO₄/Cl ratio: 0.7
- Mash pH: 5.37
- Sparge pH: 5.5
Mash Additions
- 0.3 g Gypsum
- 3 ml Lactic Acid (80%)
Sparge Additions
- 0.31 g Gypsum
- 1.27 ml Lactic Acid (80%)
Mash Schedule
- 65 °C (149 °F) — 60 min
- 77 °C (171 °F) — 10 min mash out
Mash water: 15.98 L (4.2 gal)
Sparge water: 16.36 L (4.3 gal) @ 80 °C (176 °F)
Fermentation Schedule
- Primary fermentation: 20 °C (68 °F) for 14 days
- Carbonation: 1.5 vols CO₂ (traditional stout level)
- Brewfather_Batch58_20260310
Step-by-Step Brewing Method
1. Mash In
Mash 3.9 kg (8.6 lb) of grain in 15.98 L (4.2 gal) water at 65 °C (149 °F). Hold for 60 minutes to produce a dry, fermentable wort.
2. Mash Out & Sparge
Raise to 77 °C (171 °F) for 10 minutes. Sparge with 16.36 L (4.3 gal) at 80 °C (176 °F) to collect roughly 28–29 L (7.5 gal) pre-boil wort.
3. Boil – 60 Minutes
Add East Kent Goldings hops:
- 50 g at 60 minutes
- 50 g at 10 minutes
Boil vigorously for 60 minutes to develop colour and bitterness.
4. Chill & Transfer
Chill wort to 20 °C (68 °F) and transfer to fermenter.
5. Fermentation
Pitch two packs of LalBrew Windsor yeast and ferment at 20 °C (68 °F) for approximately 14 days.
6. Packaging
Bottle or keg and carbonate to 1.5 volumes CO₂. For a true Guinness-style pour, serve on nitrogen using a stout faucet.
Brew Notes
- Brew Date: 27 Feb 2026
- Fermentation Start: 27 Feb 2026
- Bottled: 13 Mar 2026
- Pre-Boil Gravity: 1.033
- OG: 1.047
- FG: 1.004
- Boiled on 3000W
- Added + 10ml glucoamylase on day 5 of ferm & 2 packs US05 to fix stuck fermentation
- Second ferm kicked off too fast after gluco. Transferred to keg and fridge at 1.004 to attempt to stop ferm and save some body - DONT DO WHAT I DID! Get mash temps correct!
- Brewfather link
.png)
Tooheys Old Dark Ale Clone (21 L / 5.5 gal)
One of the few truely great commercial beers available in almost any Australian Pub, so here we show you how to clone it to have on tap in your own home! A smooth, sessionable Australian dark ale inspired by the iconic Tooheys Old. Deep brown with ruby highlights, light chocolate roast, and a subtle Pride of Ringwood bitterness, this beer delivers classic pub-style drinkability with a fruity, roasty finish.
Stats
- Style: Australian Dark Ale / Dark Mild
- ABV: 4.5%
- OG: 1.041
- FG: 1.007
- IBU: 14
- Colour: 61 EBC
- Carbonation: 2.4 vols CO₂
- Batch Size: 21 L (5.5 gal)
- Brewhouse Efficiency: 75.7%
- System: BrewZilla 65L Gen4
Ingredients
Grain Bill (3.78 kg / 8.33 lb total)
- 3.26 kg (7.19 lb) Golden Promise Pale Ale Malt — 86.2%
- 260 g (0.57 lb) Medium Crystal 240 — 6.9%
- 260 g (0.57 lb) Dark Chocolate Malt — 6.9%
Hops — Pride of Ringwood (34 g / 1.2 oz total)
- 6 g (0.21 oz) @ 60 min — 7 IBU
- 28 g (1 oz) @ 5 min — 6 IBU
Yeast
- 11 g Fermentis SafAle US-05
Water Profile (Stout-Style Balanced)
- Ca 51 ppm
- Mg 9 ppm
- Na 15 ppm
- Cl 57 ppm
- SO₄ 46 ppm
- HCO₃ 101 ppm
- SO₄/Cl ratio: 0.8
- Mash pH: 5.56
- Sparge pH: 5.5
Mash Additions
- 5.3 g Calcium Chloride
- 1.5 g Epsom Salt
- 1.5 g Gypsum
- 1.3 g Slaked Lime
Mash Schedule
- 65 °C (149 °F) — 60 min
- 77 °C (171 °F) — 10 min mash out
Mash water: 20 L (5.3 gal)
Sparge water: 15 L (4 gal) @ 80 °C (176 °F)
Fermentation Schedule
- Primary fermentation: 20 °C (68 °F) for 14 days
- Carbonation: 2.4 vols CO₂
Step-by-Step Brewing Method
1. Mash In
Mash 3.78 kg (8.33 lb) of grain in 20 L (5.3 gal) water at 65 °C (149 °F). Hold for 60 minutes for a highly fermentable wort.
2. Mash Out & Sparge
Raise to 77 °C (171 °F) for 10 minutes. Sparge with 15 L (4 gal) at 80 °C (176 °F) to collect approximately 29–30 L (7.8 gal) pre-boil wort.
3. Boil – 60 Minutes
Add Pride of Ringwood hops:
- 6 g at 60 minutes
- 28 g at 5 minutes
Boil on 2500–3500 W for strong evaporation and colour development.
4. Chill & Transfer
Chill wort to 20 °C (68 °F) and transfer to fermenter. Pitch US-05 yeast.
5. Fermentation
Ferment at 20 °C (68 °F) for 14 days until gravity stabilises around 1.007–1.008.
6. Package
Bottle or keg and carbonate to 2.4 vols CO₂. This beer drinks well young but improves after a week of conditioning.
Brew Notes
- Brew Date: 11 Feb 2026
- Fermentation Start: 11 Feb 2026
- Bottled: 25 Feb 2026
- Pre-Boil Gravity: 1.032
- OG: 1.041
- FG: 1.007
.png)
Historically Accurate 1800's Double Decoction Vienna Lager!
A traditional 19th-century Vienna Lager brewed using a true double decoction mash. Built entirely on Vienna malt, this beer delivers rich toasted bread character, firm bitterness from Tettnang hops, and a clean, dry finish shaped by classic lager fermentation. Inspired by early Austrian brewing methods, this recipe focuses on depth, balance, and authenticity.
Stats
- Style: Vienna Lager
- ABV: 4.6%
- OG: 1.044 (measured 1.047)
- FG: 1.009
- IBU: 22 (Tinseth)
- Colour: 10 EBC (SRM ~5)
- Carbonation: 2.4 vols CO₂
- Batch Size: 45 L (11.9 gal)
- Boil Time: 60 min
- Brewhouse Efficiency: 80%
- System: BrewZilla / RoboBrew 65 L
Ingredients
Grain Bill (8 kg / 17.6 lb total)
- 8 kg (17.6 lb) Gladfield Vienna Malt (8.2 EBC) — 100%
Hops – Tettnang (250 g / 8.8 oz total)
- 79 g (2.8 oz) @ 60 min
- 56 g (2 oz) @ 30 min
- 87 g (3.1 oz) @ 10 min
- 28 g (1 oz) @ 5 min
Yeast
- 2 packs White Labs WLP802 Czech Budejovice Lager
Water Profile (Historic Vienna Profile)
- Ca 35 ppm
- Mg 16 ppm
- Na 17 ppm
- Cl 31 ppm
- SO₄ 66 ppm
- HCO₃ 112 ppm
- SO₄/Cl ratio: 2.2
- Mash pH: 5.56
- Sparge pH: 5.4
Mash Additions
- 0.31 g Baking Soda
- 4.4 g Epsom Salt
- 1.1 g Gypsum
- 3 ml Phosphoric Acid (85%)
- 1.2 g Slaked Lime
Sparge Additions
- 0.19 g Baking Soda
- 2.75 g Epsom Salt
- 0.69 g Gypsum
- 2.83 ml Phosphoric Acid (85%)
- 0.75 g Slaked Lime
Boil
- 1.67 g Whirlfloc @ 15 mins
Mash Schedule — Traditional Double Decoction
- 64 °C (147 °F) — 15 min beta rest
- Pull decoction, boil 15 min
- Return to 64 °C — 15 min
- Raise to 70 °C (158 °F) — 15 min alpha rest
- Second decoction boil — 15 min
- Return to 70 °C — 15 min
- Mash out at 77 °C (171 °F) — 15 min
Mash water: 40 L (10.6 gal)
Sparge water: 25 L (6.6 gal)
Fermentation Schedule
- Primary: 10 °C (50 °F) for 14 days
- Secondary: 12 °C (54 °F) for 3 days
- Cold crash: 1 °C (34 °F) for 3 days
- Carbonation: 2.4 vols CO₂
Step-by-Step Brewing Method
1. Mash In
Mash 8 kg (17.6 lb) Vienna malt in 40 L (10.6 gal) of water at 64 °C (147 °F). Rest for 15 minutes.
2. First Decoction
Pull a thick portion of the mash, bring to a boil, and boil for 15 minutes. Return to main mash to maintain 64 °C for another 15 minutes.
3. Alpha Rest
Raise mash to 70 °C (158 °F) and hold for 15 minutes.
4. Second Decoction
Pull a second thick decoction, boil 15 minutes, then return to mash and hold at 70 °C for another 15 minutes.
5. Mash Out & Sparge
Raise to 77 °C (171 °F) for 15 minutes. Sparge with 25 L (6.6 gal) at 77 °C to collect approximately 55–56 L (14.5 gal) pre-boil wort.
6. Boil – 60 Minutes
Add Tettnang hops according to schedule. Add Whirlfloc with 15 minutes remaining.
7. Chill & Transfer
Chill wort to 10 °C (50 °F) and transfer to fermenter. Pitch WLP802 yeast.
8. Fermentation & Lagering
Ferment at 10 °C for 14 days, raise to 12 °C for 3 days, then cold crash to 1 °C for 3 days. Lager cold for several additional weeks for full historical authenticity.
Brew Notes
- Brew Date: 5 Dec 2025
- Fermentation Start: 5 Dec 2025
- Bottling Date: 25 Dec 2025
- Pre-Boil Gravity: 1.040
- OG: 1.047
- FG: 1.009
.png)
Xmas Pavlova Milkshake IPA (25 L / 6.6 gal)
This one’s pure Christmas indulgence. Our Xmas Pavlova Milkshake IPA takes everything we love about a classic Aussie pavlova! It's soft sweetness, tropical fruit, and creamy texture — and pours it into a hazy IPA. Loaded with oats, wheat, lactose, and punchy New Zealand hops, this beer is juicy, smooth, and packed full of the flavours of Christmas!
Stats
- Style: Hazy IPA / Milkshake IPA
- ABV: 6.3%
- OG: 1.062 (measured 1.068)
- FG: 1.014
- IBU: 19 (Tinseth)
- Colour: 10 EBC (SRM ~5)
- Carbonation: 2.4 vols CO₂
- Batch Size: 25 L (6.6 gal)
- Boil Time: 60 min
- Brewhouse Efficiency: 75%
- System: BrewZilla / RoboBrew 35 L
- Brewfather Link
Ingredients
Malt, Adjuncts & Sugars (7.04 kg / 15.5 lb total)
- 4.121 kg (9.1 lb) Ale Malt (6 EBC) – 58.6%
- 1.0 kg (2.2 lb) Rolled Oats – 14.2%
- 1.0 kg (2.2 lb) Rolled Wheat – 14.2%
- 703 g (1.55 lb) Wheat Malt – 10%
- 211 g (0.47 lb) Gladiator Malt – 3%
- 500 g (1.1 lb) Lactose (Milk Sugar)
- 500 g (1.1 lb) Rice Hulls
- 60ml (2 oz) Vanilla extract from 2 beans (added post-fermentation)
Hops (346 g / 12.2 oz total)
Mash Hop
- 20 g (0.7 oz) Riwaka – 3 IBU
Hop Stand – 20 min @ 78 °C (172 °F)
- 87 g (3.1 oz) Riwaka – 5 IBU
- 44 g (1.55 oz) Nectaron – 6 IBU
- 44 g (1.55 oz) Superdelic – 5 IBU
Dry Hop – Day 7 (48 hours)
- 75 g (2.65 oz) Riwaka
- 38 g (1.34 oz) Nectaron
- 38 g (1.34 oz) Superdelic
Yeast
- 2 packs Lallemand LalBrew Pomona
Water Profile (NEIPA-focused)
- Ca 127 ppm
- Mg 17 ppm
- Na 15 ppm
- Cl 200 ppm
- SO₄ 99 ppm
- HCO₃ 57 ppm
- SO₄/Cl ratio: 0.5
- Mash pH: 5.27
- Sparge pH: 5.4
Mash Schedule
- 68 °C (154 °F) – 90 min (main mash, medium fermentability)
- 77 °C (171 °F) – 10 min mash out
Mash water: 25 L (6.6 gal)
Sparge water: 10 L (2.6 gal)
Fermentation Schedule
- Primary fermentation at 25 °C (77 °F) for 7 days
- Dry hop on day 5-7 for 48 hours
- Package immediately after dry hop for maximum hop freshness
- Carbonate to 2.4 vols CO₂
- Brewfather_Batch55_20251219
Step-by-Step Brewing Method
1. Mash In
Mash all grains, oats, wheat, lactose, and rice hulls in 25 L (6.6 gal) of water at 68 °C (154 °F). Hold for 90 minutes to build body and creaminess.
2. Mash Hop
Add 20 g (0.7 oz) of Riwaka directly to the mash for soft hop flavour integration.
3. Mash Out & Sparge
Raise to 77 °C (171 °F) for 10 minutes. Sparge with 10 L (2.6 gal) at 77 °C to collect approximately 30 L (7.9 gal) pre-boil wort.
4. Boil – 60 Minutes
Boil for 60 minutes. No kettle hop additions beyond mash hop. Maintain a gentle but consistent boil.
5. Hop Stand
After flameout, cool wort to 78 °C (172 °F). Add Riwaka, Nectaron, and Superdelic. Hold for 20 minutes before chilling fully.
6. Chill & Transfer
Chill wort to 25 °C (77 °F). Transfer to fermenter and pitch LalBrew Pomona yeast.
7. Fermentation
Ferment at 25 °C (77 °F) for 7 days. On day 7, add dry hops and allow to steep for 48 hours.
8. Vanilla Addition & Packaging
Remove dry hops. Add vanilla extract from two beans. Package immediately to preserve hop aroma. Carbonate to 2.4 vols CO₂.
Brew Notes
- Brewed: 5 Dec 2025
- Bottled: 12 Dec 2025
- Pre-boil gravity: 1.056
- OG: 1.068
- FG: 1.014
- Result: creamy, tropical, dessert-like IPA with soft bitterness and smooth vanilla finish
.png)
Homemade Eggnog Recipe
There’s nothing quite like a glass of cold, homemade eggnog as you get into the Christmas spirit! Forget the store-bought stuff, the real deal is richer, smoother and packs real flavour from scratch. Whether you enjoy it straight, over ice, or with a cheeky splash of rum, this recipe will turn you into the holiday hero in about 15 minutes.
Prep Time: 10 minutes
Cook Time: 10 minutes
Batch Size: ~1 litre (34 fl oz)
Ingredients
- 6 large egg yolks
- 100 g granulated sugar (½ cup)
- 240 ml heavy whipping cream (1 cup)
- 480 ml milk (2 cups)
- ½ tsp ground nutmeg (2.5 ml)
- ½ tsp ground cinnamon (2.5 ml)
- Pinch of salt
- 1 tsp vanilla extract (5 ml)
- Optional: rum, bourbon, or brandy (a generous splash to taste)
- Ground cinnamon, for topping
Step-By-Step Instructions
1. Whisk the yolks and sugar
In a medium mixing bowl, whisk 6 egg yolks and 100 g (½ cup) sugar until pale, creamy and slightly thickened.
2. Heat the dairy and spices
In a saucepan over medium-high heat, combine:
- 240 ml (1 cup) cream
- 480 ml (2 cups) milk
- ½ tsp nutmeg
- ½ tsp cinnamon
- Pinch of salt
Stir often and heat until the mixture reaches a bare simmer (just steaming, not boiling).
3. Temper the eggs
Add a large spoonful of the hot milk mixture to the egg mixture while whisking vigorously.
Repeat spoonful by spoonful until most of the hot liquid has been incorporated.
This prevents the eggs from scrambling and keeps your eggnog silky.
4. Cook to thicken
Pour the tempered mixture back into the saucepan.
Heat over medium, whisking constantly for 1–2 minutes, until slightly thickened or until it reaches 71°C (160°F).
It will continue to thicken as it cools.
5. Add vanilla (and optional booze)
Remove from heat and stir in 1 tsp vanilla and your chosen alcohol, if using.
6. Strain and chill
Pour the eggnog through a fine mesh strainer into a jug or container.
Cover and refrigerate for at least a few hours until cold.
7. Blend if you want it ultra-smooth
Once chilled, blend with 1–2 tbsp (15–30 ml) milk if you prefer a lighter, thinner texture.
8. Serve & store
Serve cold with a dusting of cinnamon or nutmeg.
Store in the fridge for up to 1 week.
Tips for Best Results
- Fresh spices make a big difference—use good nutmeg and cinnamon.
- Don’t rush tempering—slow and steady equals smooth eggnog.
- For a thicker, dessert-style nog, use more cream and less milk.
- For a more drinkable, cocktail-style nog, thin with extra milk or blend before serving.
.png)
German Kölsch (48 L / 12.7 gal)
Crisp like a lager, fruity like an ale, the Kölsch is the best of both worlds! This light golden beer from Cologne is known for its delicate balance, subtle hop bite, and super-clean finish. We brewed ours with Bohemian pilsner malt, Vienna sweetness, and a touch of Gladiator for body. Fermented cool with German K-97 for authenticity its perfect for sunny days, grilled sausages, or any excuse to say “Prost!”
Stats
- Style: Kölsch
- ABV: 4.5 %
- OG: 1.042 (measured 1.052)
- FG: 1.008 (measured 1.010)
- IBU: 20 (Tinseth)
- Colour: 7 EBC (SRM ≈ 3.5)
- Carbonation: 3.0 vols CO₂
- Batch Size: 48 L (12.7 gal)
- Boil Time: 60 min
- Efficiency: 82 % brewhouse, 85 % mash
- Brewfather_Batch52_20251206
Ingredients
Malt Bill (8.44 kg / 18.6 lb total)
- 6.921 kg (15.25 lb) Floor-Malted Bohemian Pilsner — 82 %
- 1.097 kg (2.42 lb) Gladfield Vienna Malt (8.2 EBC) — 13 %
- 422 g (0.93 lb) Gladfield Gladiator Malt (8.2 EBC) — 5 %
- Brewfather_Batch52_20251206
Hops (200 g / 7.05 oz total)
- 60 min – 28 g (1 oz) Hallertauer Mittelfrüh (3.5 %) – 9 IBU
- 30 min – 50 g (1.76 oz) Tettnang (2.4 %) – 5 IBU
- 30 min – 28 g (1 oz) Hallertauer Mittelfrüh (3.5 %)
- 10 min – 50 g (1.76 oz) Tettnang (2.4 %) – 2 IBU
- 10 min – 44 g (1.55 oz) Hallertauer Mittelfrüh (3.5 %)
- Brewfather_Batch52_20251206
Yeast
- 3 packs Fermentis SafAle German Ale K-97
- Brewfather_Batch52_20251206
Water Profile (Adjusted)
Ca 55 ppm • Mg 5 ppm • Na 16 ppm • Cl 64 ppm • SO₄ 67 ppm • HCO₃ 57 ppm
SO₄/Cl ratio 1.0 • Mash pH 5.4 • Sparge pH 5.4
Additions:
- Mash – 2 g CaCl₂ + 3 g Gypsum + 4.4 mL Phosphoric Acid (85 %)
- Sparge – 2 g CaCl₂ + 3 g Gypsum + 1.73 mL Phosphoric Acid (85 %)
- Brewfather_Batch52_20251206
Mash Schedule
Medium–High German Step Mash
64 °C (147 °F) – 30 min (Beta rest for dryness)
70 °C (158 °F) – 30 min (Alpha rest for body & head retention)
77 °C (170 °F) – 10 min (Mash out)
Fermentation Schedule
- Primary – 17 °C (63 °F) × 9 days
- Diacetyl Rest – 19 °C (66 °F) × 2 days
- Cold Crash – 1.5 °C (35 °F) × 2 days
- Brewfather_Batch52_20251206
- Carbonate – 3.0 vols CO₂
Step-by-Step Method
Mash In
Add 8.44 kg (18.6 lb) grain to 30 L (7.9 gal) of water at 64 °C (147 °F). Hold 30 min.
Raise to Alpha Rest
Increase to 70 °C (158 °F) and hold 30 min for malt character.
Mash Out & Sparge
Raise to 77 °C (170 °F) for 10 min, then sparge with 30 L (7.9 gal) at 77 °C (170 °F).
Boil – 60 min
Add hops as listed above. Boil vigorously for a clean malt profile.
Chill & Transfer
Cool to 17 °C (63 °F) and transfer to fermenter.
Fermentation & Rest
Pitch 3 packs of SafAle K-97. Ferment 9 days @ 17 °C (63 °F), then raise to 19 °C (66 °F) for 2 days to clean up diacetyl.
Cold Crash & Package
Cold crash to 1.5 °C (35 °F) for 2 days, then bottle or keg and carbonate to 3.0 vols CO₂. Lager cold for 2–3 weeks for polish.
Notes
- Brewed 14 Nov 2025 • Fermentation Start 14 Nov • Bottled 27 Nov 2025
- Boiled on 3000 W element
- Pre-boil gravity 1.037 • OG 1.052 • FG 1.010
.png)
Sierra Nevada Pale Ale Clone (23 L / 6.1 gal)
Few beers define craft brewing like Sierra Nevada's Pale Ale. Crisp, aromatic, and perfectly balanced, it’s the beer that inspired a generation of brewers! This clone nails that signature citrus-pine hop punch over a clean, and chewy caramel malt base. If you’re looking for a classic American Pale Ale to brew at home, this is the one that started it all!
Stats
- Style: American Pale Ale
- ABV: 5.6 %
- OG: 1.053
- FG: 1.010
- IBU: 37 (Tinseth)
- Colour: 24 EBC (SRM ~12)
- Carbonation: 2.4 vols CO₂
- Batch Size: 23 L (6.1 gal)
- Boil Time: 60 min
- Efficiency: 78.5 % brewhouse, 81.9 % mash
- System: BrewZilla / RoboBrew 35 L
- Brewfather_Batch53_20251126
Ingredients
Malt Bill (4.94 kg / 10.9 lb total)
- 4.594 kg (10.13 lb) Pale Ale Malt (5.9 EBC) — 93 %
- 346 g (0.76 lb) Medium Crystal 240 (265 EBC) — 7 %
- Brewfather_Batch53_20251126
Hops (Cascade + Simcoe = 302 g / 10.6 oz total)
- 60 min: 14 g (0.5 oz) Cascade (7.2 %) – 11 IBU
- 10 min: 28 g (1 oz) Cascade – 9 IBU
- 0 min (Flameout): 28 g (1 oz) Simcoe (14.7 %) – 4 IBU
- Hopstand (76 °C / 169 °F, 20 min):
- 58 g (2 oz) Cascade – 4 IBU
- 58 g (2 oz) Simcoe – 9 IBU
- Dry Hop (Day 7, 2 days):
- 102 g (3.6 oz) Cascade
- 14 g (0.5 oz) Simcoe
- Brewfather_Batch53_20251126
- Whirlfloc 0.8g (0.03 oz) a 15m left in boil
Yeast
- 23 g (0.8 oz) Fermentis AUS-05 / US-05
- Brewfather_Batch53_20251126
Water Profile (Adjusted)
- Base: Sweet Pale Ale
- Ca 51 ppm • Mg 5 ppm • Na 15 ppm • Cl 50 ppm • SO₄ 75 ppm • HCO₃ 57 ppm
- SO₄/Cl ratio: 1.5 • Mash pH: 5.41 • Sparge pH: 5.5
Mash Schedule
- Mash in 17L (4.5 Gal) at 65 °C (149 °F) for 60 min – we did 15L on the brewday but added water to dilute later, so just adding extra water the recipe in mash and sparge
- Mash out: 77 °C (171 °F) for 10 min
- Sparge: 17 L (4.5 gal) @ 77 °C (171 °F)
- Brewfather_Batch53_20251126
Fermentation Schedule
- Primary: 20 °C (68 °F) × 14 days
- Dry Hop: Day 7 for 48 hours
- Cold Crash (optional): 2–4 °C (36–39 °F) × 2 days
- Carbonation: 2.4 vols CO₂
- Brewfather_Batch53_20251126
Step-by-Step Method
1. Mash In
Add 4.94 kg (10.9 lb) of grain to 17 L (4.5 gal) of water at 65 °C (149 °F). Hold for 60 minutes for a crisp, dry finish.
2. Mash Out & Sparge
Raise mash to 77 °C (171 °F) for 10 min, then sparge with 17 L (4.5 gal) water at the same temp. Collect about 28 L (7.4 gal) pre-boil wort.
3. Boil – 60 Minutes
Add hops as follows:
- 14 g Cascade @ 60 min
- 28 g Cascade @ 10 min
- 0.8 g Whirlfloc @ 15 min remaining
4. Flameout & Hopstand
At flameout, add 28 g Simcoe, then hopstand at 76 °C (169 °F) for 20 minutes with 58 g Cascade + 58 g Simcoe.
5. Chill & Transfer
Chill wort to 20 °C (68 °F), transfer to fermenter, and pitch 23 g AUS-05 yeast.
6. Fermentation
Ferment 14 days at 20 °C (68 °F). Add dry hops (102 g Cascade, 14 g Simcoe) on day 7 for 48 hours, then remove.
7. Packaging
Cold crash if desired. Carbonate to 2.4 vols CO₂. Enjoy fresh for maximum hop brightness.
.png)
Succulent Chinese Beer! (48 L / 12.7 gal)
What is the charge!? Drinking a BEER? A Succulent CHINESE Beer!? In honour of democracy manifest we have brewed up a delicious, succulent Chinese Beer! This refreshing 4.5 % lager is clean, dry, a touch sweet and perfectly balanced with Saaz hops. Its the perfect palate cleanser with a Succulent Chinese Meal!
Stats
- Style: Chinese Lager
- ABV: 4.6 %
- OG: 1.043 (measured 1.041)
- FG: 1.008 (measured 1.007)
- IBU: 20 (Tinseth)
- Colour: 9 EBC (SRM ~4.5)
- Carbonation: 2.8 vols CO₂
- Batch Size: 48 L (12.7 gal)
- Boil Time: 60 min
- Efficiency: 82 % brewhouse, 85 % mash
- System: BrewZilla / RoboBrew 65 L
- Brewfather_Batch51_20251113
Brewfather Link
Ingredients
Malt Bill (8.48 kg / 18.7 lb total)
- 5.342 kg (11.78 lb) Pilsner Malt (Craft Export, 3.2 EBC) — 63 %
- 2.544 kg (5.61 lb) Long Grain Chinese Rice (2 EBC) — 30 % (boil 30 min to gelatinise)
- 339 g (0.75 lb) Medium Crystal Malt (100 EBC) — 4 %
- 254 g (0.56 lb) Gladiator Malt (8.2 EBC) — 3 %
- 200 g (0.44 lb) Rice Hulls (for lautering)
- Brewfather_Batch51_20251113
Hops (Saaz – 174 g / 6.14 oz total)
- 57 g (2 oz) @ 60 min — 9 IBU
- 57 g (2 oz) @ 30 min — 7 IBU
- 60 g (2.1 oz) @ 15 min — 4 IBU
Yeast
- 34 g (1.2 oz) Fermentis SafLager West European Lager Yeast
Water Profile (Adjusted)
- Base Profile: Myk Light Lager
- Ca 22 ppm • Mg 5 ppm • Na 15 ppm • Cl 31 ppm • SO₄ 30 ppm • HCO₃ 57 ppm
- SO₄/Cl ratio: 1.0 • Mash pH: 5.35 • Sparge pH: 5.3
Additions (per batch):
- Mash: 1.3 g Gypsum (CaSO₄), 6.6 mL Phosphoric Acid (85%)
- Sparge: 1.3 g Gypsum, 1.77 mL Phosphoric Acid
- Boil (15 min): 1.67 g Whirlfloc
- Brewfather_Batch51_20251113
Mash Schedule
- Single infusion at 64 °C (147 °F) for 60 min
- Mash out at 76 °C (169 °F)
- Sparge with 20 L (5.3 gal) @ 77 °C (170 °F)
Fermentation Schedule
- Primary: 15 °C (59 °F) × 14 days
- Cold Crash: 1–2 °C (34–36 °F) × 3 days
- Carbonation: 2.8 vols CO₂
- Conditioning: Lager cold for 3–5 weeks for clarity and smoothness
- Brewfather_Batch51_20251113
Step-by-Step Method
1. Rice Prep
Boil 2.54 kg (5.6 lb) long-grain rice in water for 30 minutes until fully gelatinised. Set aside to add during mash-in.
2. Mash In
Add all grains plus prepared rice to 40 L (10.6 gal) water at 64 °C (147 °F). Hold for 60 minutes for a highly fermentable wort.
3. Mash Out & Sparge
Raise mash to 76 °C (169 °F) for 10 minutes, then sparge with 20 L (5.3 gal) at 77 °C (170 °F) to collect roughly 58–60 L (15.3 gal) pre-boil volume.
4. Boil – 60 Minutes
- Add 57 g (2 oz) Saaz at 60 min
- Add 57 g (2 oz) Saaz at 30 min
- Add 60 g (2.1 oz) Saaz and 1.67 g (0.06 oz) Whirlfloc at 15 min
Boil hard and clean for 60 minutes.
5. Chill & Transfer
Cool wort to 15 °C (59 °F) and transfer to fermenter.
6. Fermentation
Pitch 34 g (1.2 oz) SafLager West European yeast. Ferment at 15 °C (59 °F) for 14 days.
7. Cold Crash & Package
Cold crash at 1–2 °C (34–36 °F) for 3 days. Bottle or keg, carbonating to 2.8 vols CO₂. Lager for several weeks for best clarity and flavour.
.png)
Stone & Wood Pacific Ale Clone! (23 L / 6.1 gal)
This is our take on one of Australias flagship beer, the Stone & Wood Pacific Ale! An easy drinking hazy pale ale crammed full of passionfruit and tropical hop aroma thanks to Australia's own Galaxy hops, coupled with a soft yet crisp and refreshing body — this beer is summer in a glass!
Stats
- Style: Pacific Ale
- ABV: 4.2 %
- OG: 1.040 (measured 1.037)
- FG: 1.008 (measured 1.006)
- IBU: 30 (Tinseth)
- Colour: 7 EBC (SRM ~3.5)
- Batch Size: 23 L (6.1 gal)
- Boil Time: 60 min
- Efficiency: 82 % brewhouse, 85 % mash
- System: BrewZilla / RoboBrew 35L
- Brewfather_Batch50_20251107
Brewfather Link
Ingredients
Malt Bill (3.55 kg / 7.8 lb total)
- 2.13 kg (4.7 lb) Pale Ale Malt — 60 %
- 1.065 kg (2.35 lb) Wheat Malt — 30 %
- 355 g (0.78 lb) Rolled Wheat — 10 %
Hops (Galaxy All The Way)
- First Wort: 8 g (0.28 oz) @ 60 min – 19 IBU
- Hop Stand: 57 g (2 oz) @ 76 °C (169 °F) for 20 min – 11 IBU
- Dry Hop: 35 g (1.23 oz) Galaxy on Day 7 for 2 days
Yeast
- 11.5 g (0.4 oz) Fermentis AUS-05 (US-05 equivalent)
Water Profile (Adjusted)
- Base Profile: Hazy Pale Ale
- Ca 63 ppm • Mg 9 ppm • Na 15 ppm • Cl 101 ppm • SO₄ 51 ppm • HCO₃ 57 ppm
- SO₄/Cl ratio: 0.5 • Mash pH: 5.55
Additions (per batch):
- Mash: 2.2 g CaCl₂, 0.65 g Epsom Salt, 0.7 g Gypsum, 1.6 mL Phosphoric Acid
- Sparge: 2.23 g CaCl₂, 0.66 g Epsom Salt, 0.71 g Gypsum, 0.85 mL Phosphoric Acid
- Boil @ 15 min: 0.8 g Whirlfloc
- Brewfather_Batch50_20251107
Mash Schedule
- Single infusion at 65 °C (149 °F) for 60 min
- Sparge with 15 L (3.96 gal) at ~75–78 °C (167–172 °F)
Fermentation Schedule
- Ferment at 20 °C (68 °F) for 14 days
- Dry hop on Day 7 for 48 hours
- Bottle or keg and carbonate to 2.4 vols CO₂
Step-by-Step Method
1. Mash In
Mash 3.55 kg (7.8 lb) grain in 15 L (3.96 gal) of water at 65 °C (149 °F). Hold for 60 minutes.
2. Sparge & Boil
Sparge with 15 L (3.96 gal) at 75–78 °C (167–172 °F) to collect ~28 L (7.4 gal) pre-boil volume.
3. First Wort Hop
Add 8 g (0.28 oz) Galaxy to boil kettle as you begin heating.
4. Boil – 60 Minutes
Add Whirlfloc at 15 minutes remaining in the boil.
5. Hop Stand
After flameout, cool wort to 76 °C (169 °F) and add 57 g (2 oz) Galaxy. Hold for 20 minutes.
6. Chill & Transfer
Chill to 20 °C (68 °F). Transfer to fermenter and pitch 11.5 g (0.4 oz) AUS-05 yeast.
7. Fermentation
Ferment at 20 °C (68 °F) for 14 days. Add 35 g (1.23 oz) Galaxy hops on day 7 for 2 days, then remove.
8. Package
Cold crash if desired. Carbonate to 2.4 vols CO₂. Enjoy fresh for maximum hop aroma!
.png)
Honey Mead & Blackberry Mead (2.5 L)
This easy small-batch mead recipe shows you how to make both a traditional honey mead and a blackberry fruit mead at home. Using only honey, water, and yeast (plus berries for the fruit version), you’ll learn how to ferment, stabilise, and backsweeten for clear, delicious mead that’s ready to enjoy in just a few weeks.
Stats
Regular Mead
- OG 1.106
- FG 1.002
- ABV 13.6 %
Blackberry Mead
- OG 1.087
- FG 1.004
- ABV 10.9 %
Batch Size: 2.5 L (0.66 gal) each
Fermentation Temperature: 20 °C (68 °F)
Fermentation Time: 4 weeks
Ingredients
Base Must
- 620 g (1.37 lb) honey (we used Archibalds Orange Blossom)
- 2 L (0.53 gal) water
- A few grams (~1 tsp) of Mangrove Jack’s Mead Yeast
(Makes roughly 2.5 L / 0.66 gal finished mead)
Blackberry Mead Additions
- 1 kg (2.2 lb) frozen blackberries, added in a brew-in-a-bag during fermentation
Stabilising Agents (per 2.5 L / 0.66 gal batch)
- 0.2 g (0.007 oz) Potassium Metabisulphite
- 1.5 g (0.05 oz) Potassium Sorbate
Backsweetening
- 106 g (3.74 oz) honey — for the regular mead
- 103 g (3.63 oz) honey — for the blackberry mead
Step-by-Step Method
1. Prepare the Must
Combine 620 g (1.37 lb) honey with 2 L (0.53 gal) water in a saucepan. Bring to a gentle boil for 15 minutes, skimming off any foam. Pour into a sanitised fermenter and allow to cool to about 25 °C (77 °F).
2. Pitch the Yeast
Once the must has cooled, take a gravity reading. Add a few grams (~1 tsp) of Mangrove Jack’s Mead Yeast and seal with an airlock.
3. Blackberry Mead Variation
Place 1 kg (2.2 lb) of frozen blackberries inside a brew bag and add to the fermenter. Take another gravity reading after the fruit addition. The bag keeps skins and seeds contained for easy removal later.
4. Fermentation
Maintain 20 °C (68 °F) for around four weeks. Swirl gently every few days to keep the yeast active.
5. Cold Crash
When fermentation is complete, remove the blackberry bag from the fruit batch. Cold crash both meads at 1–2 °C (34–36 °F) for several days to help them clear.
6. Racking
Siphon the clear mead carefully off the sediment into a new, clean vessel.
7. Stabilisation
Add 0.2 g (0.007 oz) Potassium Metabisulphite and 1.5 g (0.05 oz) Potassium Sorbate per 2.5 L (0.66 gal) batch to prevent refermentation. Wait 24 hours before back-sweetening.
8. Backsweetening & Bottling
Add honey to taste — 106 g (3.74 oz) for the plain mead, 103 g (3.63 oz) for the blackberry version. Stir gently until dissolved. Bottle and enjoy. The mead is drinkable immediately but improves beautifully with age.
Notes
The regular honey mead finishes drier and stronger, showcasing floral honey character at 13.6 %.
The blackberry mead sits at 10.9 %, bursting with berry aroma and soft colour.
Both clear nicely after cold crashing and stabilising — ready to sip, share, or age for a richer flavour.
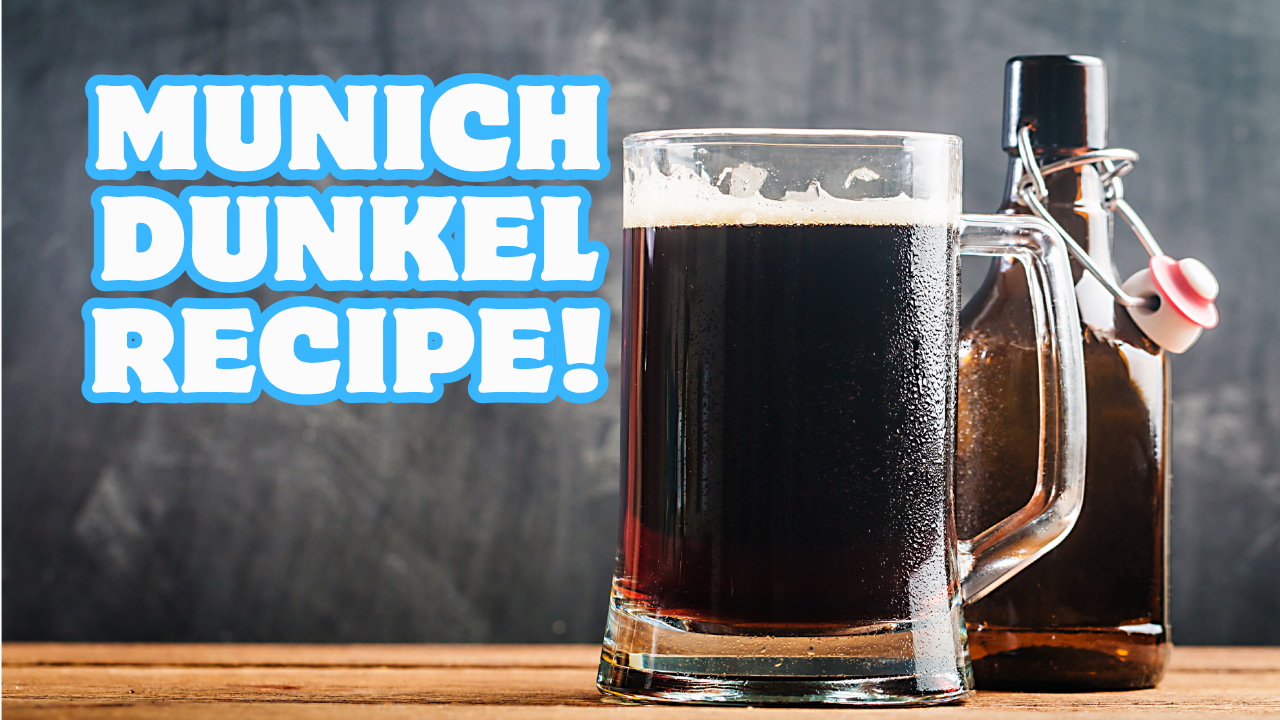
Munich Dunkel (48 L)
This is a Munich Dunkel, Germany’s iconic dark lager. Expect layers of toffee, bread crust, and chocolate, balanced by Tettnang hops and a clean lager finish. This is a true showcase of Munich’s dark-lager tradition, pouring a deep chestnut with a tan head and an aroma of toasted malt, biscuit, and caramel. Smooth, balanced, and endlessly drinkable — perfect for cool evenings or pairing with hearty food.
Stats
- Style: Munich Dunkel
- ABV: 5%
- IBU: 19 (Tinseth)
- Colour: 42 EBC (SRM ~21)
- Original Gravity (design): 1.046
- Final Gravity (design): 1.008
- Measured Pre-Boil Gravity: 1.048
- Measured Final Gravity: 1.012
- Batch Size: 48 L
- Boil Time: 60 min
- Brewhouse Efficiency: 83%
- System: BrewZilla / RoboBrew 65 L
- Brewfather_Batch48_20251004
Ingredients
Malt & Adjuncts (8.86 kg total)
- 3.544 kg Light Munich Malt (22 EBC) — 40%
- 2.658 kg Dark Munich Malt (44 EBC) — 30%
- 1.949 kg Floor-Malted Bohemian Pilsner — 22%
- 443 g Gladfield Shepherd’s Delight (320 EBC) — 5%
- 266 g Carafa Special II (1100 EBC) — 3%
- Brewfather_Batch48_20251004
Hops (Tettnang)
- 57 g @ 60 min
- 57 g @ 30 min
- 87 g @ 15 min
(Total ~19 IBU) - Brewfather_Batch48_20251004
Yeast
- Fermentis SafLager West European Lager (lager pitch rate)
- Brewfather_Batch48_20251004
Water Profile & Additions
Target Profile (ppm): Ca 55, Mg 5, Na 33, Cl 79, SO₄ 45, HCO₃ 104
SO₄/Cl ratio: 0.6 • Mash pH target: ~5.27 • Sparge pH: ~5.4
Additions (per batch):
- Mash: 2 g Baking Soda (NaHCO₃), 3 g Calcium Chloride (CaCl₂), 2 g Gypsum (CaSO₄)
- Sparge: 2.2 g Baking Soda, 3.3 g Calcium Chloride, 2.2 g Gypsum, 3.49 ml Phosphoric Acid (85%)
- Boil (15 min): 1.6 g Whirlfloc
Water Volumes: Mash 30 L, Sparge 33 L - Brewfather_Batch48_20251004
Mash Schedule
- 64 °C – 30 min (Beta rest: fermentability, clean profile)
- 70 °C – 30 min (Alpha rest: body & malt depth)
- 77 °C – 15 min (Mash out)
- Sparge with 33 L @ 77 °C to reach ~58–59 L pre-boil
- Brewfather_Batch48_20251004
🍻 Fermentation Schedule
- Primary: 14 °C × 14 days
- Rise/Secondary: 16 °C × 2 days (cleanup)
- Cold Crash: 1.5 °C × 2 days
- Carbonation: 2.7 vols CO₂
- Lagering: 4–6 weeks cold for polish
- Brewfather_Batch48_20251004
Brew Notes
- Brewed: 10 Sep 2025 • Bottled: 28 Sep 2025
- First trub dump removed 1.5 L
- Gravity around 1.015 at day 7
- Brewfather_Batch48_20251004
Step-by-Step Method (Brew Day to Glass)
1) Water Prep
- Treat mash and sparge water with the listed salts and phosphoric acid to hit Ca 55 | Cl 79 | SO₄ 45 | HCO₃ 104 ppm and mash pH ≈ 5.27. Heat 30 L strike water to mash-in temp.
- Brewfather_Batch48_20251004
2) Mash In
- Dough in at 64 °C and hold 30 min (beta rest).
- Raise to 70 °C, hold 30 min (alpha rest).
- Raise to 77 °C, hold 15 min (mash out).
- Brewfather_Batch48_20251004
3) Lauter & Sparge
- Vorlauf until clear, then lauter.
- Sparge with 33 L @ 77 °C to collect ~58–59 L pre-boil. Aim pre-boil gravity ≈ 1.041–1.048 (you measured 1.048).
- Brewfather_Batch48_20251004
4) Boil – 60 Minutes
- 60 min: Tettnang 57 g
- 30 min: Tettnang 57 g
- 15 min: Tettnang 87 g + 1.6 g Whirlfloc
- Chill immediately at flameout.
- Brewfather_Batch48_20251004
5) Chill & Transfer
- Chill to 14 °C, transfer to fermenter, and oxygenate well.
6) Fermentation
- Pitch SafLager West European Lager at 14 °C, hold 14 days.
- Raise to 16 °C for 2 days to finish and clean up.
- Cold crash to 1.5 °C for 2 days.
- Brewfather_Batch48_20251004
7) Package & Lager
- Carbonate to 2.7 vols CO₂ (bottle or keg).
- Lager cold 4–6 weeks for a smooth, polished beer. Serve cool, not ice-cold, to showcase malt.
.png)
Double Decoction Hefeweizen!
We’re brewing a traditional German Hefeweizen for Oktoberfest using the classic double decoction mash method – an old-school brewing technique that builds depth, body, and authentic flavour. We cover the full step-by-step brewing process for a 23L batch of Weissbier, including mash schedule, decoctions, sparging, fermentation profile, and tasting notes.
Stats
- Style: Weissbier
- ABV: 5%
- OG: 1.046 (measured 1.055)
- FG: 1.008 (measured 1.014)
- IBU: 10 (Tinseth)
- Colour: 7 EBC (SRM ~3.5)
- Carbonation: 3.5 CO₂-vol
- Batch Size: 23 L
- Boil Time: 60 min
- Brewhouse Efficiency: 67%
Ingredients
Malt & Adjuncts (5.1 kg total)
- 2.55 kg – Gladfield Wheat Malt (50%)
- 1.78 kg – Floor-Malted Bohemian Pilsner (35%)
- 0.76 kg – Gladfield Rolled Wheat (15%)
- 0.47 kg – Rice Hulls (lautering aid)
Hops
- 28 g Spalt Spalter (3% AA) — 60 min (10 IBU)
Yeast
- Lallemand (LalBrew) Munich Classic
Water Profile (adjusted)
- Mash Water: 24 L
- Sparge Water: 15.5 L
- Total Water: 39.5 L
- Acid Additions:
- 5 ml Phosphoric Acid (Mash)
- 0.84 ml Phosphoric Acid (Sparge)
Target Profile (ppm):
- Ca²⁺: 50
- Mg²⁺: 5
- Na⁺: 10
- Cl⁻: 60
- SO₄²⁻: 50
- HCO₃⁻: 0
(Balanced, soft water — ideal for Weissbier yeast character.)
Brewfather_Batch49_20250926
Mash Schedule (Double Decoction)
- 45 °C – 10 min (Ferulic Acid Rest — promotes clove phenols).
- 64 °C – 15 min (Beta Rest, part 1).
- Pull ⅓ thick mash, 15 mins in, and boil for 15 min, then return to tun (Decoction #1).
- 64 °C – 15 min (Beta Rest, part 2).
- 69 °C – 30 min (Alpha Rest for body).
- Pull ⅓ thick mash 15 mins in, and boil for 15 min, then return to tun (Decoction #2).
- 77 °C – 10 min (Mash Out).
- Sparge at 77 °C until pre-boil volume (~28 L) is reached.
Fermentation Schedule
- Primary: 22 °C × 7 days
- Secondary: 23 °C × 2 days
- Cold Crash: 1.5 °C × 2 days
Brew Notes
- Brewed: 10 Sept 2025
- Bottled: 21 Sept 2025
- Heat Source: 1900 W element
- Brewfather_Batch49_20250926
Step-by-Step Brewing Method
- Water Prep
- Adjust your brewing water to target profile (Ca 50 ppm, SO₄ 50 ppm, Cl 60 ppm).
- Add phosphoric acid to mash and sparge water.
- Mash In
- Heat 24 L strike water to 45 °C.
- Add grains and hold for 10 min (Ferulic Rest).
- Step Mash & Decoctions
- Raise to 64 °C, rest 15 min.
- Pull ⅓ of the thick mash, boil 15 min, return to tun.
- Hold at 64 °C again for 15 min.
- Raise to 69 °C for 30 min (Alpha Rest).
- Pull ⅓ of thick mash again, boil 15 min, return to tun.
- Mash out at 77 °C for 10 min.
- Sparge
- Sparge with 15.5 L water at 77 °C until ~28 L collected.
- Boil (60 min)
- Add 28 g Spalt Spalter at start of boil.
- Boil for full 60 min.
- Chill & Transfer
- Chill wort to 22 °C.
- Transfer to fermenter and aerate well.
- Fermentation
- Pitch yeast and ferment at 22 °C for 7 days.
- Raise to 23 °C for 2 days (clean up).
- Cold crash at 1.5 °C for 2 days.
- Packaging
- Bottle or keg, targeting 3.5 vols CO₂ for lively effervescence.
- Condition and enjoy!
.png)
Smoked Lamb Shanks – Low & Slow Perfection
Smoked lamb shanks are rich, tender, and full of deep smoky flavour when cooked low and slow. Using a simple herb-spice rub and a squeeze of mustard to bind, these shanks develop a beautifully caramelised bark on the outside while becoming fall-apart tender inside. Cooked for 5–6 hours at 125 °C (257 °F), they’re the ultimate comfort BBQ dish that brings together rustic flavours and refined barbecue technique.
Prep time
20 minutes
Cook time
5–6 hours
Serves
4
Ingredients
- 4 lamb shanks, 500 g (1.1 lb) each
- Squeeze of American mustard (about 2 tbsp / 30 g) for binding
- 1 tbsp (6 g) thyme, finely chopped
- 1 tbsp (6 g) rosemary, finely chopped
- 1 tbsp (18 g) salt
- 1 tsp (3 g) garlic powder
- 3 tsp (7 g) smoked paprika
- ½ tsp (1 g) cayenne pepper
Method
Step 1 – Preheat the smoker
Set your smoker to 125 °C (257 °F). Choose wood that complements lamb, such as oak, cherry, or hickory.
Step 2 – Prepare the shanks
Pat the lamb shanks dry with paper towel. Apply a light squeeze of American mustard to each shank and rub evenly to create a sticky surface for the seasoning.
Step 3 – Make and apply the rub
Mix thyme, rosemary, salt, garlic powder, smoked paprika, and cayenne in a small bowl. Coat each lamb shank generously with the rub, pressing it in so it sticks well.
Step 4 – Smoke the lamb shanks
Place the shanks directly on the smoker grates. Smoke for 5–6 hours, maintaining a steady 125 °C (257 °F). Rotate occasionally to ensure even cooking.
Step 5 – Check tenderness
The shanks are ready when the internal temperature reaches 93 °C (199.4 °F) and the meat is tender enough to pull back easily from the bone. If they’re not quite tender, keep cooking until they reach this texture.
Step 6 – Rest & serve
Remove the lamb shanks from the smoker and rest them, loosely tented in foil, for 15 minutes before serving. This allows juices to redistribute and ensures maximum tenderness.
Tips
- For extra juiciness, wrap the shanks in foil with a splash of stock or red wine after 3–4 hours, then return them to the smoker until done.
- Pair these smoked lamb shanks with creamy mashed potatoes or roasted vegetables for the perfect BBQ feast.
.png)
Czech Pilsner – 4.7% ABV
A crisp, golden classic brewed with 100% floor-malted Bohemian Pilsner malt and an all-Saaz hop schedule. This Czech Premium Pale Lager is soft, bready, and perfectly balanced — lightly floral, delicately bitter, and ultra-refreshing. Fermented cold with traditional Budejovice lager yeast and conditioned long and cold, this one's as close to the Czech motherland as you’ll get without hopping on a plane.
Specs
- Style: Czech Premium Pale Lager
- Batch Size: 45 L (11.9 gal)
- OG: 1.045
- FG: 1.009
- ABV: 4.7%
- IBU: 31 (Tinseth)
- Colour: 7 EBC (3.5 SRM)
- BU/GU: 0.68
- Carbonation: 2.7 CO₂-vol
Grain Bill (8.8 kg / 19.4 lbs)
- 8.8 kg (19.4 lbs) Floor-Malted Bohemian Pilsner Malt – 100%
Water & Mash
- Mash Water: 35 L (9.25 gal)
- Sparge Water: 25 L (6.6 gal)
- Total Water: 60 L (15.85 gal)
Water Profile:
Ca 23 | Mg 5 | Na 15 | Cl 31 | SO₄ 32 | HCO₃ 57
- Mash pH: 5.58
- Sparge pH: 5.4
Water Adjustments:
- Mash: 1.5 g Gypsum, 3 ml Phosphoric Acid
- Sparge: 1.5 g Gypsum, 1.73 ml Phosphoric Acid
Mash Schedule (Double Decoction – Czech Lager Profile)
- 64°C (147°F) – 15 min Beta Rest
- Pull Decoction #1 – Boil for 15 min
- Return decoction, hold at 64°C – 15 min
- 70°C (158°F) – 15 min Alpha Rest
- Pull Decoction #2 – Boil for 15 min
- Return decoction, hold at 70°C – 15 min
- 77°C (171°F) – 15 min Mash Out
Hop Schedule (182 g / 6.4 oz total)
- 90 min – 28 g (1 oz) Saaz – 8 IBU
- 30 min – 70 g (2.47 oz) Saaz – 14 IBU
- 15 min – 56 g (1.98 oz) Saaz – 7 IBU
- 5 min – 28 g (1 oz) Saaz – 1 IBU
Other Additions
- 15 min Boil – 1.67 g Whirlfloc
Yeast
- 1 pack White Labs WLP802 Czech Budejovice Lager - made with a yeast starter 1 day before brewing
Fermentation Schedule:
- 10°C (50°F) – 14 days Primary
- 12°C (54°F) – 3 days Secondary
- 1°C (34°F) – 7 days Cold Crash
Brew Day Notes
- Brewed on BrewZilla 65L system
- Boiled at 3000W for 90 minutes
- Brewhouse Efficiency: 80%
Step-by-Step Brew Day Process
1. Heat Water & Adjust
- Heat 35 L (9.25 gal) of water for the mash.
- Add 1.5 g Gypsum and 3 ml Phosphoric Acid.
- Target mash pH: 5.58
2. Mash In & Decoction #1
- Add 8.8 kg Bohemian Pilsner malt.
- Hold at 64°C (147°F) for 15 minutes (Beta rest).
- Pull thick decoction (~30–40% of mash), bring to 100°C (212°F), boil 15 min.
- Return decoction to main mash, stir, rest at 64°C again for 15 minutes.
3. Decoction #2
- Raise to 70°C (158°F) – hold for 15 minutes (Alpha rest).
- Pull second decoction (~25–30%), boil 15 minutes.
- Return to mash, hold at 70°C for 15 minutes.
- Raise to 77°C (171°F) for 15-minute mash out.
4. Sparge & Collect Wort
- Sparge with 25 L (6.6 gal) water, adjusted with:
- 1.5 g Gypsum
- 1.73 ml Phosphoric Acid
- Collect pre-boil volume of ~58.7 L (15.5 gal)
5. Boil – 90 Minutes
- Start a 90-minute vigorous boil.
- Hop Additions:
- 90 min: 28 g Saaz
- 30 min: 70 g Saaz
- 15 min: 56 g Saaz
- 5 min: 28 g Saaz
- 15 min: Add 1.67 g Whirlfloc
6. Chill & Transfer
- Chill to 10°C (50°F).
- Transfer to fermenter. Top up to 46.5 L (if needed).
- Aerate well.
7. Pitch Yeast
- Pitch 1 pack of WLP802 Czech Lager yeast
- No starter required if yeast is fresh and healthy
8. Fermentation & Lagering
- 14 days at 10°C (50°F)
- 3 days at 12°C (54°F) for cleanup
- 3 days at 1°C (34°F) cold crash
- Optional: Lager for 4+ weeks at 1–2°C (34–36°F) for clarity and refinement
9. Package
- Target 2.7 vol CO₂
- For bottling: use ~8.2 g/L (1.1 oz/gal) priming sugar
- Condition cold and serve crisp!
.png)
Belgian Witbier
This Belgian Witbier is a fluffy, citrus-charged classic, brewed with a hefty dose of wheat and oats for body, and spiced up with bitter orange peel and crushed coriander seed for that zingy, signature Witbier twist. Fermented warm with LalBrew Wit yeast and finished with a mountain of carbonation, this cloudy 4.9% quencher pours with a snowy white head and drinks like pure summer.
Specs
- Style: Witbier
- Batch Size: 25 L (6.6 gal)
- OG: 1.048
- FG: 1.011
- ABV: 4.9%
- IBU: 12 (Tinseth)
- Colour: 7 EBC (3.5 SRM)
- BU/GU: 0.30
- Carbonation: 3.0 CO₂-vol
Grain Bill (4.82 kg / 10.6 lbs)
- 2.169 kg (4.78 lbs) Floor-Malted Bohemian Pilsner Malt – 45%
- 1.928 kg (4.25 lbs) Gladfield Rolled Wheat – 40%
- 482 g (1.06 lbs) Gladfield Rolled Oats – 10%
- 241 g (0.53 lbs) Light Munich Malt – 5%
- 280 g (0.62 lbs) Rice Hulls – not included in % (lautering aid)
Water & Mash
- Mash Water: 16 L (4.23 gal)
- Sparge Water: 16 L (4.23 gal)
- Total Water: 32 L (8.45 gal)
Water Profile:
Ca 70 | Mg 5 | Na 16 | Cl 80 | SO₄ 81 | HCO₃ 57
(SO₄ / Cl ratio: 1.0)
- Mash pH: 5.37
- Sparge pH: 5.5
Water Adjustments:
- Mash:
- 4.48 g Calcium Chloride
- 5.57 g Epsom Salt
- 4.51 g Gypsum
- 1.82 ml Phosphoric Acid
- Sparge:
- 1.32 g Calcium Chloride
- 1.64 g Epsom Salt
- 1.33 g Gypsum
- 0.43 ml Phosphoric Acid
Mash Schedule (Step Mash)
- 50°C (122°F) – 10 min – Protein rest
- 64°C (147°F) – 30 min – Beta-amylase
- 70°C (158°F) – 30 min – Alpha-amylase
- 77°C (171°F) – 10 min – Mash out
Hop Schedule (48 g / 1.69 oz total)
- 60 min – 20 g (0.71 oz) Tettnang – 10 IBU
- 5 min – 28 g (0.99 oz) Tettnang – 3 IBU
Spice Additions (Boil – 5 min)
- 11 g (0.39 oz) Crushed Coriander Seed
- 14 g (0.49 oz) Bitter Orange Peel
- 20 g (0.71 oz) Sweet Orange Peel
Yeast
- 1 pack Lallemand (LalBrew) Wit – Belgian Witbier strain
Fermentation Schedule:
- 20°C (68°F) – 9 days Primary
- 22°C (72°F) – 2 days Diacetyl Rest
- 1.5°C (35°F) – 2 days Cold Crash
Step by step process
1. Prep Water
- Heat 16 L (4.23 gal) of mash water in your BrewZilla.
- Adjust with:
- 4.48 g Calcium Chloride
- 5.57 g Epsom Salt
- 4.51 g Gypsum
- 1.82 ml Phosphoric Acid
- Set temperature to 50°C (122°F).
2. Mash In
- Add grains:
- Pilsner, Wheat, Oats, Munich, and Rice Hulls
- Stir to break up any dough balls.
3. Step Mash
- 50°C (122°F) – 10 min – Protein rest
- Raise to 64°C (147°F) – 30 min – Beta rest
- Raise to 70°C (158°F) – 30 min – Alpha rest
- Raise to 77°C (171°F) – 10 min – Mash out
4. Sparge
- Sparge with 16 L (4.23 gal) of 77°C water.
- Add sparge salts:
- 1.32 g Calcium Chloride
- 1.64 g Epsom Salt
- 1.33 g Gypsum
- 0.43 ml Phosphoric Acid
5. Boil – 60 Minutes
- Start a 60-minute boil.
- At 60 min: Add 20 g Tettnang
- At 5 min:
- 28 g Tettnang
- 11 g Coriander Seed (crushed)
- 14 g Bitter Orange Peel
- 20 g Sweet Orange Peel
6. Chill & Transfer
- Chill to 20°C (68°F).
- Transfer to fermenter.
- Aerate well.
7. Pitch Yeast
- Pitch 1 packet of Lallemand Wit.
- No starter needed.
8. Ferment
- 9 days at 20°C (68°F)
- Raise to 22°C (72°F) for 2 days (diacetyl rest)
- Cold crash at 1.5°C (35°F) for 2 days
9. Package
- Bottle or keg at 3.0 vol CO₂.
- For bottling: use approx 9.5 g/L (1.25 oz/gal) priming sugar.
- Carbonate cold for at least 2 weeks.

BBQ Pork Ribs – 3-2-1 Method!
The 3-2-1 method is a foolproof way to get perfectly tender, smoky, and flavour-packed pork ribs every time! It breaks the cook into three stages: 3 hours of slow smoking to build flavour & bark, 2 hours wrapped in foil to lock in moisture, and a final 1 hour unwrapped to set the glaze and finish cooking. This method ensures juicy ribs with a deep smoky bark and meat that pulls cleanly from the bone!
Recipe!
Prep time: 15 minutes
Cook time: 6 hours
Serves: 4
Ingredients
- 2 racks of pork ribs (baby back or spare ribs)
- Your favourite BBQ dry rub (about ½ cup / 120 g)
- ½ cup (120 ml) apple juice (for spritzing)
- ½ cup (120 ml) butter, melted
- ½ cup (120 ml) brown sugar
- ½ cup (120 ml) honey
- BBQ sauce (optional, for glazing)
Step-by-Step Instructions
Step 1 – Preheat the smoker
Set your smoker to 110 °C (225 °F). Use fruit woods like apple, cherry, or hickory for a balanced smoke flavour.
Step 2 – Remove the membrane
Flip the ribs so the bone side is up. Slide a butter knife under the thin membrane, then grab it with a piece of paper towel for grip and peel it off completely. This helps smoke penetrate the meat and improves texture.
Step 3 – Season the ribs
Generously coat both sides of the ribs with your BBQ dry rub, pressing it in so it sticks well.
Step 4 – Smoke – the “3” stage
Place ribs bone-side down in the smoker and cook for 3 hours. Spritz lightly with apple juice every 45–60 minutes to keep the surface moist.
Step 5 – Wrap – the “2” stage
Remove ribs from the smoker and place each rack on heavy-duty aluminium foil. Sprinkle brown sugar over them, drizzle with honey, and pour over melted butter. Wrap tightly to seal in steam and return to the smoker for 2 hours.
Step 6 – Unwrap & glaze – the “1” stage
Carefully remove the ribs from the foil (watch for hot steam) and place them back on the smoker, bone-side down. Brush with BBQ sauce if desired. Continue cooking until the internal temperature reaches 91 °C (195.8 °F), usually about 1 hour.
Step 7 – Rest & serve
Remove ribs from the smoker and let them rest for 10–15 minutes before slicing between the bones. Serve with extra BBQ sauce if you like.
Tips:
- If your ribs finish early, you can wrap them in foil and a towel, then rest them in a cooler for up to an hour.
- The 3-2-1 method works best for spare ribs; if using baby back ribs, try 2-2-1 to avoid overcooking.
.png)
So... What is it?
This is farmhouse funk turned up to eleven – dry, peppery, citrusy, and built for refreshment. Clocking in at 7%, this crisp Belgian Saison keeps things lively with traditional Spalt hops, a dry champagne-like finish, and a burst of bright citrus and spice from bitter/sweet orange peel and crushed coriander seed. Fermented hot with BE-134 for that classic Belgian phenolic zing, this beer is rustic, refreshing, and unapologetically lively. The complexity is layered, the carbonation is sky high, and the pour is pure sunshine.
Batch Size & Stats
- Style: Belgian Saison
- Batch Size: 48 L (12.7 gal)
- OG: 1.057
- FG: 1.004
- ABV: 7.0%
- IBU: 24 (Tinseth)
- Colour: 7 EBC (3.5 SRM)
- BU/GU: 0.41
- Carbonation: 3.0 CO₂-vol (very high for effervescence)
What ingredients?
Water & Mash
- Mash Water: 30 L (7.93 gal)
- Sparge Water: 30 L (7.93 gal)
- Total Water: 60 L (15.85 gal)
Mash Schedule (Step Mash):
- 45°C (113°F) – 10 min – Ferulic Acid Rest
- 64°C (147°F) – 30 min – Beta-Amylase Rest
- 70°C (158°F) – 30 min – Alpha-Amylase Rest
- 77°C (171°F) – 10 min – Mash Out
Water Profile:
Ca 100 | Mg 8 | Na 16 | Cl 80 | SO₄ 163 | HCO₃ 57
(SO₄ / Cl ratio: 2.0 – promoting dryness)
- Mash pH: 5.5
- Sparge pH: 5.5
Grain Bill (11.08 kg / 24.43 lbs)
- 7.202 kg (15.88 lbs) Pilsner Malt – Craft Export (65%)
- 2.216 kg (4.89 lbs) Gladfield Rolled Wheat (20%)
- 1.662 kg (3.66 lbs) Gladfield Vienna Malt (15%)
- 500 g (1.1 lbs) Rice Hulls (for lautering aid)
Hops (174 g / 6.13 oz total)
- 60 min – 58 g (2.05 oz) Spalt Spalter – 12 IBU
- 30 min – 58 g (2.05 oz) Spalt Spalter – 9 IBU
- 5 min – 58 g (2.05 oz) Spalt Spalter – 2 IBU
Yeast
- 3 packs Fermentis Safale BE-134 (Belgian Saison strain)
Fermentation Schedule:
- 25°C (77°F) – 9 days Primary
- 26°C (79°F) – 2 days Diacetyl Rest
- 1.5°C (35°F) – 2 days Cold Crash
Step by step process
1. Water Preparation
- Add 30 L (7.93 gal) of water to your BrewZilla for the mash.
- Adjust the mash water chemistry:
- 8.6 g Calcium Chloride (CaCl₂)
- 10.7 g Epsom Salt (MgSO₄)
- 8.65 g Gypsum (CaSO₄)
- 3.5 ml Phosphoric Acid (85%)
- Heat to 45°C (113°F).
2. Mash In
- Add the crushed grain bill to the strike water:
- 7.202 kg Pilsner Malt
- 2.216 kg Rolled Wheat
- 1.662 kg Vienna Malt
- 500 g Rice Hulls (for flow aid)
- Stir well to avoid dough balls.
3. Step Mash Schedule
- 45°C (113°F) – 10 min: Ferulic acid rest (for yeast spice expression)
- Ramp up to 64°C (147°F) – Hold for 30 min (beta-amylase rest for fermentability)
- Ramp to 70°C (158°F) – Hold for 30 min (alpha-amylase for body)
- Final step: 77°C (171°F) – 10 min mash out
4. Sparge
- Sparge with 30 L (7.93 gal) of water heated to 77°C (171°F).
- Adjust sparge water chemistry:
- 2.53 g Calcium Chloride
- 3.15 g Epsom Salt
- 2.55 g Gypsum
- 0.83 ml Phosphoric Acid
- Collect a total pre-boil volume of around 58.6 L (15.5 gal).
5. Boil – 60 Minutes Total
- Bring wort to a rolling boil.
- Add hops and spices as follows:
Time Remaining
- 60 min 58 g Spalt Spalter (12 IBU)
- 30 min 58 g Spalt Spalter (9 IBU)
- 5 min 58 g Spalt Spalter (2 IBU)
- 5 min 22 g Crushed Coriander Seeds, 28 g Bitter Orange Peel, 28 g Sweet Orange Peel
6. Chill & Transfer
- Chill wort down to 25°C (77°F) using an immersion chiller or counterflow chiller.
- Transfer to fermenter.
- Aerate well (e.g. by shaking or using an aquarium pump).
7. Pitch Yeast
- Pitch 3 packets of Fermentis BE-134 into the fermenter.
- No starter needed – dry yeast direct pitch is fine.
8. Fermentation Schedule
- Primary Fermentation:
- 25°C (77°F) for 9 days
- Diacetyl Rest:
- Raise to 26°C (79°F) for 2 days
- Cold Crash:
- Drop to 1.5°C (35°F) for 2 days before packaging
9. Packaging
- Bottle or keg with appropriate carbonation target:
- 3.0 vol CO₂ (Use around 9.5 g/L priming sugar / 1.25 oz/gal for bottling)
- Store cold and enjoy after a few weeks of conditioning.
.png)
So... What is it?
How do you make a juicy NEIPA even juicier? You throw it on NITRO! This 7% hazy beast is an absolute game-changer – by far the creamiest, silkiest NEIPA we’ve ever brewed. That cascading nitro pour gives it a dreamy, pillowy mouthfeel that’s smoother than velvet. Packed with mountains of hops, it’s dripping with tropical fruit, citrus, and candy-like sweetness. And because we don’t do things by halves, we hit it with not one, but TWO massive rounds of dry hopping – including a biotransformation charge – to supercharge those juicy, aromatic hop oils.
Batch Size & ABV
- Style: Hazy IPA (NEIPA)
- Batch Size: 25 L (6.6 gal)
- OG: 1.065
- FG: 1.014
- ABV: 6.7%
- IBU: 32 (Tinseth)
- Colour: 10 EBC (5 SRM)
- BU/GU: 0.5
Ingredients
Water
- Mash Water: 24 L (6.34 gal)
- Sparge Water: 10 L (2.64 gal)
- Total Water: 34 L (8.98 gal)
- Mash Schedule:
- 69 °C (156 °F) – 60 min
- 77 °C (171 °F) – 10 min Mash Out
- Mash Schedule:
- Water Profile: Ca 130 | Mg 16 | Na 15 | Cl 202 | SO₄ 100 (SO₄/Cl ratio: 0.5)
-
Grain Bill (7.33 kg / 16.15 lbs)
- 4.398 kg (9.7 lbs) Ale Malt (60%)
- 1.10 kg (2.43 lbs) Gladfield Rolled Oats (15%)
- 1.026 kg (2.26 lbs) Gladfield Wheat Malt (14%)
- 513 g (1.13 lbs) Gladfield Rolled Wheat (7%)
- 293 g (0.65 lbs) Gladfield Gladiator Malt (4%)
- 510 g (1.12 lbs) Rice Hulls (for lautering aid)
Hops & whirlfloc tablets
Mash Hop:
- 18 g (0.63 oz) Motueka (7%) – 3 IBU
Hopstand @ 78°C (172°F) for 20 min:
- 44 g (1.55 oz) El Dorado (11.6%)
- 44 g (1.55 oz) El Dorado (11.6%)
- 44 g (1.55 oz) Amarillo Lupomax (13.5%)
- 44 g (1.55 oz) Citra Lupomax (18.5%)
- 44 g (1.55 oz) Superdelic (10.5%)
Dry Hops:
- Day 2 or 3 (Biotransformation):
- 18 g (0.63 oz) Amarillo Lupomax
- 18 g (0.63 oz) Citra Lupomax
- 18 g (0.63 oz) El Dorado Lupomax
- 18 g (0.63 oz) Superdelic
- Day 7 (Near FG):
- 38 g (1.34 oz) Amarillo Lupomax
- 38 g (1.34 oz) Citra Lupomax
- 38 g (1.34 oz) El Dorado Lupomax
- 38 g (1.34 oz) Superdelic
Yeast options & fermentation temperatures
- 22 g (0.8 oz) — Lallemand (LalBrew) Pomona - 22 °C (71.6 °F)
alternatives below
- 23g (0.8 oz) Lallmand East Coast New England Ale Yeast ferment at 25°C (55°F)
- 23g (0.8 oz) Kveik (we used a Omega yeats Espe Kveik, but any kveik is great!) ferment at 32°C
- 23g (0.8 oz) US-05 – ferment at 20°C
- 23g (0.8 oz) S-04 – ferment at 19°C
Step by step process
Step 1 – Milling
- Mill grains to medium crush (set mill rollers to a gap of approx. 1mm / 0.039 inches) (BUT DONT crush the rice hulls or oats, add them into your grain separately after crushing them)
- Just keep in mind roller gap settings are not universal so as you brew more batches you will find the ideal crush size for your setup
- Alternatively if you don’t have a grain mill you can order your grains crushed from most homebrew stores, both online and in person
Step 2 – Mashing
- Add your brewing salts and mix to ensure they are fully dissolved prior to mashing in grains
- Mash for 60 minutes at 69°C (156°F)
- ensure you mix in the grains thoroughly with a mash paddle to prevent dough balls from forming (big spoons, spatulas or whisks will also work)
- its easier to mash the grains and prevent dough balls if you add a little grain at a time, mix, add more grain and repeat until all the grains are mixed
- now add your mash hops!! This is going to free a bunch of bound thiols from your hops and make this beer even more juicy! I would recommend adding these in a hop bag to make sure you can remove all the hop particles before you start boiling so you don't get extra unaccounted bitterness
- if you don’t have a mash tun with heating then ensure after you have finished mixing the grains in to insulate your mash tun (thick neoprene or heavy blankets both work well)
- after 60 minutes of mashing raise temperature to 77°C (170°F) for 10 minutes to Mash out
Step 3 (optional) – Sparging
- if your setup has the capability to sparge then do so with 25L (6.6 gal) of sparge water at 78 °C (172°F)
- if you are not sparging and using a BIAB (brew in a bag) method then remove grains from mash tun and twist and squeeze the bag to get as much liquid out of the grains as possible
- as you start sparging (or straining your BIAB bag) begin raising the temperature of your wort to a boil
Step 4 – Boiling
- once your wort begins to boil start a timer for a 60-minutes
- after 60 minutes of boiling turn of the heat and chill the temperature of the wort down to 78°C (172°F) and begin whirlpooling
- if you don’t have a wort chiller you could rest your boil kettle in an ice bucket
- if your system can’t whirlpool you can also achieve this with a mash paddle and a power drill, if you don’t have this either don’t worry about whirlpooling it’s not completely necessary
Step 5 – Whirlpooling / whirlpool hop additions
- once temperature reaches 75°C (167°F) and you have started whirlpooling add your whirlpool hops, 44 g - 1.55 oz each of Lupomax citra, Amarillo and regular Superdelic & El Dorado
- allow hops to whirlpool in the wort for 20 minutes and then begin chilling wort again down to yeast pitching temperature
- once you’ve reached yeast pitching temperature take an original gravity reading of your wort
Step 6 – Yeast Pitching
- It is best to make a yeast starter before beginning your brew day (ideally 1 day before) to ensure your yeast are as active and healthy as possible before pitching, but not completely necessary – you could also just rehydrate yeast 30 minutes before pitching.
- Pitch yeast in wort a degree or two higher than the target fermentation temperature to help yeast take off more aggressively
- To make a yeast starter you can use either:
- DME (dry malt extract) at a ratio of approx. 100g per 1L water (3.5 oz per 33 fluid ounces) for gravity of approx. 1.040
- some unfermented wort kept cold and sanitary from a previous brew day
- 70g of table sugar per 1L water (2.5 oz per 33 fluid ounces) – however, it is best to use malt sugar (wort / DME) whenever possible to reduce the chance of shocking the yeast with a different food source from starter to wort pitching
- To rehydrate yeast
- Add yeast to approx. 10 times as much room temperature water as the weight of the yeast e.g. 10g yeast in 100 ml water (0.35 oz yeast in 3.5 fluid ounces water)
Step 7 – Fermentation, dry hopping and Soft Crashing (optional)
- After 2 to 3 days of fermentation add your first round of dry hops, we are aiming for a high krausen hop addition to maximise biotransformation
- after 2-3 days of contact time remove these hops (either bu trub dumping if you can, or add your hops in a hop back with a magnet and pull them out)
- Allow yeast to ferment over the next 5 days to a week
- When the gravity reaches around 1.016 raise the temperature of your fermenter by 1-2 degrees for 2 days for a diacetyl rest
- Whilst starting your Diacetyl rest add your second round of dry hops
- 2 days after dry hopping move on to cold crashing and dump trub / remove hops and take a final gravity reading
- (If you can’t / don’t want to cold crash go straight to kegging/bottling your beer!)
Step 8 (optional) – Cold crashing
- begin cold crashing your fermenter (bring the temperature of your fermenter down to as close to 0°C (32°F) as possible, for 2 days to a week depending on how patient you are
- If you don’t have a temp-controlled fermenter, you can cold crash by putting your fermenter in a fridge or temp-controlled chest freezer
- After you have finished cold crashing it's time to keg/bottle your beer! If you are bottling your beer from the fermenter uncarbonated remember to add about 5-7 grams (0.17 - 0.24 oz) of priming sugar to your bottles to carbonate your beer.
.png)
So... What is it?
Forget the sugary soda stand – today we give you 2 different versions of lemonade all grown up and ready to party! Bursting with real lemon juice, a kiss of sweetness, and a kick of booze, this rebellious refresher is equal parts sunshine and sass. Whether you're backyard chillin', beachside sippin’, or just flipping the bird to boring drinks, this fizzy citrus crusher hits with a tart twist and a smooth finish.
Think lemonade... but with attitude.
Version 1, Fermented Lemonade!
Alcoholic Lemonade Recipe - Aprox 5.5% ABV
(Approx. 4L / 1 Gallon Batch)
🧂 Ingredients:
- 5 lemons, sliced and roughly squeezed (keep pulp and peel)
- 2 lemons, fully juiced
- 350g raw sugar or dextrose (1¾ cups)
- 200g lactose (1 cup)
- 3.8L total water (1 US gallon / 1.0 qt + 3.0 qt)
- 1.5L for boiling (6⅓ cups / 1.6 qt)
- 2.3L for cooling (9¾ cups / 2.4 qt)
- Yeast nutrient (as per pack instructions, usually ½ tsp per gallon)
- Yeast: Lalvin EC-1118, US-05, or baker’s yeast
- After fermentation: 250ml fresh lemon juice (1 cup)
- Optional: priming sugar (5g per 500ml / 1 tsp per 16 oz bottle) if bottle conditioning
🛠️ Equipment:
- Large pot (minimum 5L / 1.3 gallons)
- Sanitised fermenter (5L / 1.3 gallons or larger)
- Strainer or sieve
- Thermometer
- Airlock and bung
- Bottles or carbonation unit (iGulu or SodaStream)
👣 Instructions:
1. Prepare the Lemon Base
- Slice and roughly squeeze 5 lemons. Add pulp and peel to a large pot.
- Pour in 1.5L (6⅓ cups / 1.6 qt) of water.
- Add 350g (1¾ cups) raw sugar or dextrose and 200g (1 cup) lactose.
- Add juice from 2 more lemons.
- Add yeast nutrient per pack dosage (~½ tsp).
- Gently simmer on low heat for 30 minutes, stirring occasionally.
2. Cool the Mix
- Remove from heat after simmering.
- Strain solids if you prefer a clearer final product.
- Add 2.3L (9¾ cups / 2.4 qt) cold, clean water to bring total volume to 3.8L (1 US gallon).
- Allow mixture to cool to 20–25°C (68–77°F).
3. Pitch the Yeast
- Pour cooled mixture into a sanitised fermenter.
- Add yeast (1 sachet or ~1 tsp dry yeast).
- Seal with airlock and store at 18–22°C (64–72°F).
- Ferment for 7–10 days, or until bubbling stops and mixture is clear.
4. Post-Fermentation Additions
- Once fermentation is complete, add 250ml (1 cup) of fresh lemon juice.
- Stir gently and let rest for 24 hours.
5. Carbonate
Option 1 – Force Carbonation:
- Transfer to a keg or SodaStream-compatible container and carbonate to desired fizz level.
Option 2 – Bottle Conditioning:
- Add 5g (1 tsp) priming sugar per 500ml (16 oz) bottle.
- Cap and store at room temp for 1–2 weeks to carbonate.
🍻 Serve & Enjoy:
Chill thoroughly. Open slowly. Enjoy your fresh, fizzy, alcoholic lemonade—tart, lightly sweet, and super refreshing!
Version 2, Vodka Lemonade!
🍸 Quick Vodka Lemonade Recipe 5.5% ABV
(1L / 4 servings)
🧂 Ingredients:
- 1 cup (200g) raw sugar
- 1 cup (240ml) fresh lemon juice (~4–5 lemons)
- 1 cup (240ml) water (for dissolving sugar)
- 2¼ cups (530ml) water (for dilution)
- ⅔ cup (160ml) vodka (your favorite brand)
🛠️ Equipment:
- Saucepan
- Spoon or whisk
- Pitcher or jug
- Measuring cups
- Optional: sieve or strainer (if using freshly squeezed juice with pulp)
👣 Instructions:
1. Make the Simple Syrup
- In a saucepan, combine 1 cup (240ml) of water with 1 cup (200g) raw sugar.
- Heat gently over medium heat, stirring constantly until the sugar dissolves completely.
- Remove from heat and let cool for a few minutes.
2. Mix the Lemonade
- In a large pitcher, add 1 cup (240ml) of fresh lemon juice.
- Pour in the cooled sugar syrup.
- Add 2¼ cups (530ml) of cold water and ⅔ cup (160ml) vodka.
- Stir well to combine.
3. Chill & Serve (And carbonate if desired!)
- Refrigerate until cold, or serve immediately over ice.
- Optional: garnish with lemon slices or fresh mint for extra flair.
- Optional - Transfer to a keg, iGulu or SodaStream-compatible container and carbonate to desired fizz level.
🍹 Tips:
- For sparkling vodka lemonade, swap some of the dilution water with soda water just before serving.
- Adjust sugar or lemon to taste depending on how sweet or tart you like it.
- Easily scale this recipe up for parties!
.png)
So... What is it?
Portuguese charcoal chicken — or frango assado — is more than just grilled chicken; it’s a full-blown flavour explosion that brings fire, spice, and soul to your plate. This iconic dish, rooted in Portuguese tradition and beloved around the world (especially in Aussie suburbs), takes a humble chook and turns it into a smoky, juicy, crispy-skinned masterpiece!
Batch Size & Cook Time
- 2 Whole Charcoal Chickens
- Aprox. 1.5 hours cook time (30 mins heating charcoal (can use an oven instead if you wish) 50-65ish min cooking)
- prep time 15 mins
Equipment
- Charcoal Grill (we used a texas style offset smoker but you could use other styles, or make it unsmoked in an oven)
- thermometer! This is important, we used an inkbird but any bbq Thermometer will do
- charcoal chimney starter
- lighter or matches
What ingredients?
- For the marinade:
- 1/3 cup lemon juice
- 1/4 cup olive oil
- 2 tbsp paprika
- 2 tbsp dried oregano
- 1 tbsp brown sugar
- 2 garlic cloves, crushed
- 1/2 tsp sea salt (or to taste)
- 1/2 tsp freshly ground black pepper (or to taste)
- 1 to 2 whole chicken(s) (1.4–1.6 kg), butterflied (spatchcocked)
Step by step process
1. Butterfly (Spatchcock) the Chicken
- Using kitchen shears or a sharp knife, remove the backbone of the chicken by cutting along both sides of the spine.
- Flip the chicken breast-side up and press down firmly on the breastbone to flatten it.
- Pat the chicken dry with paper towels.
2. Make the Marinade
- In a bowl, mix together all marinade ingredients until well combined.
3. Marinate the Chicken
- Place the butterflied chicken in a large zip-lock bag or baking dish.
- Pour the marinade over the chicken, coating all sides well.
- Seal and refrigerate for at least 4 hours, ideally overnight for deeper flavour.
4. Prepare the Charcoal BBQ
- Light your charcoal and set up a two-zone fire:
- Direct zone: Charcoal underneath (hot side).
- Indirect zone: No charcoal underneath (cool side).
- Let the BBQ come up to 180–230°C (356–446°F). Use a grill thermometer if available.
5. Cook the Chicken – Indirect First
- Place the marinated chicken skin-side up on the indirect (cooler) side of the grill.
- Close the lid and cook for 35–45 minutes, maintaining a steady temperature between 180–230°C.
- Optional: Baste with leftover marinade (only in the first 30 mins of cooking).
6. Finish – Direct Heat for Crispy Skin
- Move the chicken skin-side down over to the direct heat zone.
- Cook for 5–10 minutes, watching closely to avoid flare-ups. You're aiming for charred, crispy skin, not burnt.
7. Check for Doneness
- Use a meat thermometer. Internal temp should reach 74°C (165°F) in the thickest part of the breast and 82°C (180°F) in the thigh.
- Juices should run clear when pierced.
8. Rest the Chicken
- Transfer the cooked chicken to a cutting board and tent loosely with foil.
- Let rest for 10 minutes before carving. This keeps it juicy.
9. Serve
- Carve into portions and serve with lemon wedges, grilled veggies, or a fresh salad.
- Optional: Brush with a mix of olive oil, lemon juice, and extra oregano for shine and flavour before serving.