.png)
German Kölsch (48 L / 12.7 gal)
Crisp like a lager, fruity like an ale, the Kölsch is the best of both worlds! This light golden beer from Cologne is known for its delicate balance, subtle hop bite, and super-clean finish. We brewed ours with Bohemian pilsner malt, Vienna sweetness, and a touch of Gladiator for body. Fermented cool with German K-97 for authenticity its perfect for sunny days, grilled sausages, or any excuse to say “Prost!”
Stats
- Style: Kölsch
- ABV: 4.5 %
- OG: 1.042 (measured 1.052)
- FG: 1.008 (measured 1.010)
- IBU: 20 (Tinseth)
- Colour: 7 EBC (SRM ≈ 3.5)
- Carbonation: 3.0 vols CO₂
- Batch Size: 48 L (12.7 gal)
- Boil Time: 60 min
- Efficiency: 82 % brewhouse, 85 % mash
- Brewfather_Batch52_20251206
Ingredients
Malt Bill (8.44 kg / 18.6 lb total)
- 6.921 kg (15.25 lb) Floor-Malted Bohemian Pilsner — 82 %
- 1.097 kg (2.42 lb) Gladfield Vienna Malt (8.2 EBC) — 13 %
- 422 g (0.93 lb) Gladfield Gladiator Malt (8.2 EBC) — 5 %
- Brewfather_Batch52_20251206
Hops (200 g / 7.05 oz total)
- 60 min – 28 g (1 oz) Hallertauer Mittelfrüh (3.5 %) – 9 IBU
- 30 min – 50 g (1.76 oz) Tettnang (2.4 %) – 5 IBU
- 30 min – 28 g (1 oz) Hallertauer Mittelfrüh (3.5 %)
- 10 min – 50 g (1.76 oz) Tettnang (2.4 %) – 2 IBU
- 10 min – 44 g (1.55 oz) Hallertauer Mittelfrüh (3.5 %)
- Brewfather_Batch52_20251206
Yeast
- 3 packs Fermentis SafAle German Ale K-97
- Brewfather_Batch52_20251206
Water Profile (Adjusted)
Ca 55 ppm • Mg 5 ppm • Na 16 ppm • Cl 64 ppm • SO₄ 67 ppm • HCO₃ 57 ppm
SO₄/Cl ratio 1.0 • Mash pH 5.4 • Sparge pH 5.4
Additions:
- Mash – 2 g CaCl₂ + 3 g Gypsum + 4.4 mL Phosphoric Acid (85 %)
- Sparge – 2 g CaCl₂ + 3 g Gypsum + 1.73 mL Phosphoric Acid (85 %)
- Brewfather_Batch52_20251206
Mash Schedule
Medium–High German Step Mash
64 °C (147 °F) – 30 min (Beta rest for dryness)
70 °C (158 °F) – 30 min (Alpha rest for body & head retention)
77 °C (170 °F) – 10 min (Mash out)
Fermentation Schedule
- Primary – 17 °C (63 °F) × 9 days
- Diacetyl Rest – 19 °C (66 °F) × 2 days
- Cold Crash – 1.5 °C (35 °F) × 2 days
- Brewfather_Batch52_20251206
- Carbonate – 3.0 vols CO₂
Step-by-Step Method
Mash In
Add 8.44 kg (18.6 lb) grain to 30 L (7.9 gal) of water at 64 °C (147 °F). Hold 30 min.
Raise to Alpha Rest
Increase to 70 °C (158 °F) and hold 30 min for malt character.
Mash Out & Sparge
Raise to 77 °C (170 °F) for 10 min, then sparge with 30 L (7.9 gal) at 77 °C (170 °F).
Boil – 60 min
Add hops as listed above. Boil vigorously for a clean malt profile.
Chill & Transfer
Cool to 17 °C (63 °F) and transfer to fermenter.
Fermentation & Rest
Pitch 3 packs of SafAle K-97. Ferment 9 days @ 17 °C (63 °F), then raise to 19 °C (66 °F) for 2 days to clean up diacetyl.
Cold Crash & Package
Cold crash to 1.5 °C (35 °F) for 2 days, then bottle or keg and carbonate to 3.0 vols CO₂. Lager cold for 2–3 weeks for polish.
Notes
- Brewed 14 Nov 2025 • Fermentation Start 14 Nov • Bottled 27 Nov 2025
- Boiled on 3000 W element
- Pre-boil gravity 1.037 • OG 1.052 • FG 1.010

.png)
Sierra Nevada Pale Ale Clone (23 L / 6.1 gal)
Few beers define craft brewing like Sierra Nevada's Pale Ale. Crisp, aromatic, and perfectly balanced, it’s the beer that inspired a generation of brewers! This clone nails that signature citrus-pine hop punch over a clean, and chewy caramel malt base. If you’re looking for a classic American Pale Ale to brew at home, this is the one that started it all!
Stats
- Style: American Pale Ale
- ABV: 5.6 %
- OG: 1.053
- FG: 1.010
- IBU: 37 (Tinseth)
- Colour: 24 EBC (SRM ~12)
- Carbonation: 2.4 vols CO₂
- Batch Size: 23 L (6.1 gal)
- Boil Time: 60 min
- Efficiency: 78.5 % brewhouse, 81.9 % mash
- System: BrewZilla / RoboBrew 35 L
- Brewfather_Batch53_20251126
Ingredients
Malt Bill (4.94 kg / 10.9 lb total)
- 4.594 kg (10.13 lb) Pale Ale Malt (5.9 EBC) — 93 %
- 346 g (0.76 lb) Medium Crystal 240 (265 EBC) — 7 %
- Brewfather_Batch53_20251126
Hops (Cascade + Simcoe = 302 g / 10.6 oz total)
- 60 min: 14 g (0.5 oz) Cascade (7.2 %) – 11 IBU
- 10 min: 28 g (1 oz) Cascade – 9 IBU
- 0 min (Flameout): 28 g (1 oz) Simcoe (14.7 %) – 4 IBU
- Hopstand (76 °C / 169 °F, 20 min):
- 58 g (2 oz) Cascade – 4 IBU
- 58 g (2 oz) Simcoe – 9 IBU
- Dry Hop (Day 7, 2 days):
- 102 g (3.6 oz) Cascade
- 14 g (0.5 oz) Simcoe
- Brewfather_Batch53_20251126
- Whirlfloc 0.8g (0.03 oz) a 15m left in boil
Yeast
- 23 g (0.8 oz) Fermentis AUS-05 / US-05
- Brewfather_Batch53_20251126
Water Profile (Adjusted)
- Base: Sweet Pale Ale
- Ca 51 ppm • Mg 5 ppm • Na 15 ppm • Cl 50 ppm • SO₄ 75 ppm • HCO₃ 57 ppm
- SO₄/Cl ratio: 1.5 • Mash pH: 5.41 • Sparge pH: 5.5
Mash Schedule
- Mash in 17L (4.5 Gal) at 65 °C (149 °F) for 60 min – we did 15L on the brewday but added water to dilute later, so just adding extra water the recipe in mash and sparge
- Mash out: 77 °C (171 °F) for 10 min
- Sparge: 17 L (4.5 gal) @ 77 °C (171 °F)
- Brewfather_Batch53_20251126
Fermentation Schedule
- Primary: 20 °C (68 °F) × 14 days
- Dry Hop: Day 7 for 48 hours
- Cold Crash (optional): 2–4 °C (36–39 °F) × 2 days
- Carbonation: 2.4 vols CO₂
- Brewfather_Batch53_20251126
Step-by-Step Method
1. Mash In
Add 4.94 kg (10.9 lb) of grain to 17 L (4.5 gal) of water at 65 °C (149 °F). Hold for 60 minutes for a crisp, dry finish.
2. Mash Out & Sparge
Raise mash to 77 °C (171 °F) for 10 min, then sparge with 17 L (4.5 gal) water at the same temp. Collect about 28 L (7.4 gal) pre-boil wort.
3. Boil – 60 Minutes
Add hops as follows:
- 14 g Cascade @ 60 min
- 28 g Cascade @ 10 min
- 0.8 g Whirlfloc @ 15 min remaining
4. Flameout & Hopstand
At flameout, add 28 g Simcoe, then hopstand at 76 °C (169 °F) for 20 minutes with 58 g Cascade + 58 g Simcoe.
5. Chill & Transfer
Chill wort to 20 °C (68 °F), transfer to fermenter, and pitch 23 g AUS-05 yeast.
6. Fermentation
Ferment 14 days at 20 °C (68 °F). Add dry hops (102 g Cascade, 14 g Simcoe) on day 7 for 48 hours, then remove.
7. Packaging
Cold crash if desired. Carbonate to 2.4 vols CO₂. Enjoy fresh for maximum hop brightness.
.png)
Stone & Wood Pacific Ale Clone! (23 L / 6.1 gal)
This is our take on one of Australias flagship beer, the Stone & Wood Pacific Ale! An easy drinking hazy pale ale crammed full of passionfruit and tropical hop aroma thanks to Australia's own Galaxy hops, coupled with a soft yet crisp and refreshing body — this beer is summer in a glass!
Stats
- Style: Pacific Ale
- ABV: 4.2 %
- OG: 1.040 (measured 1.037)
- FG: 1.008 (measured 1.006)
- IBU: 30 (Tinseth)
- Colour: 7 EBC (SRM ~3.5)
- Batch Size: 23 L (6.1 gal)
- Boil Time: 60 min
- Efficiency: 82 % brewhouse, 85 % mash
- System: BrewZilla / RoboBrew 35L
- Brewfather_Batch50_20251107
Brewfather Link
Ingredients
Malt Bill (3.55 kg / 7.8 lb total)
- 2.13 kg (4.7 lb) Pale Ale Malt — 60 %
- 1.065 kg (2.35 lb) Wheat Malt — 30 %
- 355 g (0.78 lb) Rolled Wheat — 10 %
Hops (Galaxy All The Way)
- First Wort: 8 g (0.28 oz) @ 60 min – 19 IBU
- Hop Stand: 57 g (2 oz) @ 76 °C (169 °F) for 20 min – 11 IBU
- Dry Hop: 35 g (1.23 oz) Galaxy on Day 7 for 2 days
Yeast
- 11.5 g (0.4 oz) Fermentis AUS-05 (US-05 equivalent)
Water Profile (Adjusted)
- Base Profile: Hazy Pale Ale
- Ca 63 ppm • Mg 9 ppm • Na 15 ppm • Cl 101 ppm • SO₄ 51 ppm • HCO₃ 57 ppm
- SO₄/Cl ratio: 0.5 • Mash pH: 5.55
Additions (per batch):
- Mash: 2.2 g CaCl₂, 0.65 g Epsom Salt, 0.7 g Gypsum, 1.6 mL Phosphoric Acid
- Sparge: 2.23 g CaCl₂, 0.66 g Epsom Salt, 0.71 g Gypsum, 0.85 mL Phosphoric Acid
- Boil @ 15 min: 0.8 g Whirlfloc
- Brewfather_Batch50_20251107
Mash Schedule
- Single infusion at 65 °C (149 °F) for 60 min
- Sparge with 15 L (3.96 gal) at ~75–78 °C (167–172 °F)
Fermentation Schedule
- Ferment at 20 °C (68 °F) for 14 days
- Dry hop on Day 7 for 48 hours
- Bottle or keg and carbonate to 2.4 vols CO₂
Step-by-Step Method
1. Mash In
Mash 3.55 kg (7.8 lb) grain in 15 L (3.96 gal) of water at 65 °C (149 °F). Hold for 60 minutes.
2. Sparge & Boil
Sparge with 15 L (3.96 gal) at 75–78 °C (167–172 °F) to collect ~28 L (7.4 gal) pre-boil volume.
3. First Wort Hop
Add 8 g (0.28 oz) Galaxy to boil kettle as you begin heating.
4. Boil – 60 Minutes
Add Whirlfloc at 15 minutes remaining in the boil.
5. Hop Stand
After flameout, cool wort to 76 °C (169 °F) and add 57 g (2 oz) Galaxy. Hold for 20 minutes.
6. Chill & Transfer
Chill to 20 °C (68 °F). Transfer to fermenter and pitch 11.5 g (0.4 oz) AUS-05 yeast.
7. Fermentation
Ferment at 20 °C (68 °F) for 14 days. Add 35 g (1.23 oz) Galaxy hops on day 7 for 2 days, then remove.
8. Package
Cold crash if desired. Carbonate to 2.4 vols CO₂. Enjoy fresh for maximum hop aroma!
.png)
So... What is it?
The Hazy Pale ale is the new world style of beer that took the craft beer scene by storm! This is our version of an easy drinking pale ale, coming in at 5.5% and made with a light but flavorsome body & mouthfeel, and a fantastic hop forward fruity profile, showcasing passionfruit, mango and pineapple! The perfect beer for when you want that hazy tropical character, but with the lower ABV and drinkability of a pale ale!
Batch Size & Stats
- 38L (2 19L corny kegs) / 10 gal finished beer
- 46L (13.2 gal) wort
- For a smaller 19L (5 gal) batch size simply half the ingredients of this recipe
- Starting gravity – 1.043
- Final gravity 1.007
- ABV – 4.8%
- IBU - 24
- Colour - 16.7 EBC
- Mash Efficiency - 86%
What ingredients?
Water
With sparging
- 30L (7.9 gal) for a 65°C (149°F) mash (you can use our strike water calculator to find your ideal strike temp)
- 30L (7.9 gal) sparge water at 78°C (172°F) - fermenter topped up with 4L (1 gal) post boil to reduce OG
Without sparging
- 60L (7.9 gal) for a 65°C (149°F) mash (you can use our strike water calculator to find your ideal strike temp)
Malts: 8.56kg / 18.9 lbs
- Pale ale malt – 6.63 kg (14.4 lb) - 76.3%
- Rolled Oats - 860g (1.9lbs) - 10.1%
- Rolled Wheat - 860g (1.9lbs) - 10.1%
- Medium Crystal Malt – 310g (0.68 lb) - 3.6%
Hops & whirlfloc tablets
Northern Brewer
- 10g (0.35 oz) 5 IBU's - 60 minutes left in the boil
Azacca
- 70g (2.47 oz) – 20 min Whirlpool @ 76 C / 169 F
- 50g (1.76 oz) dry hop day 7
El Dorado
- 70g (2.47 oz) – 20 min Whirlpool @ 76 C / 169 F
- 50g (1.76 oz) dry hop day 7
Lupomax Citra
- 70g (2.47 oz) – 20 min Whirlpool @ 76 C / 169 F
- 50g (1.76 oz) dry hop day 7
Whirlfloc tablets
- 1.5g (0.052 oz) / 2 tablets – 15 minutes left in the boil
Yeast options & fermentation temperatures
- 23g (0.8 oz) Lallemand Pomona at 23°C
- 23g (0.8 oz) Aus-05– ferment at 20°C
- 23g (0.8 oz) US-05 – ferment at 20°C
- 23g (0.8 oz) S-04 – ferment at 19°C
Water Profile
- Ca2+135
- Mg2+ 8
- Na+ 15
- Cl- 191
- SO42- 98
- HCO3- 57
Step by step process
Step 1 – Milling
- Mill grains to medium crush (set mill rollers to a gap of approx. 1.00mm / 0.039 inches)
- Just keep in mind roller gap settings are not universal so as you brew more batches you will find the ideal crush size for your setup
- Alternatively if you don’t have a grain mill you can order your grains crushed from most homebrew stores, both online and in person
Step 2 – Mashing
- Mash for 60 minutes at 65°C (149°F)
- Set your strike water to a few degrees above the target mash temperature, you can use our calculator to determine what your strike temperature should be
- ensure you mix in the grains thoroughly with a mash paddle to prevent dough balls from forming (big spoons, spatulas or whisks will also work)
- its easier to mash the grains and prevent dough balls if you add a little grain at a time, mix, add more grain and repeat until all the grains are mixed
- if you don’t have a mash tun with heating then ensure after you have finished mixing the grains in to insulate your mash tun (thick neoprene or heavy blankets both work well)
Step 3 (optional) – Sparging
- if your setup has the capability to sparge then do so with 34L (9 gal) sparge water at 78°C (172°F)
- if you are not sparging and using a BIAB (brew in a bag) method then remove grains from mash tun and twist and squeeze the bag to get as much liquid out of the grains as possible
- as you start sparging (or straining your BIAB bag) begin raising the temperature of your wort to a boil
Step 4 – Boiling
- once your wort begins to boil start a timer for a 60-minute boil and add your bittering hops, 10g (0.35 oz) of Pride of Ringwood
- at 15 minutes left in the boil add 2.5 whirlfloc tablets
- With 3 minutes left in the boil add your flavour and aroma hops, Pride of Ringwood 60g (2.1 oz), Galaxy 50g (1.76 oz), Topaz 70g (2.47 oz)
Step 5 – Cooling
- After 1 hour of boiling start cooling wort down to yeast pitching temperature
- once you’ve reached yeast pitching temperature take an original gravity reading of your wort
Step 6 – Yeast Pitching
- It is best to make a yeast starter before beginning your brew day (ideally 1 day before) to ensure your yeast are as active and healthy as possible before pitching, but not completely necessary – you could also just rehydrate yeast 30 minutes before pitching.
- Pitch yeast in wort a degree or two higher than the target fermentation temperature to help yeast take off more aggressively
- To make a yeast starter you can use either:
- DME (dry malt extract) at a ratio of approx. 100g per 1L water (3.5 oz per 33 fluid ounces) for gravity of approx. 1.040
- some unfermented wort kept cold and sanitary from a previous brew day
- 70g of table sugar per 1L water (2.5 oz per 33 fluid ounces) – however, it is best to use malt sugar (wort / DME) whenever possible to reduce the chance of shocking the yeast with a different food source from starter to wort pitching
- To rehydrate yeast
- Add yeast to approx. 10 times as much room temperature water as the weight of the yeast e.g. 10g yeast in 100 ml water (0.35 oz yeast in 3.5 fluid ounces water)
Step 7 – Fermentation & Dry Hopping
- Allow yeast to ferment over the next week to two weeks
- If you have a temperature controlled system keep the fermenter temperature to the recommended fermentation temperature for each yeast strain (stated in the yeast ingredients section above)
- Monitor the fermentation activity over the first 7 days by the bubbling of the blow off tube / airlock of your fermenter, as the bubbling slows down (roughly around day 7) take a gravity reading. When the gravity reaches around 1.01 raise the temperature of your fermenter by 1-2 degrees for 2 days for a diacetyl rest (if you don’t have temperature control don’t worry about this step, its not the end of the world!)
- When you start your diacetyl rest also add your dry hops, 50g - 1.76 oz each of Lupomax Citra, Azacca & El Dorado
- Its important to note that fermentation times will vary based on your circumstances like, temperature, amount of yeast pitched, healthiness of yeast, gravity of wort, pH etc. so don’t stress be patient and know that these times are just a rough guide
- Once the gravity is the same 2 days in a row move onto cold crashing! (If you can’t / don’t want to cold crash go straight to kegging/bottling your beer!)
Step 8 (optional) – Cold crashing
- begin cold crashing your fermenter (bring the temperature of your fermenter down to as close to 0°C (32°F) as possible, for 2 days to a week depending on how patient you are
- If you don’t have a temp-controlled fermenter, you can cold crash by putting your fermenter in a fridge or temp-controlled chest freezer
- After you have finished cold crashing it's time to keg/bottle your beer! If you are bottling your beer from the fermenter uncarbonated remember to add about 5-7 grams (0.17 - 0.24 oz) of priming sugar to your bottles to carbonate your beer.
.jpg)
So... What is it?
The American Cream Ale is a light, crisp, smooth and easy-drinking, highly carbonated beer, similar to a lighter lager but with a touch more character! It balances mild malt sweetness with a subtle hop presence and has a pale golden to straw color with good clarity and a white, frothy head. It’s brewed using a mix of pale malt and adjuncts like corn or rice, and often fermented with a co pitch of both ale and lager yeast to enhance the smooth clean finish!
What's ours like?
Coming in at an easy drinking 4.6% & 14 IBU's, its crisp with a slightly sweet with a corn like flavour, and incredibly easy to drink! The hop character is sublte and slightly fruity with a citrus finish, and the body is light but not boring! This is an awesome summer beer that will become one of our go-to's for easy afternoon drinking in the setting sun!
Batch Size & Stats
- 42L (2x 19L & 1 half 9L corny kegs) / 11 gal finished beer
- 46L (13.5 gal) wort
- For a smaller 19L (5 gal) batch size simply half the ingredients of this recipe
- Starting gravity – 1.041
- Final gravity 1.006
- ABV – 4.6%
- IBU - 14
- Colour - 4.5 EBC
- Mash Efficiency - 83%
What ingredients?
Water
With sparging
- 30L (7.9 gal) for a 64°C (147°F) mash (you can use our strike water calculator to find your ideal strike temp)
- 30L (7.9 gal) sparge water at 78°C (172°F) - fermenter topped up with 4L (1 gal) post boil to reduce OG
Without sparging
- 55L (14.5 gal) for a 64°C (147°F) mash (you can use our strike water calculator to find your ideal strike temp)
Malts:
- Pilsner Malt – 2.2 kg (4.8 lb) - 31.7%
- Ale Malt – 2.2 kg (4.8 lb) - 31.7%
- Flaked Corn (Maize) – 3.4 kg (4.8 lb) - 31.7%
- Corn Sugar (Dextrose) - 1kg (2.2 lb) - 14.4%
Hops & whirlfloc tablets
Cascade
- 25g (0.88 oz) 12 IBU's – 60 mins
- 75g (2.6 oz) - Whirlpool at 80°C (176°F) for 20 mins
Huell Melon
- 25g (0.88 oz) 2 IBU's – 5 mins
- 50g (1.76 oz) - Whirlpool at 80°C (176°F) for 20 mins
Whirlfloc tablets
- 1.5g (0.052 oz) / 2 tablets – 15 minutes left in the boil
Yeast options & fermentation temperatures
- 1 packet (10.5g) fermentis US-05 American Ale yeast - ferment at 18°C (64.4°F)
AND one lager yeast such as the below
- 1 packet (10.5g) Lallemand Novalager yeast - ferment at 18°C (64.4°F)
- 1 packet (10.5g) Saflager S-23 – ferment at 14°C (57°F)
- 1 packet (10.5g) Saflager W-34/70 – ferment at 14°C (57°F)
Water Profile
- Ca2+28
- Mg2+ 5
- Na+ 15
- Cl- 31
- SO42- 45
- HCO3- 57
Step by step process
Step 1 – Milling
- Mill grains to medium crush (set mill rollers to a gap of approx. 1.00mm / 0.039 inches)
- Just keep in mind roller gap settings are not universal so as you brew more batches you will find the ideal crush size for your setup
- Alternatively if you don’t have a grain mill you can order your grains crushed from most homebrew stores, both online and in person
Step 2 – Mashing
- Mash for 60 minutes at 64°C (147°F)
- Set your strike water to a few degrees above the target mash temperature, you can use our calculator to determine what your strike temperature should be
- ensure you mix in the grains thoroughly with a mash paddle to prevent dough balls from forming (big spoons, spatulas or whisks will also work)
- its easier to mash the grains and prevent dough balls if you add a little grain at a time, mix, add more grain and repeat until all the grains are mixed
- if you don’t have a mash tun with heating then ensure after you have finished mixing the grains in to insulate your mash tun (thick neoprene or heavy blankets both work well)
Step 3 (optional) – Sparging
- if your setup has the capability to sparge then do so with 30L (7.9 gal) sparge water at 78°C (172°F)
- if you are not sparging and using a BIAB (brew in a bag) method then remove grains from mash tun and twist and squeeze the bag to get as much liquid out of the grains as possible
- as you start sparging (or straining your BIAB bag) begin raising the temperature of your wort to a boil
Step 4 – Boiling
- Once your wort begins to boil start a timer for a 60-minute boil and add your bittering hops, 25g (0.88 oz) of Cascade
- At 15 minutes left in the boil add 2 whirlfloc tablets
- With 5 minutes left in the boil add your first set of flavour and aroma hops, 25g (0.88 oz) of Huell Melon
Step 5 – Cooling & Whirlpool Hops
- After 1 hour of boiling start cooling wort down to 80°C (176°F) for a 20 minute whirlpool, then add 50g (1.76 oz) of Huell Melon & 75g (2.6 oz) of Cascade
- After 20 mins of whirlpooling cool the wort down to yeast pitching temp and take an original gravity reading of your wort
Step 6 – Yeast Pitching
- It is best to make a yeast starter before beginning your brew day (ideally 1 day before) to ensure your yeast are as active and healthy as possible before pitching, but not completely necessary – you could also just rehydrate yeast 30 minutes before pitching.
- Pitch yeast in wort a degree or two higher than the target fermentation temperature to help yeast take off more aggressively
- To make a yeast starter you can use either:
- DME (dry malt extract) at a ratio of approx. 100g per 1L water (3.5 oz per 33 fluid ounces) for gravity of approx. 1.040
- some unfermented wort kept cold and sanitary from a previous brew day
- 70g of table sugar per 1L water (2.5 oz per 33 fluid ounces) – however, it is best to use malt sugar (wort / DME) whenever possible to reduce the chance of shocking the yeast with a different food source from starter to wort pitching
- To rehydrate yeast
- Add yeast to approx. 10 times as much room temperature water as the weight of the yeast e.g. 10g yeast in 100 ml water (0.35 oz yeast in 3.5 fluid ounces water)
Step 7 – Fermentation
- Allow yeast to ferment over the next week to two weeks
- If you have a temperature controlled system keep the fermenter temperature to the recommended fermentation temperature for each yeast strain (stated in the yeast ingredients section above)
- Monitor the fermentation activity over the first 7 days by the bubbling of the blow off tube / airlock of your fermenter, as the bubbling slows down (roughly around day 7) take a gravity reading. When the gravity reaches around 1.01 raise the temperature of your fermenter by 1-2 degrees for 2-4 days for a diacetyl rest (if you don’t have temperature control don’t worry about this step, its not the end of the world!)
- Its important to note that fermentation times will vary based on your circumstances like, temperature, amount of yeast pitched, healthiness of yeast, gravity of wort, pH etc. so don’t stress be patient and know that these times are just a rough guide
- Once the gravity is the same 2 days in a row move onto cold crashing! (If you can’t / don’t want to cold crash go straight to kegging/bottling your beer!)
Step 8 (optional) – Cold crashing
- begin cold crashing your fermenter (bring the temperature of your fermenter down to as close to 0°C (32°F) as possible, for 2 days to a week depending on how patient you are
- If you don’t have a temp-controlled fermenter, you can cold crash by putting your fermenter in a fridge or temp-controlled chest freezer
- After you have finished cold crashing it's time to keg/bottle your beer! If you are bottling your beer from the fermenter uncarbonated remember to add about 5-7 grams (0.17 - 0.24 oz) of priming sugar to your bottles to carbonate your beer.
.jpg)
So... What is it?
We love beer! But sometimes you need a beer that wont blow your socks off with booze! so here we made an easy drinking, full flavoured pale ale... but made is sessionable! Imagine a hoppy Australian pale ale, with all the soft maltiness and hoppy punch you know and love, but only 3.3% alcohol! Thats exactly what this is, so you can enjoy it all night long, having a good time with your mates, but still be able to function the next day!
Batch Size & Stats
- 19L / 5 gal finished beer
- 21L (5.5 gal) wort
- Starting gravity – 1.031
- Final gravity 1.006
- ABV – 3.3%
- Brewhouse Efficiency 74%
- EBC - 13.6
- IBU - 19
What ingredients?
Water
With sparging
- 14L (3.7 gal) strike water approx. 67°C (152.6°F) for 60 mins, then mash out at 77°C (170°F) for 15 mins
- 14L (3.7 gal) sparge water at 78°C (172°F)
Without sparging
- 24L (6.3 gal) strike water approx. 64°C (152.6°F) for 60 mins, then mash out at 77°C (170°F) for 15 mins
Malts
Total Grain Bill 5kg (11 4lb)
- 2.54 kg / 5.6 lb (90.7%) — Pilsner Malt
- 140 g / 4.9 oz (5%) — Gladiator Malt / Dextrin Malt
- 120 g / 4.23 oz (4.3%) — Medium Crystal Malt
Hops & whirlfloc tablets
Northern Brewer (8.5% Alpha Acid)
- 5g (0.17 oz) 6 IBU - 60 mins
Huell Melon (7.2% Alpha Acid)
- 30g (1 oz) 3 IBU - 2 mins
Lupomax Citra (18.5% Alpha Acid)
- 30g (1 oz) 6 IBU - 2 mins
Mosaic (12.25% Alpha Acid)
- 30g (1 oz) 4 IBU - 2 mins
Whirlfloc
- 0.75g (0.026 oz) / 1 tablets – 15 minutes left in the boil
Water Profile
- Ca2+87
- Mg2+ 5
- Na+ 15
- Cl- 72
- SO42- 131
- HCO3- 57
Yeast options & fermentation temperatures
- US-05 – ferment at 20°C (68°F) 11g (0.38 oz) / (1 packet)
- AUS-05 – ferment at 20°C (68°F) 11g (0.38 oz) / (1 packet)
- S-04 – ferment at 18°C (64.4°F) 11g (0.38 oz) / (1 packet)
Step by step process
Step 1 – Milling
- Mill grains to medium crush (set mill rollers to a gap of approx. 1.00mm / 0.039 inches (credit card width)
- Just keep in mind roller gap settings are not universal so as you brew more batches you will find the ideal crush size for your setup
- Alternatively if you don’t have a grain mill you can order your grains crushed from most homebrew stores, both online and in person
Step 2 – Mashing
Mash at 67°C (152.6°F) for 60 mins, then mash out at 77°C (170°F) for 15 mins
- Set your strike water to a few degrees above the target mash temperature (you can use the calculator in our website for this)
- ensure you mix in the grains thoroughly with a mash paddle to prevent dough balls from forming (big spoons, spatulas or whisks will also work)
- its easier to mash the grains and prevent dough balls if you add a little grain at a time, mix, add more grain and repeat until all the grains are mixed
if you don’t have a mash tun with heating then ensure after you have finished mixing the grains in to insulate your mash tun (thick neoprene or heavy blankets both work well)
Step 3 (optional) – Sparging
- if your setup has the capability to sparge then do so with 14L (3.7 gal) sparge water at 78°C (172°F)
- if you are not sparging and using a BIAB (brew in a bag) method then remove grains from mash tun and twist and squeeze the bag to get as much liquid out of the grains as possible
- as you start sparging (or straining your BIAB bag) begin raising the temperature of your wort to a boil
Step 4 – Boiling
- once your wort begins to boil start a timer for a 60-minute boil and add your bittering hops, 5g (0.17 oz) of Northern Brewer
- at 15 minutes left in the boil add 1 whirlfloc tablet (OR granulated whirlfloc 0.7g (0.025 oz)) and at 2 mins left add 30g (1 oz) each of Huel Melon, Lupomax Citra and Mosaic
Step 5 – Whirlpooling / cooling
- After 60 mins of boiling turn off your heat source and start cooling wort down
- Once you’ve reached yeast pitching temperature take an original gravity reading of your wort
Step 6 – Yeast Pitching
- It is best to make a yeast starter before beginning your brew day (ideally 1 day before) to ensure your yeast are as active and healthy as possible before pitching, but not completely necessary – you could also just rehydrate yeast 30 minutes before pitching.
- Wort Aeration (Optional) if you have a paint mixer give your wort a quick blitz before pitching yeast to help add more dissolved oxygen into the wort to help the yeast have a healthier kick start into fermentation
- Now add your tincture of Vanilla extract! (or you can wait till end of fermentation if you prefer)
- Pitch yeast in wort a degree or two higher than the target fermentation temperature to help yeast take off more aggressively
- To make a yeast starter you can use either:
- DME (dry malt extract) at a ratio of approx. 100g per 1L water (3.5 oz per 33 fluid ounces) for gravity of approx. 1.040
- some unfermented wort kept cold and sanitary from a previous brew day
- 70g of table sugar per 1L water (2.5 oz per 33 fluid ounces) – however, it is best to use malt sugar (wort / DME) whenever possible to reduce the chance of shocking the yeast with a different food source from starter to wort pitching
- To rehydrate yeast
- Add yeast to approx. 10 times as much room temperature water as the weight of the yeast e.g. 10g yeast in 100 ml water (0.35 oz yeast in 3.5 fluid ounces water)
Step 7 – Fermentation
- Allow yeast to ferment over the next week to two weeks (aprox)
- If you have a temperature-controlled system keep the fermenter temperature to the recommended fermentation temperature for each yeast strain (stated in the yeast ingredients section above)
- It's important to note that fermentation times will vary based on your circumstances like temperature, amount of yeast pitched, the healthiness of yeast, the gravity of the wort, pH, etc. so don’t stress be patient and know that these times are just a rough guide
- If you have temp control then when there are 2 days left of fermentation raise the temperature by 2 degrees for a diacetyl rest (once gravity reaches roughly 1.08) & if gravity is the same 3 days in a row move onto cold crashing and adding gelatin! (Dont worry cold crashing & gelatin are both optional steps to help clarify your beer)
Step 8 (optional) – Cold crashing & Gelatin
- begin cold crashing your fermenter (bring the temperature of your fermenter down to as close to 0°C (32°F) as possible, for 2 days to a week depending on how patient you are, and add 1-2 teaspoons of gelatin dissolved in boiling water and allowed to cool a bit to your fermenter
- If you don’t have a temp-controlled fermenter, you can cold crash by putting your fermenter in a fridge or temp-controlled chest freezer
- After you have finished cold crashing it's time to keg/bottle your beer! If you are bottling your beer from the fermenter uncarbonated, remember to add about 5-7 grams (0.17 - 0.24 oz) of priming sugar to your bottles to carbonate your beer.
.png)
So... What is it?
This is an ancient style (or as close as we can get) of Norwegian farmhouse ale, so the focus is all about amazing kveik yeast expression, pine tree resinous flavours and beautiful malty mouthfeel and character! To make this beer we ran a 4 hour boil, we cut down and made a pine tree luge and we ran an open fermentation! So this was a lot of firsts for us, but boy this beer does not dissapoint! Its packed full of sweet and complex malt character, almost like a decoction mash Marzen, but bursting with tropical fruits like mango, orange citrus and guava from the Kveik yeast, and underneath it all there's hints of the forest from the pine tree infusion. This is truely on of my favourite brews ever, and it was made with the symbol of Christmas!
Batch Size & ABV
- 38L (2 19L corny kegs) / 10 gal finished beer
- 48L (12.7 gal) wort
- For a smaller 19L (5 gal) batch size simply half the ingredients of this recipe
- Starting gravity – 1.077
- Final gravity 1.01
- ABV – 8.8%
- IBU - 34
- Mash Efficiency - 81%
Ingredients
Water
- With sparging
- 50L (13.2 gal) strike water approx. for a 60 min mash at 67°C (152.6°F) with a 10 min mash out step at the end at 77°C (170°F)
- 30L (7.9 gal) sparge water at 78°C (172°F)
- Without sparging
- 70L (18.5 gal) strike water approx. for a 60 min mash at 67°C (152.6°F) with a 10 min mash out step at the end at 77°C (170°F)
Malts: 14kg (30.9 lb)
- 14 kg - 30.9 lb (63%) — Pilsner Malt
Hops & whirlfloc tablets
70 g - 2.5 oz (4 IBU) — East Kent Goldings 5% — Mash
58 g - 2 oz (14 IBU) — East Kent Goldings 5% — 60 Min Boil
70 g - 2.5 oz (6 IBU) — East Kent Goldings 5% — 10 Min Boil
70 g - 2.5 oz (6 IBU) — Fuggles 4.5% — 10 Min Boil
Adjuncts
250 g (8.8 oz)— Pine Shoots - Mash
250 g (14.1 oz) — Pine Shoots - Boil 10 min
1 Pine tree Luge - Mash
Yeast options & fermentation temperatures
- 33 g — Lallemand (LalBrew) Voss Kveik - 34 °C (93 °F)
Water Profile
Ca2+ 61
Mg2+ 9
Na+ 20
Cl- 50
SO42- 44
HCO3- 155
Step by step process
Step 1 – Milling
- Mill grains to medium crush (set mill rollers to a gap of approx. 1mm / 0.039 inches) (BUT DONT crush the rice hulls or oats, add them into your grain separately after crushing them)
- Just keep in mind roller gap settings are not universal so as you brew more batches you will find the ideal crush size for your setup
- Alternatively if you don’t have a grain mill you can order your grains crushed from most homebrew stores, both online and in person
Step 1.1 – Cut your Tree!
- Using a saw cut down a pine tree of your choice and slice off the branches of the tree from the trunk
- Then cut a channel through the centre of the trunk to make a luge to flow the hot wort through during the mashing step
- seperate your pine needles (shoots) to be used for both mashing and boiling
Step 2 – Mashing
- Add your brewing salts and mix to ensure they are fully dissolved prior to mashing in grains
- Mash for 60 minutes at 67°C (152.6°F)
- ensure you mix in the grains thoroughly with a mash paddle to prevent dough balls from forming (big spoons, spatulas or whisks will also work)
- its easier to mash the grains and prevent dough balls if you add a little grain at a time, mix, add more grain and repeat until all the grains are mixed
- now add your mash hops!! This is going to free a bunch of bound thiols from your hops and make this beer even more juicy! I would recommend adding these in a hop bag to make sure you can remove all the hop particles before you start boiling so you don't get extra unaccounted bitterness
- Now begin recirculating your wort through your pine tree luge and add your mash pine needles!
- if you don’t have a mash tun with heating then ensure after you have finished mixing the grains in to insulate your mash tun (thick neoprene or heavy blankets both work well)
- after 60 minutes of mashing raise temperature to 77°C (170°F) for 10 minutes to Mash out
Step 3 (optional) – Sparging
- if your setup has the capability to sparge then do so with 30L (7.9 gal) of sparge water at 78 °C (172°F)
- if you are not sparging and using a BIAB (brew in a bag) method then remove grains from mash tun and twist and squeeze the bag to get as much liquid out of the grains as possible
- as you start sparging (or straining your BIAB bag) begin raising the temperature of your wort to a boil
Step 4 – Boiling
- once your wort begins to boil start a timer for a 4 hours!! we want a nice long boil to raise our original gravity and create complex Maillard reactions to produce melanoidins in our beer and help change the colour!
- After 3 hours of boiling add your 60 minute boil addition of hops, 58 g - 2 oz of East Kent Goldings
- With 10 minutes of boiling left add your final flavour & aroma hops, 70 g - 2.5 oz each of East Kent Goldings & Fuggles as well as your boil addition of pine needles, 400g / 14.1 oz
Step 5 – Cooling & Transferring
- After the full 4 hours of boil, begin cooling the wort down to yeast pitching temperature, around 34 °C (93 °F)
- once you’ve reached yeast pitching temperature take an original gravity reading of your wort
Step 6 – Yeast Pitching
- It is best to make a yeast starter before beginning your brew day (ideally 1 day before) to ensure your yeast are as active and healthy as possible before pitching, but not completely necessary – you could also just rehydrate yeast 30 minutes before pitching.
- Pitch yeast in wort a degree or two higher than the target fermentation temperature to help yeast take off more aggressively
- To make a yeast starter you can use either:
- DME (dry malt extract) at a ratio of approx. 100g per 1L water (3.5 oz per 33 fluid ounces) for gravity of approx. 1.040
- some unfermented wort kept cold and sanitary from a previous brew day
- 70g of table sugar per 1L water (2.5 oz per 33 fluid ounces) – however, it is best to use malt sugar (wort / DME) whenever possible to reduce the chance of shocking the yeast with a different food source from starter to wort pitching
- To rehydrate yeast
- Add yeast to approx. 10 times as much room temperature water as the weight of the yeast e.g. 10g yeast in 100 ml water (0.35 oz yeast in 3.5 fluid ounces water)
Step 7 – Fermentation
- Allow yeast to ferment over the next 5 days to two weeks
- If you have a temperature-controlled system keep the fermenter temperature to the recommended fermentation temperature for each yeast strain (stated in the yeast ingredients section above)
- Monitor the fermentation activity over the first 7 days by the bubbling of the blow-off tube/airlock of your fermenter, as the bubbling slows down (roughly around day 7) take a gravity reading. When the gravity is the same 2-3 days in a row fermentation is finished
Step 8 (optional) – Cold crashing
- begin cold crashing your fermenter (bring the temperature of your fermenter down to as close to 0°C (32°F) as possible, for 2 days to a week depending on how patient you are
- If you don’t have a temp-controlled fermenter, you can cold crash by putting your fermenter in a fridge or temp-controlled chest freezer
- After you have finished cold crashing it's time to keg/bottle your beer! If you are bottling your beer from the fermenter uncarbonated remember to add about 5-7 grams (0.17 - 0.24 oz) of priming sugar to your bottles to carbonate your beer.
.png)
So... What is it?
Blonde ale is a refreshing, easy-drinking beer that's all about balance! Light in body and golden in color, it’s the kind of beer that invites you to take a sip and savor its subtle flavors, such as hints of honey, biscuit and light hoppiness. Born in the U.S. in the 1980s as a lighter, more approachable alternative to hop-heavy brews, it was designed to be a crowd-pleaser for both seasoned beer drinkers and newcomers alike!
What's ours like?
Coming in at 5.1% its sessionable & delicious so you can enjoy this beautiful blond all night long! ;) Brewed with moderation and balance in mind, it showcases a light malt profile with a subtle biscuit character and honey like sweetness, followed by gentle bitterness and a subtle herbal and floral hop finish leaving you wanting another sip!
Batch Size & Stats
- 19L / 5 gal finished beer
- 22L (6.8 gal) wort
- Starting gravity – 1.048
- Final gravity 1.009
- ABV – 5.1%
- Brewhouse Efficiency 80%
- EBC - 8.5
- IBU - 18
What ingredients?
Water
With sparging
- 20L (5.3 gal) strike water approx. 64°C (147°F) for 30 mins then 70°C (158°F) for 30 mins, then mash out at 77°C (170°F) for 15 mins
- 15.2L (4 gal) sparge water at 78°C (172°F)
Without sparging
- 30L (7.9 gal) strike water approx. 64°C (147°F) for 30 mins then 70°C (158°F) for 30 mins, then mash out at 77°C (170°F) for 15 mins
Malts
Total Grain Bill 5kg (11 4lb)
- 4.059 kg / 8.9 lb (84.5%) — Pilsner Malt
- 472 g / 1lb (9.8%) — Wheat Malt
- 150 g / 5.3 oz (3.1%) — Gladiator Malt / Dextrin Malt
- 125 g / 4.4 oz (2.6%) — Medium Crystal Malt
Hops & whirlfloc tablets
Hallertauer Mittelfrueh (3% Alpha Acid)
- 28g (1 oz) 9 IBU - 60 mins
- 56g (2 oz) 9 IBU - 15 mins
Whirlfloc
- 0.75g (0.026 oz) / 1 tablets – 15 minutes left in the boil
Water Profile
- Ca2+24
- Mg2+ 5
- Na+ 15
- Cl- 31
- SO42- 36
- HCO3- 57
Yeast options & fermentation temperatures
- US-05 – ferment at 20°C (68°F) 11g (0.38 oz) / (1 packet)
- AUS-05 – ferment at 20°C (68°F) 11g (0.38 oz) / (1 packet)
- S-04 – ferment at 18°C (64.4°F) 11g (0.38 oz) / (1 packet)
Step by step process
Step 1 – Milling
- Mill grains to medium crush (set mill rollers to a gap of approx. 1.00mm / 0.039 inches (credit card width)
- Just keep in mind roller gap settings are not universal so as you brew more batches you will find the ideal crush size for your setup
- Alternatively if you don’t have a grain mill you can order your grains crushed from most homebrew stores, both online and in person
Step 2 – Mashing
Mash at 64°C (147°F) for 30 mins then 70°C (158°F) for 30 mins, then mash out at 77°C (170°F) for 15 mins
- Set your strike water to a few degrees above the target mash temperature (you can use the calculator in our website for this)
- ensure you mix in the grains thoroughly with a mash paddle to prevent dough balls from forming (big spoons, spatulas or whisks will also work)
- its easier to mash the grains and prevent dough balls if you add a little grain at a time, mix, add more grain and repeat until all the grains are mixed
if you don’t have a mash tun with heating then ensure after you have finished mixing the grains in to insulate your mash tun (thick neoprene or heavy blankets both work well)
Step 3 (optional) – Sparging
- if your setup has the capability to sparge then do so with 15L (4 gal) sparge water at 78°C (172°F)
- if you are not sparging and using a BIAB (brew in a bag) method then remove grains from mash tun and twist and squeeze the bag to get as much liquid out of the grains as possible
- as you start sparging (or straining your BIAB bag) begin raising the temperature of your wort to a boil
Step 4 – Boiling
- once your wort begins to boil start a timer for a 60-minute boil and add your bittering hops, 28g (1 oz) of Hallertauer Mittelfrueh
- at 15 minutes left in the boil add 1 whirlfloc tablet (OR granulated whirlfloc 0.7g (0.025 oz)) and 56g (2 oz) of Hallertauer Mittelfrueh
Step 5 – Whirlpooling / cooling
- After 60 mins of boiling turn off your heat source and start cooling wort down
- Once you’ve reached yeast pitching temperature take an original gravity reading of your wort
Step 6 – Yeast Pitching
- It is best to make a yeast starter before beginning your brew day (ideally 1 day before) to ensure your yeast are as active and healthy as possible before pitching, but not completely necessary – you could also just rehydrate yeast 30 minutes before pitching.
- Wort Aeration (Optional) if you have a paint mixer give your wort a quick blitz before pitching yeast to help add more dissolved oxygen into the wort to help the yeast have a healthier kick start into fermentation
- Now add your tincture of Vanilla extract! (or you can wait till end of fermentation if you prefer)
- Pitch yeast in wort a degree or two higher than the target fermentation temperature to help yeast take off more aggressively
- To make a yeast starter you can use either:
- DME (dry malt extract) at a ratio of approx. 100g per 1L water (3.5 oz per 33 fluid ounces) for gravity of approx. 1.040
- some unfermented wort kept cold and sanitary from a previous brew day
- 70g of table sugar per 1L water (2.5 oz per 33 fluid ounces) – however, it is best to use malt sugar (wort / DME) whenever possible to reduce the chance of shocking the yeast with a different food source from starter to wort pitching
- To rehydrate yeast
- Add yeast to approx. 10 times as much room temperature water as the weight of the yeast e.g. 10g yeast in 100 ml water (0.35 oz yeast in 3.5 fluid ounces water)
Step 7 – Fermentation
- Allow yeast to ferment over the next two weeks (aprox)
- If you have a temperature-controlled system keep the fermenter temperature to the recommended fermentation temperature for each yeast strain (stated in the yeast ingredients section above)
- It's important to note that fermentation times will vary based on your circumstances like temperature, amount of yeast pitched, the healthiness of yeast, the gravity of the wort, pH, etc. so don’t stress be patient and know that these times are just a rough guide
- If you have temp control then when there are 2 days left of fermentation raise the temperature by 2 degrees for a diacetyl rest (once gravity reaches roughly 1.01) & gravity is the same 3 days in a row move onto cold crashing and adding gelatin! (Dont worry cold crashing & gelatin are both optional steps to help clarify your beer)
Step 8 (optional) – Cold crashing & Gelatin
- begin cold crashing your fermenter (bring the temperature of your fermenter down to as close to 0°C (32°F) as possible, for 2 days to a week depending on how patient you are, and add 1-2 teaspoons of gelatin dissolved in boiling water and allowed to cool a bit to your fermenter
- If you don’t have a temp-controlled fermenter, you can cold crash by putting your fermenter in a fridge or temp-controlled chest freezer
- After you have finished cold crashing it's time to keg/bottle your beer! If you are bottling your beer from the fermenter uncarbonated, remember to add about 5-7 grams (0.17 - 0.24 oz) of priming sugar to your bottles to carbonate your beer.

So... What is it?
The Australian Pale Ale is a vibrant beer that captures the essence of the Land Down Under. Its flavor combines tropical fruit and citrus with a balanced hop bitterness and malt sweetness. The aroma offers hints of mango, passionfruit, and grapefruit, alongside a subtle caramel undertone. This style has its roots in Australia's brewing history and represents our nations diverse hop varieties, love for beer and adventurous spirit!
What's ours like?
Ours is bang on the money with the twist of combing some classic old school Aussie hops with new world varieties! Coming in at a sessionable 4.8% it has a very crisp and light body up front, and is an easy drinking thirst quencher for the hot Australian summer! Ultimately... this one is a beer flavoured beer! its clean, refreshing, and has a light citrus and floral character, and a short sharp finish. If you want an easy drinking easy to brew beer, this is your go to!
Batch Size & Stats
- 38L (2 19L corny kegs) / 10 gal finished beer
- 46L (13.2 gal) wort
- For a smaller 19L (5 gal) batch size simply half the ingredients of this recipe
- Starting gravity – 1.043
- Final gravity 1.007
- ABV – 4.8%
- IBU - 24
- Colour - 16.7 EBC
- Mash Efficiency - 86%
Brewfather link
https://share.brewfather.app/TopKZRwK7tdMXO
What ingredients?
Water
With sparging
- 30L (7.9 gal) for a 65°C (149°F) mash (you can use our strike water calculator to find your ideal strike temp)
- 30L (9.2 gal) sparge water at 78°C (172°F) - fermenter topped up with 4L (1 gal) post boil to reduce OG
Without sparging
- 60L (7.9 gal) for a 65°C (149°F) mash (you can use our strike water calculator to find your ideal strike temp)
Malts:
- Pale ale malt – 7.62 kg (16.8 lb) - 95.5%
- Medium Crystal Malt – 360g (0.79 lb) - 4.5%
Hops & whirlfloc tablets
Pride of Ringwood
- 10g (0.35 oz) - 60 minutes left in the boil
- 60g (2.1 oz) – 3 minutes left in the boil
Galaxy
- 50g (1.76 oz) – 3 minutes left in the boil
Topaz
- 70g (2.47 oz) – 3 minutes left in the boil
Whirlfloc tablets
- 1.5g (0.052 oz) / 2 tablets – 15 minutes left in the boil
Yeast options & fermentation temperatures
- 23g (0.8 oz) Aus-05– ferment at 20°C
- 23g (0.8 oz) US-05 – ferment at 20°C
- 23g (0.8 oz) S-04 – ferment at 19°C
Water Profile
- Ca2+58
- Mg2+ 5
- Na+ 15
- Cl- 56
- SO42- 82
- HCO3- 57
Step by step process
Step 1 – Milling
- Mill grains to medium crush (set mill rollers to a gap of approx. 1.00mm / 0.039 inches)
- Just keep in mind roller gap settings are not universal so as you brew more batches you will find the ideal crush size for your setup
- Alternatively if you don’t have a grain mill you can order your grains crushed from most homebrew stores, both online and in person
Step 2 – Mashing
- Mash for 60 minutes at 65°C (149°F)
- Set your strike water to a few degrees above the target mash temperature, you can use our calculator to determine what your strike temperature should be
- ensure you mix in the grains thoroughly with a mash paddle to prevent dough balls from forming (big spoons, spatulas or whisks will also work)
- its easier to mash the grains and prevent dough balls if you add a little grain at a time, mix, add more grain and repeat until all the grains are mixed
- if you don’t have a mash tun with heating then ensure after you have finished mixing the grains in to insulate your mash tun (thick neoprene or heavy blankets both work well)
Step 3 (optional) – Sparging
- if your setup has the capability to sparge then do so with 34L (9 gal) sparge water at 78°C (172°F)
- if you are not sparging and using a BIAB (brew in a bag) method then remove grains from mash tun and twist and squeeze the bag to get as much liquid out of the grains as possible
- as you start sparging (or straining your BIAB bag) begin raising the temperature of your wort to a boil
Step 4 – Boiling
- once your wort begins to boil start a timer for a 60-minute boil and add your bittering hops, 10g (0.35 oz) of Pride of Ringwood
- at 15 minutes left in the boil add 2.5 whirlfloc tablets
- With 3 minutes left in the boil add your flavour and aroma hops, Pride of Ringwood 60g (2.1 oz), Galaxy 50g (1.76 oz), Topaz 70g (2.47 oz)
Step 5 – Cooling
- After 1 hour of boiling start cooling wort down to yeast pitching temperature
- once you’ve reached yeast pitching temperature take an original gravity reading of your wort
Step 6 – Yeast Pitching
- It is best to make a yeast starter before beginning your brew day (ideally 1 day before) to ensure your yeast are as active and healthy as possible before pitching, but not completely necessary – you could also just rehydrate yeast 30 minutes before pitching.
- Pitch yeast in wort a degree or two higher than the target fermentation temperature to help yeast take off more aggressively
- To make a yeast starter you can use either:
- DME (dry malt extract) at a ratio of approx. 100g per 1L water (3.5 oz per 33 fluid ounces) for gravity of approx. 1.040
- some unfermented wort kept cold and sanitary from a previous brew day
- 70g of table sugar per 1L water (2.5 oz per 33 fluid ounces) – however, it is best to use malt sugar (wort / DME) whenever possible to reduce the chance of shocking the yeast with a different food source from starter to wort pitching
- To rehydrate yeast
- Add yeast to approx. 10 times as much room temperature water as the weight of the yeast e.g. 10g yeast in 100 ml water (0.35 oz yeast in 3.5 fluid ounces water)
Step 7 – Fermentation
- Allow yeast to ferment over the next week to two weeks
- If you have a temperature controlled system keep the fermenter temperature to the recommended fermentation temperature for each yeast strain (stated in the yeast ingredients section above)
- Monitor the fermentation activity over the first 7 days by the bubbling of the blow off tube / airlock of your fermenter, as the bubbling slows down (roughly around day 7) take a gravity reading. When the gravity reaches around 1.01 raise the temperature of your fermenter by 1-2 degrees for 2 days for a diacetyl rest (if you don’t have temperature control don’t worry about this step, its not the end of the world!)
- Its important to note that fermentation times will vary based on your circumstances like, temperature, amount of yeast pitched, healthiness of yeast, gravity of wort, pH etc. so don’t stress be patient and know that these times are just a rough guide
- Once the gravity is the same 2 days in a row move onto cold crashing! (If you can’t / don’t want to cold crash go straight to kegging/bottling your beer!)
Step 8 (optional) – Cold crashing
- begin cold crashing your fermenter (bring the temperature of your fermenter down to as close to 0°C (32°F) as possible, for 2 days to a week depending on how patient you are
- If you don’t have a temp-controlled fermenter, you can cold crash by putting your fermenter in a fridge or temp-controlled chest freezer
- After you have finished cold crashing it's time to keg/bottle your beer! If you are bottling your beer from the fermenter uncarbonated remember to add about 5-7 grams (0.17 - 0.24 oz) of priming sugar to your bottles to carbonate your beer.

So... What is it?
A fruited beer is brewed with added fruits during the brewing process, giving it unique flavors, aromas, and sometimes colors. It can include various fruits like berries, citrus, or tropical fruits, resulting in a range of tastes from tart to sweet. Fruit beers come in different styles and are a refreshing alternative to traditional beers, especially in warm weather or as a dessert-like treat. The brewing process can vary, with some using fresh fruits and others relying on concentrates, purees, or extracts to achieve desired flavors.
What's our like?
Here is our Fruited beer! Coming in at 5.8% the Pina Colada Pale Ale is a tropical-inspired fruited beer with a hazy golden colour and a captivating aroma of ripe pineapples and creamy coconut. The beer presents a light touch of acidity and gentle notes of citrus & tangy pineapple, but the real star of the show is the big, bold creamy & slightly nutty coconut body! All this is balanced with a light malt sweetness and very creamy body courtesy of the wheat & oat in the grain bill, followed by a mild hop bitterness. If you are looking for a refreshing and exotic beer that transports you to a tropical paradise with every sip then look no further, this is it!

Batch Size & Stats
- 19L / 5 gal finished beer
- 24L (6.3 gal) wort
- Starting gravity – 1.054
- Final gravity 1.01
- ABV – 5.8%
What ingredients?
Water
With sparging
- 15L (3.9 gal) strike water approx. 66°C (15.8°F)
- 17.5L (4.6 gal) sparge water at 78°C (172°F)
Without sparging
- 30L (7.9 gal) strike water approx. 66°C (15.8°F)
Malts
Total Grain Bill 5kg (10.58 4lb)
- Pale ale malt – 4kg (8.38 lb)
- wheat – 1.05kg (2.3 lb)
- Rolled Oats - 1.05kg (2.3 lb)
- Medium Crystal – 400g (0.88 lb)
- Rice Hulls – 400g (1.1 lb)
Adjuncts
- 450g (15.87 oz) of pureed pineapple (end of fermentation)
- 1kg (1.1 lb) oven toasted coconut shavings (180°C (356°F) for 8 minutes) (half in whirlpool, half end of fermentation)
Hops & whirlfloc tablets
Northern Brewer
- 20g (0.53 oz) - 60 minutes left in the boil
Galaxy
- 40g (1.41 oz) - whirlpool/hop steep after boil for 20 mins at 75°C (167°F)
Azacca
- 40g (1.41 oz) - whirlpool/hop steep after boil for 20 mins at 75°C (167°F)
El Dorado
- 40g (1.41 oz) - whirlpool/hop steep after boil for 20 mins at 75°C (167°F)
Amarillio
- 40g (1.41 oz) - whirlpool/hop steep after boil for 20 mins at 75°C (167°F)
Whirlfloc
- 1.5g (0.052 oz) / 2 tablets – 15 minutes left in the boil
Yeast options & fermentation temperatures
- US-05 – ferment at 20°C (68°F) 23g (0.81 oz) / (2 packets)
- AUS-05 – ferment at 20°C (68°F) 23g (0.81 oz) / (2 packets)
- S-04 – ferment at 18°C (64.4°F) 22g (0.81 oz) / (2 packets)
Step by step process
Step 1 – Milling
- Mill grains to medium crush (set mill rollers to a gap of approx. 1.00mm / 0.039 inches (credit card width)
- Just keep in mind roller gap settings are not universal so as you brew more batches you will find the ideal crush size for your setup
- Alternatively if you don’t have a grain mill you can order your grains crushed from most homebrew stores, both online and in person
Step 2 – Mashing
Mash for 60 minutes at 66°C (150.8°F) with 15L (3.9 gal) of strike water
- Set your strike water to a few degrees above the target mash temperature (you can use the calculator in our website for this)
- ensure you mix in the grains thoroughly with a mash paddle to prevent dough balls from forming (big spoons, spatulas or whisks will also work)
- its easier to mash the grains and prevent dough balls if you add a little grain at a time, mix, add more grain and repeat until all the grains are mixed
if you don’t have a mash tun with heating then ensure after you have finished mixing the grains in to insulate your mash tun (thick neoprene or heavy blankets both work well)
Step 3 (optional) – Sparging
- if your setup has the capability to sparge then do so with 17.5L (4.6 gal) sparge water at 78°C (172°F)
- if you are not sparging and using a BIAB (brew in a bag) method then remove grains from mash tun and twist and squeeze the bag to get as much liquid out of the grains as possible
- as you start sparging (or straining your BIAB bag) begin raising the temperature of your wort to a boil
Step 4 – Boiling
- once your wort begins to boil start a timer for a 60-minute boil and add your bittering hops, 20g (0.53 oz) of Northern Brewer
- at 15 minutes left in the boil add 1 whirlfloc tablet (OR granulated whirlfloc 0.7g (0.025 oz))
- at 10 minutes left in the boil add 15g (0.53 oz) each of amarillio and galaxy
Step 5 – Whirlpooling / cooling
- after 60 mins of boil turn off your heat source and cool wort down to 75°C (167°F) & add 40g (1.41 oz) each of El Dorado, Azacca, Amarillio & Galaxy AND 500g (1.1 lb) of oven toasted coconut shavings (180°C (356°F) for 8 minutes)
- after 20 minutes of hop steeping / whirlpooling cool wort down to yeast pitching temperature & take an original gravity reading of your wort
Step 6 – Yeast Pitching
- It is best to make a yeast starter before beginning your brew day (ideally 1 day before) to ensure your yeast are as active and healthy as possible before pitching, but not completely necessary – you could also just rehydrate yeast 30 minutes before pitching.
- Wort Aeration (Optional) if you have a paint mixer give your wort a quick blitz before pitching yeast to help add more dissolved oxygen into the wort to help the yeast have a healthier kick start into fermentation
- Now add your tincture of Vanilla extract! (or you can wait till end of fermentation if you prefer)
- Pitch yeast in wort a degree or two higher than the target fermentation temperature to help yeast take off more aggressively
- To make a yeast starter you can use either:
- DME (dry malt extract) at a ratio of approx. 100g per 1L water (3.5 oz per 33 fluid ounces) for gravity of approx. 1.040
- some unfermented wort kept cold and sanitary from a previous brew day
- 70g of table sugar per 1L water (2.5 oz per 33 fluid ounces) – however, it is best to use malt sugar (wort / DME) whenever possible to reduce the chance of shocking the yeast with a different food source from starter to wort pitching
- To rehydrate yeast
- Add yeast to approx. 10 times as much room temperature water as the weight of the yeast e.g. 10g yeast in 100 ml water (0.35 oz yeast in 3.5 fluid ounces water)
Step 7 – Fermentation & Fruit Additions!
- Allow yeast to ferment over the next two weeks (aprox)
- If you have a temperature-controlled system keep the fermenter temperature to the recommended fermentation temperature for each yeast strain (stated in the yeast ingredients section above)
- After 7-10 days of fermentation or around 1.012 gravity, its time to ADD FRUIT!
- Add 500g (1.1 lb) of oven toasted coconut shavings (180°C (356°F) for 8 minutes) and 450g (15.87 oz) of pureed pineapple (we used tinned crushed pineapple in syrup) into the fermenter and allow to ferment for another 5 days
- It's important to note that fermentation times will vary based on your circumstances like temperature, amount of yeast pitched, the healthiness of yeast, the gravity of the wort, pH, etc. so don’t stress be patient and know that these times are just a rough guide
- If you have temp control then when there are 2 days left of fermentation raise the temperature by 2 degrees for a diacetyl rest (once gravity reaches roughly 1.014) & gravity is the same 3 days in a row move onto cold crashing! (If you can’t / don’t want to cold crash go straight to kegging/bottling your beer!)
Step 8 (optional) – Cold crashing
- begin cold crashing your fermenter (bring the temperature of your fermenter down to as close to 0°C (32°F) as possible, for 2 days to a week depending on how patient you are
- If you don’t have a temp-controlled fermenter, you can cold crash by putting your fermenter in a fridge or temp-controlled chest freezer
- After you have finished cold crashing it's time to keg/bottle your beer! If you are bottling your beer from the fermenter uncarbonated, remember to add about 5-7 grams (0.17 - 0.24 oz) of priming sugar to your bottles to carbonate your beer.
So... What is it?
A fruited beer is brewed with added fruits during the brewing process, giving it unique flavors, aromas, and sometimes colors. It can include various fruits like berries, citrus, or tropical fruits, resulting in a range of tastes from tart to sweet. Fruit beers come in different styles and are a refreshing alternative to traditional beers, especially in warm weather or as a dessert-like treat. The brewing process can vary, with some using fresh fruits and others relying on concentrates, purees, or extracts to achieve desired flavors.
What's our like?
Here is our Fruited beer! Coming in at 5.8% the Piña colada Sour is a tropical-inspired fruited beer with a hazy golden colour but unlike the pale ale version this one is ALL about the pineapple punch! Huge punchy aromas and flavours of ripe pineapples and gentle acidity punch through with a very suble coconut aftertaste. The acidity of the sour yeast leans pushes this beer to be much fresher & more zesty than its pale ale cousin, with the light coconut and creaminess playing a more subdued background role again balanced by subtle bitterness. So If you are looking for a refreshing and exotic beer that leans way more into full robust pineapple juiciness rather than coconut cream then allow this Piña colada sour to take you to a tropical paradise!
Batch Size & Stats
- 19L / 5 gal finished beer
- 24L (6.3 gal) wort
- Starting gravity – 1.054
- Final gravity 1.01
- ABV – 5.8%
What ingredients?
Water
With sparging
- 15L (3.9 gal) strike water approx. 66°C (15.8°F)
- 17.5L (4.6 gal) sparge water at 78°C (172°F)
Without sparging
- 30L (7.9 gal) strike water approx. 66°C (15.8°F)
Malts
Total Grain Bill 5kg (10.58 4lb)
- Pale ale malt – 4kg (8.38 lb)
- wheat – 1.05kg (2.3 lb)
- Rolled Oats - 1.05kg (2.3 lb)
- Medium Crystal – 400g (0.88 lb)
- Rice Hulls – 400g (1.1 lb)
Adjuncts
- 450g (15.87 oz) of pureed pineapple (end of fermentation)
- 1kg (1.1 lb) oven toasted coconut shavings (180°C (356°F) for 8 minutes) (half in whirlpool, half end of fermentation)
Hops & whirlfloc tablets
Northern Brewer
- 20g (0.53 oz) - 60 minutes left in the boil
Galaxy
- 40g (1.41 oz) - whirlpool/hop steep after boil for 20 mins at 75°C (167°F)
Azacca
- 40g (1.41 oz) - whirlpool/hop steep after boil for 20 mins at 75°C (167°F)
El Dorado
- 40g (1.41 oz) - whirlpool/hop steep after boil for 20 mins at 75°C (167°F)
Amarillio
- 40g (1.41 oz) - whirlpool/hop steep after boil for 20 mins at 75°C (167°F)
Whirlfloc
- 1.5g (0.052 oz) / 2 tablets – 15 minutes left in the boil
Yeast options & fermentation temperatures
- WildBrew Philly Sour – ferment at 25°C (77°F) 11g (0.39 oz) / (1 packets)
Step by step process
Step 1 – Milling
- Mill grains to medium crush (set mill rollers to a gap of approx. 1.00mm / 0.039 inches (credit card width)
- Just keep in mind roller gap settings are not universal so as you brew more batches you will find the ideal crush size for your setup
- Alternatively if you don’t have a grain mill you can order your grains crushed from most homebrew stores, both online and in person
Step 2 – Mashing
Mash for 60 minutes at 66°C (150.8°F) with 15L (3.9 gal) of strike water
- Set your strike water to a few degrees above the target mash temperature (you can use the calculator in our website for this)
- ensure you mix in the grains thoroughly with a mash paddle to prevent dough balls from forming (big spoons, spatulas or whisks will also work)
- its easier to mash the grains and prevent dough balls if you add a little grain at a time, mix, add more grain and repeat until all the grains are mixed
if you don’t have a mash tun with heating then ensure after you have finished mixing the grains in to insulate your mash tun (thick neoprene or heavy blankets both work well)
Step 3 (optional) – Sparging
- if your setup has the capability to sparge then do so with 17.5L (4.6 gal) sparge water at 78°C (172°F)
- if you are not sparging and using a BIAB (brew in a bag) method then remove grains from mash tun and twist and squeeze the bag to get as much liquid out of the grains as possible
- as you start sparging (or straining your BIAB bag) begin raising the temperature of your wort to a boil
Step 4 – Boiling
- once your wort begins to boil start a timer for a 60-minute boil and add your bittering hops, 20g (0.53 oz) of Northern Brewer
- at 15 minutes left in the boil add 1 whirlfloc tablet (OR granulated whirlfloc 0.7g (0.025 oz))
- at 10 minutes left in the boil add 15g (0.53 oz) each of amarillio and galaxy
Step 5 – Whirlpooling / cooling
- after 60 mins of boil turn off your heat source and cool wort down to 75°C (167°F) & add 40g (1.41 oz) each of El Dorado, Azacca, Amarillio & Galaxy AND 500g (1.1 lb) of oven toasted coconut shavings (180°C (356°F) for 8 minutes)
- after 20 minutes of hop steeping / whirlpooling cool wort down to yeast pitching temperature & take an original gravity reading of your wort
Step 6 – Yeast Pitching
- It is best to make a yeast starter before beginning your brew day (ideally 1 day before) to ensure your yeast are as active and healthy as possible before pitching, but not completely necessary – you could also just rehydrate yeast 30 minutes before pitching.
- Wort Aeration (Optional) if you have a paint mixer give your wort a quick blitz before pitching yeast to help add more dissolved oxygen into the wort to help the yeast have a healthier kick start into fermentation
- Now add your tincture of Vanilla extract! (or you can wait till end of fermentation if you prefer)
- Pitch yeast in wort a degree or two higher than the target fermentation temperature to help yeast take off more aggressively
- To make a yeast starter you can use either:
- DME (dry malt extract) at a ratio of approx. 100g per 1L water (3.5 oz per 33 fluid ounces) for gravity of approx. 1.040
- some unfermented wort kept cold and sanitary from a previous brew day
- 70g of table sugar per 1L water (2.5 oz per 33 fluid ounces) – however, it is best to use malt sugar (wort / DME) whenever possible to reduce the chance of shocking the yeast with a different food source from starter to wort pitching
- To rehydrate yeast
- Add yeast to approx. 10 times as much room temperature water as the weight of the yeast e.g. 10g yeast in 100 ml water (0.35 oz yeast in 3.5 fluid ounces water)
Step 7 – Fermentation & Fruit Additions!
- Allow yeast to ferment over the next two weeks (aprox)
- If you have a temperature-controlled system keep the fermenter temperature to the recommended fermentation temperature for each yeast strain (stated in the yeast ingredients section above)
- After 7-10 days of fermentation or around 1.012 gravity, its time to ADD FRUIT!
- Add 500g (1.1 lb) of oven toasted coconut shavings (180°C (356°F) for 8 minutes) and 450g (15.87 oz) of pureed pineapple (we used tinned crushed pineapple in syrup) into the fermenter and allow to ferment for another 5 days
- It's important to note that fermentation times will vary based on your circumstances like temperature, amount of yeast pitched, the healthiness of yeast, the gravity of the wort, pH, etc. so don’t stress be patient and know that these times are just a rough guide
- If you have temp control then when there are 2 days left of fermentation raise the temperature by 2 degrees for a diacetyl rest (once gravity reaches roughly 1.014) & gravity is the same 3 days in a row move onto cold crashing! (If you can’t / don’t want to cold crash go straight to kegging/bottling your beer!)
Step 8 (optional) – Cold crashing
- begin cold crashing your fermenter (bring the temperature of your fermenter down to as close to 0°C (32°F) as possible, for 2 days to a week depending on how patient you are
- If you don’t have a temp-controlled fermenter, you can cold crash by putting your fermenter in a fridge or temp-controlled chest freezer
- After you have finished cold crashing it's time to keg/bottle your beer! If you are bottling your beer from the fermenter uncarbonated, remember to add about 5-7 grams (0.17 - 0.24 oz) of priming sugar to your bottles to carbonate your beer.
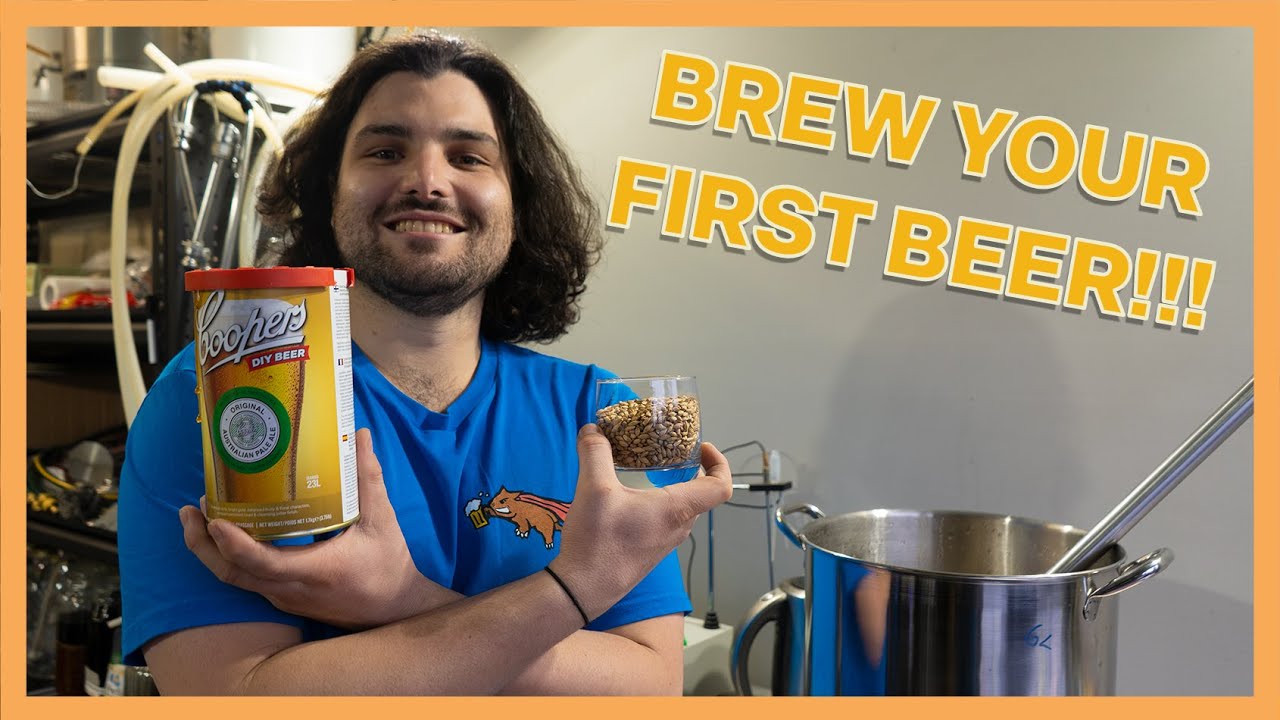
So... What is it?
The Pale Ale is one of the most common and popular beer varieties on the planet! typically a golden sometimes amber coloured ale with low to moderate bitterness, a balanced malt profile and hop forward flavours and aromas. Typically sitting between 4.2%-5.5% ABV its a very drinkable and sessionable style of beer.
What's ours like?
This particular recipe is designed to be a really quick and easy brewday for people who have never brewed before or have only just gotten into home brewing. It allows you to combine all the ease of extract brewing, with an element of all grain, requiring minimal start up costs, equipment and ingredients, but providing you with the ability to really make this recipe your own and make some awesome homebrew pale ale! Coming in at 4.7% it sits in the middle of the ABV scale for the style. On the hops side we use Galaxy for a fresh, tropical, citrusy, passionfruit flavour profile, balanced by a light malt base for easy sessionable drinking.
Batch Size & Stats
- 24L (6.3 gal)
- Starting gravity – 1.040
- Final gravity 1.004
- ABV – 4.7%
What ingredients?
Equipment required
- large cooking pot (anything between 4-20L (1-5 gal) will work)
- hydrometer
- measuring cylinder
- Stellarsan
- mixing spoon
- 2 hop socks or grain bags
- fermenter (a regular food safe sealable bucket will do)
- airlock
- bucket tap (optional but very useful)
- about 24 750ml (25 oz) bottles OR 44 500ml (17 oz) bottles
- PET bottles & resealable flip top bottles are both good options
Water
- 30L (7.9 gal) for a 66°C (151°F) mash (you can use our strike water calculator to find your ideal strike temp)
Malts:
- Pale ale extract Kit – (we used Coopers pale ale, but any pale ale extract will work!)
- Medium Crystal Malt – 200g (7 oz) - 30 mins soak at 70°C (158°F)
- dextrose OR dried malt extract (id recommend DME over dextrose) - 1kg (2.2 lbs)
Hops & whirlfloc tablets
Galaxy
- 40g (1.4 oz) - 20 minutes soak at 70°C (158°F)
- 20g (0.7 oz) - dry hop 2 days before bottling (Optional!)
Yeast options & bottling sugar
- Yeast packet from the extract kit (what we did!) - Ferment at 18°C / room temp (64.4°F)
- 11g US-05 – ferment at 19°C (66°F)
- 11g S-04 – ferment at 18°C (64.4°F)
- some regular table sugar OR carbonation drops for carbonating your finished beer

Step by step process
Before starting!
Wash all your pots, buckets, bottles and anything that will come into contact with your beer with a solution of stellarsan (easy to use and you dont have to rinse) or dishwashing detergent (just make sure you thoroughly rinse off if using detergent), we want yeast to grow not bacteria!
Step 1 – Milling
- Mill grains to medium crush (set mill rollers to a gap of approx. 1.00mm / 0.039 inches)
- Just keep in mind roller gap settings are not universal so as you brew more batches you will find the ideal crush size for your setup
- Alternatively if you don’t have a grain mill you can order your grains crushed from most homebrew stores, both online and in person
Step 2 – Mashing
- pour 200g (7 oz) of crushed Medium Crystal Malt into the hop sock / grain bag
- in a pot measure out a portion of your 22L (5.8 gal) of water - anywhere between 3-10L (0.8-2.6 gal) will work fine (just note its easier to keep more liquid at a stable temperature than less liquid)
- heat up your pot of water to about 70°C (158°F), drop your grain bag into the pot and start your stop watch for 30 minutes
- check the temperature of your pot every now and then and turn the heat back on if needed to keep it around 70°C (158°F) - just make sure when your heat is on the grain bag doesnt sit at the bottom of the pot or it will burn! so keep stirring and stop the bag from touching the bottom of the pot while the heat is on!
Step 4 – Hop Additions
- In your other hop sock / grain bag pour in 20g (0.52 oz) of Galaxy hops
- when your stop watch is at 10 minutes drop your hops into the pot, they will soak in there with the grains for the remaining 20 minutes
- once soaking has gone for 30 minutes total remove both the hops and grains and turn off your heat source
Step 5 – Making the wort
Wort is the sugary syrup made from grain sugars and water which will be fermented into beer! to make your wort for this recipe follow the below
- open your extract kit and scoop/pour out all the syrup into your pot of hot water (remember to take both the grain and hop bags out first!) and stir the mixture until the syrup is fully dissolved
- it helps to pour some hot water in the tin to get some extra syrup out!
Step 6 – Cooling / topping up the water
- now pour both your wort and the remainder of your unused water into your fermenter to bring it up to a total of about 24L (6.3 gal)
- Dont fill your fermenter right to the top! beer foams up when it ferments so make sure you use a fermenter big enough to leave 30% head room! (for this batch a 30L (7.9 gal) fermenter will do)
- now take a gravity reading with your hydrometer by gently dropping it into your wort and giving it a spin, record this number, this is your Original gravity and it is how we will determine the final ABV (alcohol percentage) of your beer!
- just note hydrometers are calibrated to work at 20°C so if your wort was hotter or colder than this when you take the reading use our correction calculator
Step 7 – Yeast Pitching
- check the temperature of your wort in your fermenter, once it has reach about 18-21°C (64-70°F) pour your packet of yeast into the fermenter
- now seal your fermenter and remember to pour a little bit of water into your airlock to make it air tight
Step 8 – Fermentation & dry hopping
- Allow yeast to ferment over the next two weeks (aprox)
- if you would like you can add some more hops into the fermenter around day 7, we added 20g, just open your fermenter, throw your hops straight in and close your fermenter
- after about 7-10 days take a small sample of beer from your fermenter into a measuring cylinder and drop in your hydromter (give it a spin to bubbles dont push it up and ruin the reading)
- record this reading, and take the same measurement the next day, when the reading is the same 3 days in a row fermentation has finished!
Step 9 – Bottling
- It's time to bottle your beer! add about 5-7 grams (0.17 - 0.24 oz) of priming sugar or 1 carbonation drop to your bottles to carbonate your beer if you are using 330-375ml (11 - 12.6 oz) bottles, double this for 750ml (25 oz) bottles
- now allow the residual amounts of yeast to ferment that little sugar addition over the next 2 weeks inside the bottle to carbonate your beer. After that its steady to drink!

So... What is it?
The Australian Pale Ale is a vibrant beer that captures the essence of the Land Down Under. Its flavor combines tropical fruit and citrus with a balanced hop bitterness and malt sweetness. The aroma offers hints of mango, passionfruit, and grapefruit, alongside a subtle caramel undertone. This style has its roots in Australia's brewing history and represents our nations diverse hop varieties, love for beer and adventurous spirit!
What's ours like?
Ours is bang on the money with the twist of some new world hops! coming in at a generous 5.7% and bursting with citrus, passionfruit and tropical aroma it is a cracker thirst quencher after a long day under the Aussie sun! the caramel body adds depth and balance to the hoppy profile without overpowering the whole profile of the beer. Punching through with a refreshing crispness, it truly makes this the land "Where beer does flow and men chunder!" - Down Under, by Men at Work
Batch Size & Stats
- 38L (2 19L corny kegs) / 10 gal finished beer
- 50L (13.2 gal) wort
- For a smaller 19L (5 gal) batch size simply half the ingredients of this recipe
- Starting gravity – 1.054
- Final gravity 1.01
- ABV – 5.7%
What ingredients?
Water
With sparging
- 30L (7.9 gal) for a 66°C (151°F) mash (you can use our strike water calculator to find your ideal strike temp)
- 35L (9.2 gal) sparge water at 78°C (172°F)
Without sparging
- 60L (7.9 gal) for a 66°C (151°F) mash (you can use our strike water calculator to find your ideal strike temp)
Malts:
- Pale ale malt – 9.6kg (21.16 lb)
- Medium Crystal Malt – 400g (14.1 oz)
Hops & whirlfloc tablets
Galaxy
- 8g (0.3 oz) - 60 minutes left in the boil
- 60g (2.1 oz) – whirlpool for 20 minutes at 75°C (167°F)
- 60g (2.1 oz) - Dry hop at gravity 1.013 (approx. day 6-10 depending on your yeast)
El Dorado
- 60g (2.1 oz) – whirlpool for 20 minutes at 75°C (167°F)
- 60g (2.1 oz) - Dry hop at gravity 1.013 (approx. day 6-10 depending on your yeast)
El Dorado
- 60g (2.1 oz) – whirlpool for 20 minutes at 75°C (167°F)
- 60g (2.1 oz) - Dry hop at gravity 1.013 (approx. day 6-10 depending on your yeast)
Whirlfloc tablets
- 1.5g (0.052 oz) / 2 tablets – 15 minutes left in the boil
Yeast options & fermentation temperatures
- 23g (0.8 oz) Aus-05– ferment at 20°C
- 23g (0.8 oz) US-05 – ferment at 20°C
- 23g (0.8 oz) S-04 – ferment at 19°C
Step by step process
Step 1 – Milling
- Mill grains to medium crush (set mill rollers to a gap of approx. 1.00mm / 0.039 inches)
- Just keep in mind roller gap settings are not universal so as you brew more batches you will find the ideal crush size for your setup
- Alternatively if you don’t have a grain mill you can order your grains crushed from most homebrew stores, both online and in person
Step 2 – Mashing
- Mash for 60 minutes at 66°C (151°F)
- Set your strike water to a few degrees above the target mash temperature, you can use our calculator to determine what your strike temperature should be
- ensure you mix in the grains thoroughly with a mash paddle to prevent dough balls from forming (big spoons, spatulas or whisks will also work)
- its easier to mash the grains and prevent dough balls if you add a little grain at a time, mix, add more grain and repeat until all the grains are mixed
- if you don’t have a mash tun with heating then ensure after you have finished mixing the grains in to insulate your mash tun (thick neoprene or heavy blankets both work well)
Step 3 (optional) – Sparging
- if your setup has the capability to sparge then do so with 35L (9.2 gal) sparge water at 78°C (172°F)
- if you are not sparging and using a BIAB (brew in a bag) method then remove grains from mash tun and twist and squeeze the bag to get as much liquid out of the grains as possible
- as you start sparging (or straining your BIAB bag) begin raising the temperature of your wort to a boil
Step 4 – Boiling
- once your wort begins to boil start a timer for a 60-minute boil and add your bittering hops, 8g (0.3 oz) of Galaxy
- at 15 minutes left in the boil add 2.5 whirlfloc tablets
- after 60 minutes of boiling turn of the heat and chill the temperature of the wort down to 75°C (167°F) and begin whirlpooling
- if you don’t have a wort chiller you could rest your boil kettle in an ice bucket
- if your system can’t whirlpool you can also achieve this with a mash paddle and a power drill, if you don’t have this either don’t worry about whirlpooling it’s not completely necessary
Step 5 – Whirlpooling & whirlpool hops / cooling
- once temperature reaches 75°C (167°F) and you have started whirlpooling add your whirlpool hops, 60g (2.1 oz) each of Galaxy, El Dorado and Azacca
- allow hops to whirlpool in the wort for 20 minutes and then begin chilling wort again down to yeast pitching temperature
- once you’ve reached yeast pitching temperature take an original gravity reading of your wort
Step 6 – Yeast Pitching
- It is best to make a yeast starter before beginning your brew day (ideally 1 day before) to ensure your yeast are as active and healthy as possible before pitching, but not completely necessary – you could also just rehydrate yeast 30 minutes before pitching.
- Pitch yeast in wort a degree or two higher than the target fermentation temperature to help yeast take off more aggressively
- To make a yeast starter you can use either:
- DME (dry malt extract) at a ratio of approx. 100g per 1L water (3.5 oz per 33 fluid ounces) for gravity of approx. 1.040
- some unfermented wort kept cold and sanitary from a previous brew day
- 70g of table sugar per 1L water (2.5 oz per 33 fluid ounces) – however, it is best to use malt sugar (wort / DME) whenever possible to reduce the chance of shocking the yeast with a different food source from starter to wort pitching
- To rehydrate yeast
- Add yeast to approx. 10 times as much room temperature water as the weight of the yeast e.g. 10g yeast in 100 ml water (0.35 oz yeast in 3.5 fluid ounces water)
Step 7 – Fermentation & dry hopping
- Allow yeast to ferment over the next week to two weeks
- If you have a temperature controlled system keep the fermenter temperature to the recommended fermentation temperature for each yeast strain (stated in the yeast ingredients section above)
- Monitor the fermentation activity over the first 7 days by the bubbling of the blow off tube / airlock of your fermenter, as the bubbling slows down (roughly around day 7) take a gravity reading. When the gravity reaches around 1.014 raise the temperature of your fermenter by 1-2 degrees for 2 days for a diacetyl rest (if you don’t have temperature control don’t worry about this step, its not the end of the world!)
- Its important to note that fermentation times will vary based on your circumstances like, temperature, amount of yeast pitched, healthiness of yeast, gravity of wort, pH etc. so don’t stress be patient and know that these times are just a rough guide
- On day 2 of the diacetly rest (once gravity reaches roughly 1.012 – 1.014) add 60g (2.1 oz) each of Galaxy, El Dorado and Azacca to your fermenter
- One day after dry hopping take a gravity reading, fermentation should finish at about 1.010, if you havnt reached this yet wait another day and take another reading, once the gravity is the same 2 days in a row move onto cold crashing! (If you can’t / don’t want to cold crash go straight to kegging/bottling your beer!)
Step 8 (optional) – Cold crashing
- begin cold crashing your fermenter (bring the temperature of your fermenter down to as close to 0°C (32°F) as possible, for 2 days to a week depending on how patient you are
- If you don’t have a temp-controlled fermenter, you can cold crash by putting your fermenter in a fridge or temp-controlled chest freezer
- After you have finished cold crashing it's time to keg/bottle your beer! If you are bottling your beer from the fermenter uncarbonated remember to add about 5-7 grams (0.17 - 0.24 oz) of priming sugar to your bottles to carbonate your beer.