.png)
So... What is it?
The Hazy Pale ale is the new world style of beer that took the craft beer scene by storm! This is our version of an easy drinking pale ale, coming in at 5.5% and made with a light but flavorsome body & mouthfeel, and a fantastic hop forward fruity profile, showcasing passionfruit, mango and pineapple! The perfect beer for when you want that hazy tropical character, but with the lower ABV and drinkability of a pale ale!
Batch Size & Stats
- 38L (2 19L corny kegs) / 10 gal finished beer
- 46L (13.2 gal) wort
- For a smaller 19L (5 gal) batch size simply half the ingredients of this recipe
- Starting gravity – 1.043
- Final gravity 1.007
- ABV – 4.8%
- IBU - 24
- Colour - 16.7 EBC
- Mash Efficiency - 86%
What ingredients?
Water
With sparging
- 30L (7.9 gal) for a 65°C (149°F) mash (you can use our strike water calculator to find your ideal strike temp)
- 30L (7.9 gal) sparge water at 78°C (172°F) - fermenter topped up with 4L (1 gal) post boil to reduce OG
Without sparging
- 60L (7.9 gal) for a 65°C (149°F) mash (you can use our strike water calculator to find your ideal strike temp)
Malts: 8.56kg / 18.9 lbs
- Pale ale malt – 6.63 kg (14.4 lb) - 76.3%
- Rolled Oats - 860g (1.9lbs) - 10.1%
- Rolled Wheat - 860g (1.9lbs) - 10.1%
- Medium Crystal Malt – 310g (0.68 lb) - 3.6%
Hops & whirlfloc tablets
Northern Brewer
- 10g (0.35 oz) 5 IBU's - 60 minutes left in the boil
Azacca
- 70g (2.47 oz) – 20 min Whirlpool @ 76 C / 169 F
- 50g (1.76 oz) dry hop day 7
El Dorado
- 70g (2.47 oz) – 20 min Whirlpool @ 76 C / 169 F
- 50g (1.76 oz) dry hop day 7
Lupomax Citra
- 70g (2.47 oz) – 20 min Whirlpool @ 76 C / 169 F
- 50g (1.76 oz) dry hop day 7
Whirlfloc tablets
- 1.5g (0.052 oz) / 2 tablets – 15 minutes left in the boil
Yeast options & fermentation temperatures
- 23g (0.8 oz) Lallemand Pomona at 23°C
- 23g (0.8 oz) Aus-05– ferment at 20°C
- 23g (0.8 oz) US-05 – ferment at 20°C
- 23g (0.8 oz) S-04 – ferment at 19°C
Water Profile
- Ca2+135
- Mg2+ 8
- Na+ 15
- Cl- 191
- SO42- 98
- HCO3- 57
Step by step process
Step 1 – Milling
- Mill grains to medium crush (set mill rollers to a gap of approx. 1.00mm / 0.039 inches)
- Just keep in mind roller gap settings are not universal so as you brew more batches you will find the ideal crush size for your setup
- Alternatively if you don’t have a grain mill you can order your grains crushed from most homebrew stores, both online and in person
Step 2 – Mashing
- Mash for 60 minutes at 65°C (149°F)
- Set your strike water to a few degrees above the target mash temperature, you can use our calculator to determine what your strike temperature should be
- ensure you mix in the grains thoroughly with a mash paddle to prevent dough balls from forming (big spoons, spatulas or whisks will also work)
- its easier to mash the grains and prevent dough balls if you add a little grain at a time, mix, add more grain and repeat until all the grains are mixed
- if you don’t have a mash tun with heating then ensure after you have finished mixing the grains in to insulate your mash tun (thick neoprene or heavy blankets both work well)
Step 3 (optional) – Sparging
- if your setup has the capability to sparge then do so with 34L (9 gal) sparge water at 78°C (172°F)
- if you are not sparging and using a BIAB (brew in a bag) method then remove grains from mash tun and twist and squeeze the bag to get as much liquid out of the grains as possible
- as you start sparging (or straining your BIAB bag) begin raising the temperature of your wort to a boil
Step 4 – Boiling
- once your wort begins to boil start a timer for a 60-minute boil and add your bittering hops, 10g (0.35 oz) of Pride of Ringwood
- at 15 minutes left in the boil add 2.5 whirlfloc tablets
- With 3 minutes left in the boil add your flavour and aroma hops, Pride of Ringwood 60g (2.1 oz), Galaxy 50g (1.76 oz), Topaz 70g (2.47 oz)
Step 5 – Cooling
- After 1 hour of boiling start cooling wort down to yeast pitching temperature
- once you’ve reached yeast pitching temperature take an original gravity reading of your wort
Step 6 – Yeast Pitching
- It is best to make a yeast starter before beginning your brew day (ideally 1 day before) to ensure your yeast are as active and healthy as possible before pitching, but not completely necessary – you could also just rehydrate yeast 30 minutes before pitching.
- Pitch yeast in wort a degree or two higher than the target fermentation temperature to help yeast take off more aggressively
- To make a yeast starter you can use either:
- DME (dry malt extract) at a ratio of approx. 100g per 1L water (3.5 oz per 33 fluid ounces) for gravity of approx. 1.040
- some unfermented wort kept cold and sanitary from a previous brew day
- 70g of table sugar per 1L water (2.5 oz per 33 fluid ounces) – however, it is best to use malt sugar (wort / DME) whenever possible to reduce the chance of shocking the yeast with a different food source from starter to wort pitching
- To rehydrate yeast
- Add yeast to approx. 10 times as much room temperature water as the weight of the yeast e.g. 10g yeast in 100 ml water (0.35 oz yeast in 3.5 fluid ounces water)
Step 7 – Fermentation & Dry Hopping
- Allow yeast to ferment over the next week to two weeks
- If you have a temperature controlled system keep the fermenter temperature to the recommended fermentation temperature for each yeast strain (stated in the yeast ingredients section above)
- Monitor the fermentation activity over the first 7 days by the bubbling of the blow off tube / airlock of your fermenter, as the bubbling slows down (roughly around day 7) take a gravity reading. When the gravity reaches around 1.01 raise the temperature of your fermenter by 1-2 degrees for 2 days for a diacetyl rest (if you don’t have temperature control don’t worry about this step, its not the end of the world!)
- When you start your diacetyl rest also add your dry hops, 50g - 1.76 oz each of Lupomax Citra, Azacca & El Dorado
- Its important to note that fermentation times will vary based on your circumstances like, temperature, amount of yeast pitched, healthiness of yeast, gravity of wort, pH etc. so don’t stress be patient and know that these times are just a rough guide
- Once the gravity is the same 2 days in a row move onto cold crashing! (If you can’t / don’t want to cold crash go straight to kegging/bottling your beer!)
Step 8 (optional) – Cold crashing
- begin cold crashing your fermenter (bring the temperature of your fermenter down to as close to 0°C (32°F) as possible, for 2 days to a week depending on how patient you are
- If you don’t have a temp-controlled fermenter, you can cold crash by putting your fermenter in a fridge or temp-controlled chest freezer
- After you have finished cold crashing it's time to keg/bottle your beer! If you are bottling your beer from the fermenter uncarbonated remember to add about 5-7 grams (0.17 - 0.24 oz) of priming sugar to your bottles to carbonate your beer.

.png)
So... What is it?
The white stout is an extra weird beer in the world of craft brews! Taking what is essentially a blonde ale and cramming it full of coffee beans (and any other adjuncts) to give it the toasty, roasty flavours of a full bodies stout, whilst having the appearance and mouthfeel of an easy drinking blonde ale! This one came out at a cruisy 5.1% and is so ridiculously easy! Carrying delicious flavours of toasted coconut, roasty espresso and a silky but light body and subdued bitterness.
POST BREW ALTERATIONS
- In hindsight we would increase our Toasted coconut in the fermenter from 500g (1.1 lb) to 1kg (2.2 lb) to really boost the cocnut infusion!
Batch Size & Stats
- 19L / 5 gal finished beer
- 25L (6.6 gal) wort
- Starting gravity – 1.055
- Final gravity 1.016
- ABV – 5.1%
- IBU - 18
- Colour - 9.5 ECB
What ingredients?
Water
With sparging
- 20L (5.2 gal) Strike water at 69°C (156.2°F)
- 15L (3.9 gal) Sparge water approx. 78°C (172°F)
Without sparging
- 30L (7.9 gal) strike water approx. 69°C (156.2°F)
Malts
Total Grain Bill 4.91kg (10.8 4lb)
- Pale ale malt - 81.1% – 3.98kg (8.77 lb) -
- wheat - 10% – 490g (1.08 lb)
- Rolled Oats - 5.9% - 290g (0.64 lb)
- Gladiator malt (dextrin malt) - 3.1% – 150g (0.33 lb)
- Rice Hulls - 250g (0.55 lb)
Adjuncts
- Lactose - start of boil250g (0.55 lb)
- Coffee Beans - 410g (0.9 lb) for a few days after primary fermentation
- Toasted Coconut Shavings (toasted at 180C / 356F for 8 mins) 1kg (2.2 lb) - half added in the last 10 mins of boil, half added after primary fermentation
In hindsight, we reccomend doubling the fermenter addition of shavings
Hops & whirlfloc tablets
Fuggles
- 28g (1 oz) / 15 IBU's - 60 min
- 35g (1.2 oz) 4 IBU's - 5 min
Whirlfloc
- 0.75g (0.025 oz) / 1 tablet – 15 minutes left in the boil
Yeast options & fermentation temperatures
- US-05 – ferment at 20°C (68°F) 23g (0.81 oz) / (2 packets)
- AUS-05 – ferment at 20°C (68°F) 23g (0.81 oz) / (2 packets)
- S-04 – ferment at 18°C (64.4°F) 22g (0.81 oz) / (2 packets)
Water Profile
- Ca2+62
- Mg2+ 9
- Na+ 15
- Cl- 98
- SO42- 49
- HCO3- 57
Step by step process
Step 1 – Milling
- Mill grains to medium crush (set mill rollers to a gap of approx. 1.00mm / 0.039 inches (credit card width)
- Just keep in mind roller gap settings are not universal so as you brew more batches you will find the ideal crush size for your setup
- Alternatively if you don’t have a grain mill you can order your grains crushed from most homebrew stores, both online and in person
Step 2 – Mashing
Mash for 60 minutes at 69°C (156.2°F) with 20L (5.2 gal) of strike water (with sparging - 30L (7.9 gal without sparging)
- Set your strike water to a few degrees above the target mash temperature (you can use the calculator in our website for this)
- ensure you mix in the grains thoroughly with a mash paddle to prevent dough balls from forming (big spoons, spatulas or whisks will also work)
- its easier to mash the grains and prevent dough balls if you add a little grain at a time, mix, add more grain and repeat until all the grains are mixed
if you don’t have a mash tun with heating then ensure after you have finished mixing the grains in to insulate your mash tun (thick neoprene or heavy blankets both work well)
Step 3 (optional) – Sparging
- if your setup has the capability to sparge then do so with 15L (3.9 gal) Sparge water approx. 78°C (172°F)
- if you are not sparging and using a BIAB (brew in a bag) method then remove grains from mash tun and twist and squeeze the bag to get as much liquid out of the grains as possible
- as you start sparging (or straining your BIAB bag) begin raising the temperature of your wort to a boil
Step 4 – Boiling
- once your wort begins to boil start a timer for a 60-minute boil and add your bittering hops, 28g (1 oz) of Fuggles
- at 15 minutes left in the boil add 1 whirlfloc tablet (OR granulated whirlfloc 0.7g (0.025 oz)
- at 10 mins left add your coconut shavings to the boil. (toast 500g / 1.1 lbs of shavings at 180C / 356F for 8 mins)
- at 5 minutes left in the boil add 35g (1.23 oz) of Fuggles
- after 60 mins of boil turn off your heat source
Step 5 – Whirlpooling / cooling
- after 60 mins of boil turn off your heat source and begin cooling
- once you’ve reached yeast pitching temperature take an original gravity reading of your wort
Step 6 – Yeast Pitching
- It is best to make a yeast starter before beginning your brew day (ideally 1 day before) to ensure your yeast are as active and healthy as possible before pitching, but not completely necessary – you could also just rehydrate yeast 30 minutes before pitching.
- Wort Aeration (Optional) if you have a paint mixer give your wort a quick blitz before pitching yeast to help add more dissolved oxygen into the wort to help the yeast have a healthier kick start into fermentation
- Now add your tincture of Vanilla extract! (or you can wait till end of fermentation if you prefer)
- Pitch yeast in wort a degree or two higher than the target fermentation temperature to help yeast take off more aggressively
- To make a yeast starter you can use either:
- DME (dry malt extract) at a ratio of approx. 100g per 1L water (3.5 oz per 33 fluid ounces) for gravity of approx. 1.040
- some unfermented wort kept cold and sanitary from a previous brew day
- 70g of table sugar per 1L water (2.5 oz per 33 fluid ounces) – however, it is best to use malt sugar (wort / DME) whenever possible to reduce the chance of shocking the yeast with a different food source from starter to wort pitching
- To rehydrate yeast
- Add yeast to approx. 10 times as much room temperature water as the weight of the yeast e.g. 10g yeast in 100 ml water (0.35 oz yeast in 3.5 fluid ounces water)
Step 7 – Fermentation & Coconut addition
- Allow yeast to ferment over the next week or two (aprox)
- If you have a temperature-controlled system keep the fermenter temperature to the recommended fermentation temperature for each yeast strain (stated in the yeast ingredients section above)
- After 7 days of fermentation or around 1.018 gravity, we added our fermenter Coconut shavings & 410g (0.9 lb) of Arabica coffee beans and raised the temperature of fermentation by 2 degrees for a diacetyl rest for the next 2 days
- 2 days after adding the coffee and spice tincture it is time to cold crash (if you can) and bottle / keg!
- It's important to note that fermentation times will vary based on your circumstances like temperature, amount of yeast pitched, the healthiness of yeast, the gravity of the wort, pH, etc. so don’t stress be patient and know that these times are just a rough guide
- If you have temp control then when there are 2 days left of fermentation raise the temperature by 2 degrees for a diacetyl rest (once gravity reaches roughly 1.014) & gravity is the same 3 days in a row move onto cold crashing! (If you can’t / don’t want to cold crash go straight to kegging/bottling your beer!)
Step 8 (optional) – Cold crashing
- begin cold crashing your fermenter (bring the temperature of your fermenter down to as close to 0°C (32°F) as possible, for 2 days to a week depending on how patient you are
- If you don’t have a temp-controlled fermenter, you can cold crash by putting your fermenter in a fridge or temp-controlled chest freezer
- After you have finished cold crashing it's time to keg/bottle your beer! If you are bottling your beer from the fermenter uncarbonated, remember to add about 5-7 grams (0.17 - 0.24 oz) of priming sugar to your bottles to carbonate your beer.
.png)
So... What is it?
Ever wondered how high-end steakhouses achieve that perfect edge-to-edge pink center with a crispy, golden crust? The secret isn’t just in the cut—it’s in the technique. Reverse searing flips traditional steak cooking on its head, delivering juicy, evenly cooked meat with a stunning sear every time. In this guide, we’ll show you exactly how to master this game AND do it even better by smoking your steaks!
Batch Size & Cook Time
- How ever many steaks you want! Ours were about 500g / 1.1 pounds each
- Aprox. 1.5 hours cook time (45ish mins heating charcoal (can use an oven instead if you wish) 45ish min smoking, about 2-3 min grilling))
- prep time 10 mins
Equipment
- Smoker (we used a texas style offset smoker but you could use other styles, or make it unsmoked in an oven)
- thermometer! This is important, we used an inkbird but any bbq Thermometer will do
- charcoal chimney starter
- lighter or matches
What ingredients?
- Steaks (we used Porterhouse cuts, but you can use any you'd like!)
- Salt Rub of your choice
- BBQ Charcoal (i prefer lumpwood)
- Hard wood (can use this alone or charcoal alone) I used Iron Bark
- Smoking woods (optional) such as cherry wood
Step by step process
1. Prep the Steak
- Take the steak out of the fridge 30–60 minutes before cooking to let it come to room temperature.
- Season generously with salt and pepper (or rub) on all sides.
2. Preheat Your Smoker
- Set your smoker to 107°C / 225°F.
- Use a mild wood like oak, cherry, or hickory for flavor.
3. Smoke the Steak
- Place the steak directly on the smoker grates.
- Insert a meat thermometer/probe into the thickest part of the steak.
- Smoke until internal temperature reaches 47°C / 117°F (for medium-rare after searing).
- This usually takes 45–60 minutes, depending on thickness and ambient temp.
4. Rest Before the Sear
- Remove steak from the smoker.
- Let it rest for 5–10 minutes while you preheat your searing surface.
5. Sear the Steak (Final Crust)
- Heat a cast iron skillet or grill to high heat (around 260–315°C / 500–600°F).
- Add a bit of oil if using a skillet.
- Sear steak for 45–60 seconds per side, including the edges, until a golden-brown crust forms.
6. Optional: Baste with Butter
- During the last 30 seconds, add a knob of butter, crushed garlic, and rosemary to the pan.
- Tilt the pan and spoon the butter over the steak for flavor.
7. Final Temp Check
- Internal temp should now be 54–57°C / 130–135°F for medium-rare.
- ENJOY!!
.png)
So... What is it?
Its finally getting to winter in the land down under, so its time for a delicious fire side sipper! Enter, the sweet stout! A thick velvety milk stout crammed full of toasted coconut and caramelized toasted marshmallows! This beer is silky on the mouth, and complex on the pallet, starting off with a wave of dark chocolate and coffee, followed by sweet toasted marshmallowy goodness and finishing with the layered flavours and aromas of toasted coconut shavings, this is a winter slam dunk!
Batch Size & Stats
- 19L / 5 gal finished beer
- 24L (6.3 gal) wort
- Starting gravity – 1.072
- Final gravity 1.02
- ABV – 7.6%
- IBU - 22
- Colour - 84 EBC
- Mash Efficiency - 87%
What ingredients?
Water
With sparging
- 20L (5.2 gal) for a 68°C (154.4°F) mash for 1 hour
- 15L (4 gal) sparge water at 78°C (172°F)
Without sparging
- 30L (7.9 gal) for a 68°C (154.4°F) mash (you can use our strike water calculator to find your ideal strike temp)
Malts: Total 4.711 kg/ 10.4 lb
- 3.178 kg / 7 lb (62.2%) — Ale Malt
- 460g / 1 lb (9%) — Rolled Oats
- 409 g / 0.9lb (8%) — Dark Chocolate Malt
- 320 g / 11.3 oz (7%) — Wheat Malt
- 307 g / 10.8 oz (6%) — Medium Crystal Malt
- 256 g / 9 oz (5%) — Gladiator (Dextrin) Malt
- 102 g / 3.6 oz (4%) — Midnight Wheat Malt
- 560 g / 1lb — Rice Hulls
Adjuncts
- 400g (14.1 oz) — Lactose (added start of boil)
- 0.5 kg (1.1 lb) — Toasted coconut shavings added in the last 5 mins of Boil (toasted in oven for 8 mins at 180C / 356F)
- 0.5 kg (1.1 lb) — Toasted coconut shavings added in secondary fermentation, around day 7 (toasted in oven for 8 mins at 180C / 356F)
- 2kg (4.4 lb) — Toasted Marshmallows added in the last 5 mins of boil (5 mins at 200C / 392F and bronzed with a kitchen blow torch)
Hops & whirlfloc tablets
Northern Brewer
- 14g (11 IBU's) - (0.5 oz) – 60 mins
- 28g (8 IBU's) - (1 oz) – 10 mins
Fuggles
- 28g (5 IBU's) (1 oz) – 10 mins
Whirlfloc tablets
- 0.75g (0.025 oz) / 1 tablet – 15 minutes left in the boil
Yeast options & fermentation temperatures
- 20g (0.7 oz) Lallemand (LalBrew) Nottingham Yeast – ferment at 18°C / 64.4°F
- 23g (0.8 oz) Aus-05– ferment at 18°C / 64.4°F
- 23g (0.8 oz) US-05 – ferment at 18°C / 64.4°F
- 23g (0.8 oz) S-04 – ferment at 18°C / 64.4°F
Water Profile
- Ca2+102
- Mg2+ 7
- Na+ 28
- Cl- 127
- SO42- 66
- HCO3- 134
Step by step process
Step 1 – Milling
- Mill grains to medium crush (set mill rollers to a gap of approx. 1.00mm / 0.039 inches)
- Just keep in mind roller gap settings are not universal so as you brew more batches you will find the ideal crush size for your setup
- Alternatively if you don’t have a grain mill you can order your grains crushed from most homebrew stores, both online and in person
Step 2 – Mashing
- Mash for 60 mins at 68°C (154.4°F)
- Set your strike water to a few degrees above the target mash temperature, you can use our calculator to determine what your strike temperature should be
- ensure you mix in the grains thoroughly with a mash paddle to prevent dough balls from forming (big spoons, spatulas or whisks will also work)
- its easier to mash the grains and prevent dough balls if you add a little grain at a time, mix, add more grain and repeat until all the grains are mixed
- if you don’t have a mash tun with heating then ensure after you have finished mixing the grains in to insulate your mash tun (thick neoprene or heavy blankets both work well)
- after 60 minutes of mashing raise the temp to 77°C (170°F) for 10-15 minutes to mash out, and deactivate the enzymes breaking down the sugars
Step 3 (optional) – Sparging
- if your setup has the capability to sparge then do so with 15L (4 gal) sparge water at 78°C (172°F)
- if you are not sparging and using a BIAB (brew in a bag) method then remove grains from mash tun and twist and squeeze the bag to get as much liquid out of the grains as possible
- as you start sparging (or straining your BIAB bag) begin raising the temperature of your wort to a boil
Step 4 – Boiling
- once your wort begins to boil start a timer for a 60-minute boil and add your bittering hops, 14g (0.5 oz) of Northern Brewer
- at 20 minutes left in the boil add your 400g / 0.88b of lactose
- at 15 minutes left in the boil add 1 whirlfloc tablets (or 0.75g of granulated whirlfloc)
- at 10 min left in the boil add 28g (1 oz) each of fuggles and northern brewer
- with 5 minutes left add both the toasted coconut shavings and toasted marshmallows
Step 5 – Cooling
- After 1 hour of boiling start cooling wort down to yeast pitching temperature
- once you’ve reached yeast pitching temperature take an original gravity reading of your wort
Step 6 – Yeast Pitching
- It is best to make a yeast starter before beginning your brew day (ideally 1 day before) to ensure your yeast are as active and healthy as possible before pitching, but not completely necessary – you could also just rehydrate yeast 30 minutes before pitching.
- Pitch yeast in wort a degree or two higher than the target fermentation temperature to help yeast take off more aggressively
- To make a yeast starter you can use either:
- DME (dry malt extract) at a ratio of approx. 100g per 1L water (3.5 oz per 33 fluid ounces) for gravity of approx. 1.040
- some unfermented wort kept cold and sanitary from a previous brew day
- 70g of table sugar per 1L water (2.5 oz per 33 fluid ounces) – however, it is best to use malt sugar (wort / DME) whenever possible to reduce the chance of shocking the yeast with a different food source from starter to wort pitching
- To rehydrate yeast
- Add yeast to approx. 10 times as much room temperature water as the weight of the yeast e.g. 10g yeast in 100 ml water (0.35 oz yeast in 3.5 fluid ounces water)
Step 7 – Fermentation
- Allow yeast to ferment over the next week to two weeks
- If you have a temperature controlled system keep the fermenter temperature to the recommended fermentation temperature for each yeast strain (stated in the yeast ingredients section above)
- Monitor the fermentation activity over the first 7 days by the bubbling of the blow off tube / airlock of your fermenter, as the bubbling slows down (roughly around day 7) take a gravity reading. When the gravity reaches around 1.022 raise the temperature of your fermenter by 1-2 degrees for 2 days for a diacetyl rest (if you don’t have temperature control don’t worry about this step, its not the end of the world!)
- at this point add the toasted coconut shavings to the fermenter and let it sit in the tank for at least 2 days
- Once the gravity is the same 2 days in a row move onto cold crashing! (If you can’t / don’t want to cold crash go straight to kegging/bottling your beer!)
Step 8 (optional) – Cold crashing
- begin cold crashing your fermenter (bring the temperature of your fermenter down to as close to 0°C (32°F) as possible, for 2 days to a week depending on how patient you are
- If you don’t have a temp-controlled fermenter, you can cold crash by putting your fermenter in a fridge or temp-controlled chest freezer
- After you have finished cold crashing it's time to keg/bottle your beer! If you are bottling your beer from the fermenter uncarbonated remember to add about 5-7 grams (0.17 - 0.24 oz) of priming sugar to your bottles to carbonate your beer.
.png)
So... What is it?
When life gives you lemons, you make Limoncello! But what do we do if life gives us limes? we make limecello too of course! Here we show you how to make the italian classics, with a special twist! Limoncello is made by infusing lemon zest in high-proof alcohol, then mixing it with simple syrup to create a sweet, intensely lemony digestivo, but today we show you our little twist on the italian classic to make it that much more delicious!
Batch Size & Cook Time
- Aprox 1.5L (0.4 gal) of 25% ABV Limoncello
- 10 mins peeling
- 1 week soaking
- 10 mins diluting and adding sugar
What ingredients?
Recipe below is for Limoncello, for a lime version simply swap out lemons for limes!
- 120g / 4.23oz lemon peels - Around 9 medium to large lemons (or limes for limecello)
- 500ml (16.9 oz) of 92% ABV vodka (184 proof) - or as high in alcohol as you can find, higher alcohol will speed up flavour extraction)
- 640ml / 21.6oz water to dilute vodka after soaking on lemons from 92% to 38% (if youre using regular 40% vodka ignore this)
- 430ml / 14.54oz boiling water (to dissolve sugar)
- 160g / 5.64oz raw sugar
- 30g / 1oz agave syrup
PLEASE NOTE - if you started with using regular 40% vodka, then you also need to half the amount of sugar syrup you add to the lemon spirit, because you wont have as much lemon spirit as the recipe above. so half the agave, boiling water and raw sugar.
Step by step process
Step 1 – Making the Lemon Spirit
- Start by peeling all your lemons (or limes) being careful not to peel too much pith
- add all the peels to a glass jar and measure out 500ml (16.9 oz) of 92% ABV vodka (184 proof). if you cant make or find high proof vodka you can use regular vodka but give the peels an additional week to soak on the vodka as higher ABV vodka helps with better flavour extraction
- allow the vodka to soak on the peels for 1 to 2 weeks (extraction will be finished when the peels loose their colour and become somewhat brittle).
Step 2 – Making the sugar syrup
- After the lemon spirit has finished soaking its time to make the sugar syrup
- measure out 430ml / 14.54oz of boiling water and use it to fully dissolve the 160g / 5.64oz raw sugar and 30g / 1oz of agave syrup
NOTE: if you're starting with 40% vodka then half the sugar syrup ingredients because you wont have as much spirit as the original recipe
Step 3 - Diluting the Lemon Spirit to make Limoncello!
- Strain the peels out of the lemon spirit and use 640ml / 21.6oz of water to dilute the high proof vodka down to 38% (if you started with regular 40% vodka skip this dilution step)
- Now mix the sugar syrup and lemon vodka together to make your limoncello!
- bottle your liquer and store in the freezer to serve ice cold and enjoy!!
.png)
So... What is it?
Us brewers love big punchy IPA's! But what if you want a couple on a school night? Dont knock down the flavour, just knock down the ABV! This is a full flavoured, full bodied session IPA at just 3.5% so now you can enjoy an old school west coast punchy IPA, packed full of resinous, piney and citrus character AND still be able to wake up and go to work the next day!
Batch Size & Stats
- 38L (2 19L corny kegs) / 10 gal finished beer
- 47L (12.4 gal) wort
- For a smaller 19L (5 gal) batch size simply half the ingredients of this recipe
- Starting gravity – 1.035
- Final gravity 1.008
- ABV – 3.5%
- IBU - 57
- Colour - 15 EBC
- Mash Efficiency - 89%
What ingredients?
Water
With sparging
- 30.5L (8 gal) Mash temp 70°C (158°F) 1 hour. use our calculator to determine your strike water temp
- 30.5L (8 gal) sparge water at 78°C (172°F)
Without sparging
- 60L (15.8 gal) Mash temp 70°C (158°F) 1 hour. use our calculator to determine your strike water temp
Malts: 6.13kg (13.5 lb)
- Pale Ale Malt – 5.119kg (11.3 lb) - 83.5%
- Light Munich Malt - 399g (0.88 lb) - 6.5%
- Gladfield Gladiator Malt (Dextrin Malt) - 307g (10.8 oz) - 5%
- Gladfield Medium Crystal Malt - 307g (10.8 oz) - 5%
Hops (606g / 21.4 oz) & whirlfloc tablets
Fuggles (5.3% AA)
- 10g (0.35 oz) - 3 IBU's - 60 minutes left in the boil
Centennial (8.7% AA)
- 57g (2 oz) - 8 IBU's) - 5 minutes left in the boil
- 57g (2 oz) - 3 IBU's) - 20 min whirlpool @ 75°C (167°F)
- 85g (3 oz) - Dry Hop day 7
Lupomax Citra (18.5% AA)
- 57g (2 oz) - 17 IBU's) - 5 minutes left in the boil
- 57g (2 oz) - 6 IBU's) - 20 min whirlpool @ 75°C (167°F)
- 85g (3 oz) - Dry Hop day 7
Lupomax Mosaic (16% AA)
- 57g (2 oz) - 15 IBU's) - 5 minutes left in the boil
- 57g (2 oz) - 5 IBU's) - 20 min whirlpool @ 75°C (167°F)
- 85g (3 oz) - Dry Hop day 7
Whirlfloc tablets
- 1.5g (0.052 oz) / 2 tablets – 15 minutes left in the boil
Yeast options & fermentation temperatures
- 23g Lallemand (LalBrew) Verdant IPA – ferment at 20°C (68 F)
- Any other ale or IPA yeast of choice
Water Profile
- Ca2+87
- Mg2+ 5
- Na+ 15
- Cl- 67
- SO42- 136
- HCO3- 57
Step by step process
Step 1 – Milling
- Mill grains to medium crush (set mill rollers to a gap of approx. 1.05mm / 0.041 inches)
- Just keep in mind roller gap settings are not universal so as you brew more batches you will find the ideal crush size for your setup
- Alternatively if you don’t have a grain mill you can order your grains crushed from most homebrew stores, both online and in person
Step 2 – Mashing
- Mash for 60 minutes at 70°C (158°F)
- Set your strike water to a few degrees above the target mash temperature, you can use our calculator to determine what your strike temperature should be
- ensure you mix in the grains thoroughly with a mash paddle to prevent dough balls from forming (big spoons, spatulas or whisks will also work)
- its easier to mash the grains and prevent dough balls if you add a little grain at a time, mix, add more grain and repeat until all the grains are mixed
- if you don’t have a mash tun with heating then ensure after you have finished mixing the grains in to insulate your mash tun (thick neoprene or heavy blankets both work well)
Step 3 (optional) – Sparging
- if your setup has the capability to sparge then do so with 30L (7.9 gal) sparge water at 78°C (172°F)
- if you are not sparging and using a BIAB (brew in a bag) method then remove grains from mash tun and twist and squeeze the bag to get as much liquid out of the grains as possible
- as you start sparging (or straining your BIAB bag) begin raising the temperature of your wort to a boil
Step 4 – Boiling
- once your wort begins to boil start a timer for a 60-minute boil and add your bittering hops, 10g (0.35 oz) of Fuggles
- at 15 minutes left in the boil add 2 whirlfloc tablets
- With 5 minutes left in the boil add 58g (2 oz) each of Fuggles, Centennial, Lupomax Citra & Lupomax Mosaic
Step 5 – Whirlpooling / cooling
- After 1 hour of boiling cool the wort down to 75°C (167°F) and add your whirlpool hops for a 20 min whirlpool
- After 20 mins of whirlpooling begin chilling wort down to yeast pitching temperature
- once you’ve reached yeast pitching temperature take an original gravity reading of your wort
Step 6 – Yeast Pitching
- It is best to make a yeast starter before beginning your brew day (ideally 1 day before) to ensure your yeast are as active and healthy as possible before pitching, but not completely necessary – you could also just rehydrate yeast 30 minutes before pitching.
- Pitch yeast in wort a degree or two higher than the target fermentation temperature to help yeast take off more aggressively
- To make a yeast starter you can use either:
- DME (dry malt extract) at a ratio of approx. 100g per 1L water (3.5 oz per 33 fluid ounces) for gravity of approx. 1.040
- some unfermented wort kept cold and sanitary from a previous brew day
- 70g of table sugar per 1L water (2.5 oz per 33 fluid ounces) – however, it is best to use malt sugar (wort / DME) whenever possible to reduce the chance of shocking the yeast with a different food source from starter to wort pitching
- To rehydrate yeast
- Add yeast to approx. 10 times as much room temperature water as the weight of the yeast e.g. 10g yeast in 100 ml water (0.35 oz yeast in 3.5 fluid ounces water)
Step 7 – Fermentation & dry hopping
- Allow yeast to ferment over the next two weeks (aprox)
- If you have a temperature-controlled system keep the fermenter temperature to the recommended fermentation temperature for each yeast strain (stated in the yeast ingredients section above)
- Monitor the fermentation activity over the first 10-12 days by the bubbling of the blow-off tube/airlock of your fermenter, as the bubbling slows down (roughly around day 7) take a gravity reading. When the gravity reaches around 1.010 raise the temperature of your fermenter by 1-2 degrees for 2-3 days for a diacetyl rest (if you don’t have temperature control don’t worry about this step, it's not the end of the world!)
- At the same time as starting your Diacetyl rest, add your dry hops, 85g (3 oz) each of Centennial, Lupomax Citra & Lupomax Mosaic
- It's important to note that fermentation times will vary based on your circumstances like temperature, amount of yeast pitched, the healthiness of yeast, the gravity of the wort, pH, etc. so don’t stress be patient and know that these times are just a rough guide
- On day 2 of the diacetyl rest (once gravity reaches roughly 1.009) & gravity is the same 2 days in a row move onto cold crashing! (If you can’t / don’t want to cold crash go straight to kegging/bottling your beer!)
Step 8 (optional) – Cold crashing
- begin cold crashing your fermenter (bring the temperature of your fermenter down to as close to 0°C (32°F) as possible, for 2 days to a week depending on how patient you are
- If you don’t have a temp-controlled fermenter, you can cold crash by putting your fermenter in a fridge or temp-controlled chest freezer
- After you have finished cold crashing it's time to keg/bottle your beer! If you are bottling your beer from the fermenter uncarbonated remember to add about 5-7 grams (0.17 - 0.24 oz) of priming sugar to your bottles to carbonate your beer.
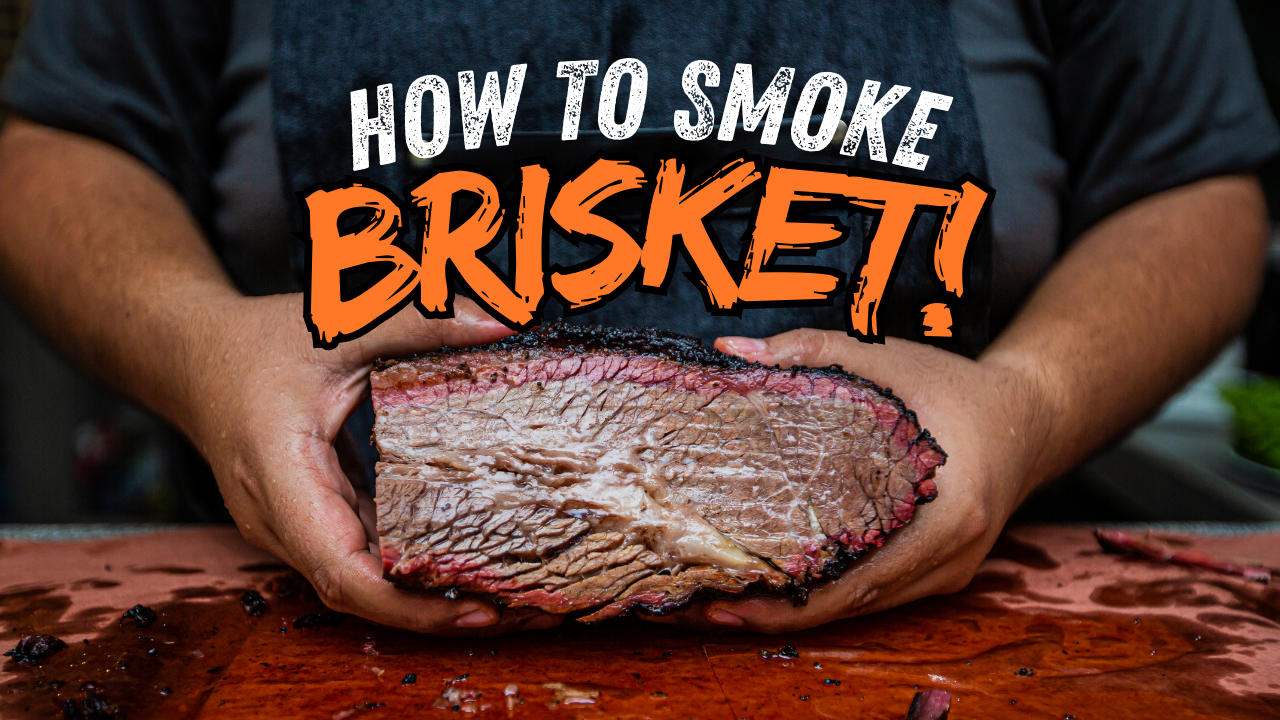
So... What is it?
Texas-style smoked beef brisket is a signature dish of American barbecue! Known for its simplicity and bold flavour —seasoned simply with a coarse rub of salt and black pepper (sometimes with garlic or paprika), then slow-smoked over hardwoods like oak or mesquite for 10–16 hours at low temperatures around 107-121°C / 225–250°F. This long, slow cook renders the fat, breaks down connective tissue, and creates a deep smoke ring beneath a dark, flavorful bark on the outside. The result is incredibly tender, juicy meat with a rich, smoky flavour and a balance of savory crust and melt-in-your-mouth interior!
Batch Size & Cook Time
- 2.5kg (but you can scale this up however big you want!)
- aprox. 12 hours total - roughly 6 hours unwrapped, 4 hours wrapped, 1-2 hours rest
- prep time 15 mins
Equipment
- Smoker (we used a texas style offset smoker but you could use other styles, or make it unsmoked in an oven)
- unwaxed butchers paper or tin foil (I prefer butchers paper)
- thermometer! This is important, we used an inkbird but any bbq Thermometer will do
- charcoal chimney starter
- lighter or matches
What ingredients?
- 2.5kg Brisket (we used a small point cut for this one, but the same methods apply!)
- Salt Rub of your choice
- BBQ Charcoal (i prefer lumpwood)
- Hard wood (can use this alone or charcoal alone) I used Iron Bark
- Smoking woods (optional) such as cherry wood
Step by step process
Step 1 – MEAT PREP – THE NIGHT BEFORE (OR AT LEAST 2 HOURS BEFORE COOKING)
- Ideally you want to cook a whole brisket, as the smaller it is the easier it is to dry out, but like us you could just cook the point
- Trim excess fat to about ¼ inch on top, and remove any hard fat that won’t render.
- Pat the brisket dry with paper towels.
Step 2 – Season generously / Rub your Meat!
- Using a salt rub of your choice pour it over the meat and rub it / pat it into the meats surface as evenly as possible
- if you have the time or patience you could also rest it in a fridge overnight to help dry-brine the brist and gain better bark development, but this is optional!
Step 3 BBQ Prep
- Start your fire in the smoke box, or if using charcoal use your chimney to light the coals, once hot tip them into the fire box
- take your time to stabilize the BBQ temp, aiming for 107-121°C / 225–250°F. You want this to be stable before starting the cook, aim for 30 mins of stability before starting
Step 4 Place brisket on the smoker
- Insert your thermometer into your brisket then place on the BBQ
- Fat side up if heat is from below, down if heat is from above or side. We had ours fat side down
- Position thick end (point) toward the heat source.
- (optional) you can also sprits with apple cider vinegar, water, or beef broth to keep surface moist and enhance bark if you wish to.
- Smoke until internal temp hits ~165°F (74°C) This may take 6–8 hours. The brisket will stall (stop rising in temperature) as moisture evaporates from the surface.
Step 5 Wrap the Brisket
- wrap tightly in butcher paper (preferred for better bark) or foil (for juicier, softer bark)
- return to the smoker and cook until the internal temp reaches 200–205°F (93–96°C)
Step 6 Rest the brisket
- Let it rest wrapped in a cooler or warm oven (around 67°C / 150°F) for at least 1 hour, preferably 2–4 hours. This helps juices redistribute.
Step 7 Time to Slice!
- Cut against the grain of the flat, and rotate 90° when slicing the point.
- Aim for pencil-thick slices (about ¼ inch) / a little over half a cm
- ENJOY!!
.png)
So... What is it?
This is our attempt to make an already super juicy beer even JUCIER! By cramming it full of blood orange flavour and ramping it up to a 8.7% ABV! It gives Huge punchy flavours of mango, pineapple, fresh orange zest and and of course a ton of BLOOD ORANGE! For this beer we did a split batch to compare the blood orange infused version against the "regular" hazy IPA and wow were we stunned with the results, check out the full video below for the deets!
Batch Size & ABV
- 38L (2 19L corny kegs) / 10 gal finished beer
- 50L (13.2 gal) wort
- For a smaller 19L (5 gal) batch size simply half the ingredients of this recipe
- Starting gravity – 1.080
- Final gravity 1.0135
- ABV – 8.7%
- IBU - 38
- Colour - 12.6 EBC
- Mash Efficiency - 80%
Ingredients
Water
- With sparging
- 45L (11.9 gal) strike water approx. for a 60 min mash at 68°C (154.4°F) with a 10 min mash out step at the end at 77°C (170°F)
- 25L (6.6 gal) sparge water at 78°C (172°F)
- Without sparging
- 65L (17.2 gal) strike water approx. for a 60 min mash at 68°C (154.4°F) with a 10 min mash out step at the end at 77°C (170°F)
Malts: 15.995kg (35 lb) of fermentable's
- 10.395 kg - 22.9 lb (65%) — Ale Malt
- 2.5 kg - 5.5lb (15.6%) — Gladfield Rolled Oats
- 1.2 kg - 2.6 lb (7.5%) — Rolled Wheat Malt
- 1.2 kg - 2.6 lb (7.5%) — Wheat Malt
- 700 g - 1.54 lb (4.4%) — Gladiator Malt
- 1 kg (2.2 lb) — Rice Hulls
Adjuncts
- Monin Blood orange syrup - 1.4L / 0.36gal into a keg and rack the beer onto it when finished (we only did this for 1 keg)
Hops & whirlfloc tablets
112 g / 4oz (3 IBU) — Astra 7.9% — Aroma — 20 min hopstand
112 g / 4oz (7 IBU) — Lupomax Amarillo 13.5% — Aroma — 20 min hopstand @ 78 °C
87.5 g / 3oz (3 IBU) — Astra 7.9% — Aroma — 20 min hopstand @ 78 °C
87.5 g / 3oz (8 IBU) — Lupomax simco 19% — Aroma — 20 min hopstand @ 78 °C
57 g / 2oz (5 IBU) — Lupomax Citra 18.5% — Aroma — 20 min hopstand @ 78 °C
200 g / 7oz — Lupomax Amarillo 13.5% — Dry Hop — day 7
87.5 g / 3oz — Astra 7.9% — Dry Hop — day 7
57 g / 3oz — Lupomax Citra 18.5% — Dry Hop — day 7
Yeast options & fermentation temperatures (we co pitched the below but you could use any strain you like)
- 11 g — Lallemand (LalBrew) Pomona - 25 °C (77 °F)
- 22 g — Lallemand (LalBrew) New England - 25 °C (77 °F)
alternatives below
- 23g (0.8 oz) Lallmand East Coast New England Ale Yeast ferment at 25°C (55°F)
- 23g (0.8 oz) Kveik (we used a Omega yeats Espe Kveik, but any kveik is great!) ferment at 32°C
- 23g (0.8 oz) US-05 – ferment at 20°C
- 23g (0.8 oz) S-04 – ferment at 19°C
Water Profile
Ca2+ 130
Mg2+ 16
Na+ 15
Cl- 202
SO42- 100
HCO3- 57
Step by step process
Step 1 – Milling
- Mill grains to medium crush (set mill rollers to a gap of approx. 1mm / 0.039 inches) (BUT DONT crush the rice hulls or oats, add them into your grain separately after crushing them)
- Just keep in mind roller gap settings are not universal so as you brew more batches you will find the ideal crush size for your setup
- Alternatively if you don’t have a grain mill you can order your grains crushed from most homebrew stores, both online and in person
Step 2 – Mashing
- Add your brewing salts and mix to ensure they are fully dissolved prior to mashing in grains
- Mash for 60 minutes at 68°C (154.4°F)
- ensure you mix in the grains thoroughly with a mash paddle to prevent dough balls from forming (big spoons, spatulas or whisks will also work)
- its easier to mash the grains and prevent dough balls if you add a little grain at a time, mix, add more grain and repeat until all the grains are mixed
- now add your mash hops!! This is going to free a bunch of bound thiols from your hops and make this beer even more juicy! I would recommend adding these in a hop bag to make sure you can remove all the hop particles before you start boiling so you don't get extra unaccounted bitterness
- if you don’t have a mash tun with heating then ensure after you have finished mixing the grains in to insulate your mash tun (thick neoprene or heavy blankets both work well)
- after 60 minutes of mashing raise temperature to 77°C (170°F) for 10 minutes to Mash out
Step 3 (optional) – Sparging
- if your setup has the capability to sparge then do so with 25L (6.6 gal) of sparge water at 78 °C (172°F)
- if you are not sparging and using a BIAB (brew in a bag) method then remove grains from mash tun and twist and squeeze the bag to get as much liquid out of the grains as possible
- as you start sparging (or straining your BIAB bag) begin raising the temperature of your wort to a boil
Step 4 – Boiling
- once your wort begins to boil start a timer for a 60-minutes
- after 60 minutes of boiling turn of the heat and chill the temperature of the wort down to 75°C (167°F) and begin whirlpooling
- if you don’t have a wort chiller you could rest your boil kettle in an ice bucket
- if your system can’t whirlpool you can also achieve this with a mash paddle and a power drill, if you don’t have this either don’t worry about whirlpooling it’s not completely necessary
Step 5 – Whirlpooling / whirlpool hop additions
- once temperature reaches 75°C (167°F) and you have started whirlpooling add your whirlpool hops, 87.5 g - 3 oz each of Lupomax versions of Amarillo, Sabro, citra and El Dorado
- allow hops to whirlpool in the wort for 20 minutes and then begin chilling wort again down to yeast pitching temperature
- once you’ve reached yeast pitching temperature take an original gravity reading of your wort
Step 6 – Yeast Pitching
- It is best to make a yeast starter before beginning your brew day (ideally 1 day before) to ensure your yeast are as active and healthy as possible before pitching, but not completely necessary – you could also just rehydrate yeast 30 minutes before pitching.
- Pitch yeast in wort a degree or two higher than the target fermentation temperature to help yeast take off more aggressively
- To make a yeast starter you can use either:
- DME (dry malt extract) at a ratio of approx. 100g per 1L water (3.5 oz per 33 fluid ounces) for gravity of approx. 1.040
- some unfermented wort kept cold and sanitary from a previous brew day
- 70g of table sugar per 1L water (2.5 oz per 33 fluid ounces) – however, it is best to use malt sugar (wort / DME) whenever possible to reduce the chance of shocking the yeast with a different food source from starter to wort pitching
- To rehydrate yeast
- Add yeast to approx. 10 times as much room temperature water as the weight of the yeast e.g. 10g yeast in 100 ml water (0.35 oz yeast in 3.5 fluid ounces water)
Step 7 – Fermentation, dry hopping and Soft Crashing (optional)
- Allow yeast to ferment over the next 5 days to two weeks
- If you have a temperature-controlled system keep the fermenter temperature to the recommended fermentation temperature for each yeast strain (stated in the yeast ingredients section above)
- Monitor the fermentation activity over the first 7 days by the bubbling of the blow-off tube/airlock of your fermenter, as the bubbling slows down (roughly around day 7) take a gravity reading. When the gravity reaches around 1.016 raise the temperature of your fermenter by 1-2 degrees for 2 days for a diacetyl rest (if you don’t have temperature control don’t worry about this step, it's not the end of the world!)
- It's important to note that fermentation times will vary based on your circumstances like temperature, amount of yeast pitched, the healthiness of yeast, the gravity of the wort, pH, etc. so don’t stress be patient and know that these times are just a rough guide
- On day 2 of the diacetyl rest (once gravity reaches roughly 1.013 – 1.014) "Soft Crash" your beer (optional, if you cant temp control move onto dry hopping), by reducing temperature to 13°C (55.4°F)
- After 1 day of soft crashing add your dry hops, 75 g - 2.6 oz each of Lupomax versions of Amarillo, Sabro, citra and El Dorado and allow the temperature of fermentation to rise again up to 22 °C (71.6 °F)
- 1 to 2 days after dry hopping move on to cold crashing and dump trub / remove hops and take a final gravity reading
- (If you can’t / don’t want to cold crash go straight to kegging/bottling your beer!)
- After beer was finished we racked one keg onto the 1.4L / 0.36gal of Monin Blood orange syrup
Step 8 (optional) – Cold crashing
- begin cold crashing your fermenter (bring the temperature of your fermenter down to as close to 0°C (32°F) as possible, for 2 days to a week depending on how patient you are
- If you don’t have a temp-controlled fermenter, you can cold crash by putting your fermenter in a fridge or temp-controlled chest freezer
- After you have finished cold crashing it's time to keg/bottle your beer! If you are bottling your beer from the fermenter uncarbonated remember to add about 5-7 grams (0.17 - 0.24 oz) of priming sugar to your bottles to carbonate your beer.
.jpg)
So... What is it?
Its Easter once again so its time for another specialty stout! This time we go to the humble Oreo in an attempt to make a deliciously creamy cookies n cream sweet stout for Easter! So this beer is going to be moderate in ABV, sweet and creamy finishing with a generous addition of lactose, and of course packed full of delicious chocolate cookie flavour!
Batch Size & Stats
- 19L (19L corny kegs) / 5 gal finished beer
- 24L (6.3 gal) wort
- Starting gravity – 1.055
- Final gravity 1.018
- ABV – 4.8%
- IBU - 24
- Colour - 81 EBC
- Mash Efficiency - 78%
Sorry the brewfather link is a bit weird. dont know why all the finished numbers areoff!!
What ingredients?
Water
With sparging
- 18L (4.7 gal) for a 68°C (154.4°F) mash for 1 hour
- 15L (4 gal) sparge water at 78°C (172°F) - fermenter topped up with 4L (1 gal) post boil to reduce OG
Without sparging
- 30L (7.9 gal) for a 68°C (154.4°F) mash (you can use our strike water calculator to find your ideal strike temp)
Malts: Total 4.313 kg/ 9.5 lb
- 2.282 kg / 5 lb (50%) — Ale Malt
- 639 g / 1.4 lb (14%) — Light Munich Malt
- 320 g / 0.7lb (7%) — Dark Chocolate Malt
- 320 g / 0.7lb (7%) — Wheat Malt
- 320 g / 0.7lb (7%) — Rolled Oats
- 251 g / 0.55 lb (5.5%) — Medium Crystal 240
- 183 g / 0.4 lb (4%) — Midnight Wheat Malt
- 560 g / 1lb — Rice Hulls
Adjuncts
- 250g (0.5 lb) — Lactose (added start of boil)
- 2 kg (4.4 lb) — oreos crushed and added in the mash
- 2 vanilla beans soaked in voda & cacoa nibs for a week
- 400 ml (13.5 oz) — vodka for extract, use total to soak, but about half liquid is absorbed, so only half goes into the fermenter at secondary)
- 300 g — toasted cacao nibs (180C for 7 mins)
Hops & whirlfloc tablets
Northern Brewer
- 14g (12 IBU) (0.5 oz) – 60 mins
- 28g (4 IBU) (1 oz) – 10 mins
Fuggles
- 28g (8 IBU) (1 oz) – 10 mins
Whirlfloc tablets
- 0.75g (0.025 oz) / 1 tablet – 15 minutes left in the boil
Yeast options & fermentation temperatures
- 20g (0.7 oz) Lallemand (LalBrew) Nottingham Yeast – ferment at 18°C / 64.4°F
- 23g (0.8 oz) Aus-05– ferment at 18°C / 64.4°F
- 23g (0.8 oz) US-05 – ferment at 18°C / 64.4°F
- 23g (0.8 oz) S-04 – ferment at 18°C / 64.4°F
Water Profile
- Ca2+67
- Mg2+ 13
- Na+ 15
- Cl- 80
- SO42- 40
- HCO3- 139
Step by step process
Step 1 – Milling
- Mill grains to medium crush (set mill rollers to a gap of approx. 1.00mm / 0.039 inches)
- Just keep in mind roller gap settings are not universal so as you brew more batches you will find the ideal crush size for your setup
- Alternatively if you don’t have a grain mill you can order your grains crushed from most homebrew stores, both online and in person
Step 2 – Mashing
- Mash for 60 mins at 68°C (154.4°F)
- Set your strike water to a few degrees above the target mash temperature, you can use our calculator to determine what your strike temperature should be
- ensure you mix in the grains thoroughly with a mash paddle to prevent dough balls from forming (big spoons, spatulas or whisks will also work)
- its easier to mash the grains and prevent dough balls if you add a little grain at a time, mix, add more grain and repeat until all the grains are mixed
- if you don’t have a mash tun with heating then ensure after you have finished mixing the grains in to insulate your mash tun (thick neoprene or heavy blankets both work well)
- after 60 minutes of mashing raise the temp to 77°C (170°F) for 10-15 minutes to mash out, and deactivate the enzymes breaking down the sugars
Step 3 (optional) – Sparging
- if your setup has the capability to sparge then do so with 30L (7.9 gal) sparge water at 78°C (172°F)
- if you are not sparging and using a BIAB (brew in a bag) method then remove grains from mash tun and twist and squeeze the bag to get as much liquid out of the grains as possible
- as you start sparging (or straining your BIAB bag) begin raising the temperature of your wort to a boil
Step 4 – Boiling
- once your wort begins to boil start a timer for a 60-minute boil and add your bittering hops, 14g (0.5 oz) of Northern Brewer
- at 20 minutes left in the boil add your 250g / 0.5lb of lactose
- at 15 minutes left in the boil add 1 whirlfloc tablets (or 0.75g of granulated whirlfloc)
- at 10 min left in the boil add 28g (1 oz) each of fuggles and northern brewer
Step 5 – Cooling
- After 1 hour of boiling start cooling wort down to yeast pitching temperature
- once you’ve reached yeast pitching temperature take an original gravity reading of your wort
Step 6 – Yeast Pitching
- It is best to make a yeast starter before beginning your brew day (ideally 1 day before) to ensure your yeast are as active and healthy as possible before pitching, but not completely necessary – you could also just rehydrate yeast 30 minutes before pitching.
- Pitch yeast in wort a degree or two higher than the target fermentation temperature to help yeast take off more aggressively
- To make a yeast starter you can use either:
- DME (dry malt extract) at a ratio of approx. 100g per 1L water (3.5 oz per 33 fluid ounces) for gravity of approx. 1.040
- some unfermented wort kept cold and sanitary from a previous brew day
- 70g of table sugar per 1L water (2.5 oz per 33 fluid ounces) – however, it is best to use malt sugar (wort / DME) whenever possible to reduce the chance of shocking the yeast with a different food source from starter to wort pitching
- To rehydrate yeast
- Add yeast to approx. 10 times as much room temperature water as the weight of the yeast e.g. 10g yeast in 100 ml water (0.35 oz yeast in 3.5 fluid ounces water)
Step 7 – Fermentation
- Allow yeast to ferment over the next week to two weeks
- If you have a temperature controlled system keep the fermenter temperature to the recommended fermentation temperature for each yeast strain (stated in the yeast ingredients section above)
- Monitor the fermentation activity over the first 7 days by the bubbling of the blow off tube / airlock of your fermenter, as the bubbling slows down (roughly around day 7) take a gravity reading. When the gravity reaches around 1.014 raise the temperature of your fermenter by 1-2 degrees for 2 days for a diacetyl rest (if you don’t have temperature control don’t worry about this step, its not the end of the world!)
- Once fermentation is finished add the liquid from the cacoa, vanilla vodka tincture to the fermenter and let it all "marinate" for 2 more days
- Once the gravity is the same 2 days in a row move onto cold crashing! (If you can’t / don’t want to cold crash go straight to kegging/bottling your beer!)
Step 8 (optional) – Cold crashing
- begin cold crashing your fermenter (bring the temperature of your fermenter down to as close to 0°C (32°F) as possible, for 2 days to a week depending on how patient you are
- If you don’t have a temp-controlled fermenter, you can cold crash by putting your fermenter in a fridge or temp-controlled chest freezer
- After you have finished cold crashing it's time to keg/bottle your beer! If you are bottling your beer from the fermenter uncarbonated remember to add about 5-7 grams (0.17 - 0.24 oz) of priming sugar to your bottles to carbonate your beer.
.jpg)
So... What is it?
The American Cream Ale is a light, crisp, smooth and easy-drinking, highly carbonated beer, similar to a lighter lager but with a touch more character! It balances mild malt sweetness with a subtle hop presence and has a pale golden to straw color with good clarity and a white, frothy head. It’s brewed using a mix of pale malt and adjuncts like corn or rice, and often fermented with a co pitch of both ale and lager yeast to enhance the smooth clean finish!
What's ours like?
Coming in at an easy drinking 4.6% & 14 IBU's, its crisp with a slightly sweet with a corn like flavour, and incredibly easy to drink! The hop character is sublte and slightly fruity with a citrus finish, and the body is light but not boring! This is an awesome summer beer that will become one of our go-to's for easy afternoon drinking in the setting sun!
Batch Size & Stats
- 42L (2x 19L & 1 half 9L corny kegs) / 11 gal finished beer
- 46L (13.5 gal) wort
- For a smaller 19L (5 gal) batch size simply half the ingredients of this recipe
- Starting gravity – 1.041
- Final gravity 1.006
- ABV – 4.6%
- IBU - 14
- Colour - 4.5 EBC
- Mash Efficiency - 83%
What ingredients?
Water
With sparging
- 30L (7.9 gal) for a 64°C (147°F) mash (you can use our strike water calculator to find your ideal strike temp)
- 30L (7.9 gal) sparge water at 78°C (172°F) - fermenter topped up with 4L (1 gal) post boil to reduce OG
Without sparging
- 55L (14.5 gal) for a 64°C (147°F) mash (you can use our strike water calculator to find your ideal strike temp)
Malts:
- Pilsner Malt – 2.2 kg (4.8 lb) - 31.7%
- Ale Malt – 2.2 kg (4.8 lb) - 31.7%
- Flaked Corn (Maize) – 3.4 kg (4.8 lb) - 31.7%
- Corn Sugar (Dextrose) - 1kg (2.2 lb) - 14.4%
Hops & whirlfloc tablets
Cascade
- 25g (0.88 oz) 12 IBU's – 60 mins
- 75g (2.6 oz) - Whirlpool at 80°C (176°F) for 20 mins
Huell Melon
- 25g (0.88 oz) 2 IBU's – 5 mins
- 50g (1.76 oz) - Whirlpool at 80°C (176°F) for 20 mins
Whirlfloc tablets
- 1.5g (0.052 oz) / 2 tablets – 15 minutes left in the boil
Yeast options & fermentation temperatures
- 1 packet (10.5g) fermentis US-05 American Ale yeast - ferment at 18°C (64.4°F)
AND one lager yeast such as the below
- 1 packet (10.5g) Lallemand Novalager yeast - ferment at 18°C (64.4°F)
- 1 packet (10.5g) Saflager S-23 – ferment at 14°C (57°F)
- 1 packet (10.5g) Saflager W-34/70 – ferment at 14°C (57°F)
Water Profile
- Ca2+28
- Mg2+ 5
- Na+ 15
- Cl- 31
- SO42- 45
- HCO3- 57
Step by step process
Step 1 – Milling
- Mill grains to medium crush (set mill rollers to a gap of approx. 1.00mm / 0.039 inches)
- Just keep in mind roller gap settings are not universal so as you brew more batches you will find the ideal crush size for your setup
- Alternatively if you don’t have a grain mill you can order your grains crushed from most homebrew stores, both online and in person
Step 2 – Mashing
- Mash for 60 minutes at 64°C (147°F)
- Set your strike water to a few degrees above the target mash temperature, you can use our calculator to determine what your strike temperature should be
- ensure you mix in the grains thoroughly with a mash paddle to prevent dough balls from forming (big spoons, spatulas or whisks will also work)
- its easier to mash the grains and prevent dough balls if you add a little grain at a time, mix, add more grain and repeat until all the grains are mixed
- if you don’t have a mash tun with heating then ensure after you have finished mixing the grains in to insulate your mash tun (thick neoprene or heavy blankets both work well)
Step 3 (optional) – Sparging
- if your setup has the capability to sparge then do so with 30L (7.9 gal) sparge water at 78°C (172°F)
- if you are not sparging and using a BIAB (brew in a bag) method then remove grains from mash tun and twist and squeeze the bag to get as much liquid out of the grains as possible
- as you start sparging (or straining your BIAB bag) begin raising the temperature of your wort to a boil
Step 4 – Boiling
- Once your wort begins to boil start a timer for a 60-minute boil and add your bittering hops, 25g (0.88 oz) of Cascade
- At 15 minutes left in the boil add 2 whirlfloc tablets
- With 5 minutes left in the boil add your first set of flavour and aroma hops, 25g (0.88 oz) of Huell Melon
Step 5 – Cooling & Whirlpool Hops
- After 1 hour of boiling start cooling wort down to 80°C (176°F) for a 20 minute whirlpool, then add 50g (1.76 oz) of Huell Melon & 75g (2.6 oz) of Cascade
- After 20 mins of whirlpooling cool the wort down to yeast pitching temp and take an original gravity reading of your wort
Step 6 – Yeast Pitching
- It is best to make a yeast starter before beginning your brew day (ideally 1 day before) to ensure your yeast are as active and healthy as possible before pitching, but not completely necessary – you could also just rehydrate yeast 30 minutes before pitching.
- Pitch yeast in wort a degree or two higher than the target fermentation temperature to help yeast take off more aggressively
- To make a yeast starter you can use either:
- DME (dry malt extract) at a ratio of approx. 100g per 1L water (3.5 oz per 33 fluid ounces) for gravity of approx. 1.040
- some unfermented wort kept cold and sanitary from a previous brew day
- 70g of table sugar per 1L water (2.5 oz per 33 fluid ounces) – however, it is best to use malt sugar (wort / DME) whenever possible to reduce the chance of shocking the yeast with a different food source from starter to wort pitching
- To rehydrate yeast
- Add yeast to approx. 10 times as much room temperature water as the weight of the yeast e.g. 10g yeast in 100 ml water (0.35 oz yeast in 3.5 fluid ounces water)
Step 7 – Fermentation
- Allow yeast to ferment over the next week to two weeks
- If you have a temperature controlled system keep the fermenter temperature to the recommended fermentation temperature for each yeast strain (stated in the yeast ingredients section above)
- Monitor the fermentation activity over the first 7 days by the bubbling of the blow off tube / airlock of your fermenter, as the bubbling slows down (roughly around day 7) take a gravity reading. When the gravity reaches around 1.01 raise the temperature of your fermenter by 1-2 degrees for 2-4 days for a diacetyl rest (if you don’t have temperature control don’t worry about this step, its not the end of the world!)
- Its important to note that fermentation times will vary based on your circumstances like, temperature, amount of yeast pitched, healthiness of yeast, gravity of wort, pH etc. so don’t stress be patient and know that these times are just a rough guide
- Once the gravity is the same 2 days in a row move onto cold crashing! (If you can’t / don’t want to cold crash go straight to kegging/bottling your beer!)
Step 8 (optional) – Cold crashing
- begin cold crashing your fermenter (bring the temperature of your fermenter down to as close to 0°C (32°F) as possible, for 2 days to a week depending on how patient you are
- If you don’t have a temp-controlled fermenter, you can cold crash by putting your fermenter in a fridge or temp-controlled chest freezer
- After you have finished cold crashing it's time to keg/bottle your beer! If you are bottling your beer from the fermenter uncarbonated remember to add about 5-7 grams (0.17 - 0.24 oz) of priming sugar to your bottles to carbonate your beer.
.jpg)
So... What is it?
Irish Red Ale is a smooth, malt-forward beer with a deep amber to reddish-copper hue, traditionally brewed with roasted barley for a subtle toasty dryness. It features flavors of caramel, toffee, and biscuit-like sweetness, balanced by a mild earthy or floral hop presence. With a medium-light to medium body and a moderate ABV (typically 4.0%–6.0%), it’s an easy-drinking ale known for its crisp, slightly dry finish.
What's ours like?
Absolutely delicious! This beer is creamy and silky on the mouth, very similar to a Guinness, but carries a complex sweetness, starting with a toffee like character, before blending more into a dark caramel with just a touch of almost burnt toast, in a good way! Then is finishes dry and refreshing, leaving you longing for another sip!
Batch Size & Stats
- 19L / 5 gal finished beer
- 23L (6 gal) wort
- Starting gravity – 1.044
- Final gravity 1.008
- ABV – 4.7%
- Brewhouse Efficiency 80%
- IBU - 18
What ingredients?
Water
With sparging
- 15L (4 gal) strike water approx. 65°C (149°F)
- 15L (4 gal) sparge water at 78°C (172°F)
Without sparging
- 27L (7.1 gal) strike water approx. 65°C (149°F)
Malts
Total Grain Bill 5kg (11 4lb)
- Ale malt – 3.219kg (7 lb) - 81.7%
- Crisp Light Munich Malt - 394g (0.87 lb) - 10%
- Medium Crystal Malt - 276g (9,7 oz) - 7%
- Roasted Barley- 52g (1.84 oz) - 1.3%
Hops & whirlfloc tablets
East Kent Goldings
- 20g (0.7 oz) 12 IBU - 60 min
- 28g (1 oz) 3 IBU - 5 min
Fuggles
- 28g (1 oz) 4 IBU - 5 min
Whirlfloc
- 0.75g (0.026 oz) / 1 tablets – 15 minutes left in the boil
Water Profile
- Ca2+62
- Mg2+ 5
- Na+ 15
- Cl- 80
- SO42- 60
- HCO3- 57
Yeast options & fermentation temperatures
- S-04 – ferment at 20°C (68°F) 11.5g (0.2 oz)
- any other English varieties will also work
Step by step process
Step 1 – Milling
- Mill grains to medium crush (set mill rollers to a gap of approx. 1.00mm / 0.039 inches (credit card width)
- Just keep in mind roller gap settings are not universal so as you brew more batches you will find the ideal crush size for your setup
- Alternatively if you don’t have a grain mill you can order your grains crushed from most homebrew stores, both online and in person
Step 2 – Mashing
Mash for 60 minutes at 65°C (149°F) with 15L (4 gal) of strike water
- Set your strike water to a few degrees above the target mash temperature (you can use the calculator in our website for this)
- ensure you mix in the grains thoroughly with a mash paddle to prevent dough balls from forming (big spoons, spatulas or whisks will also work)
- its easier to mash the grains and prevent dough balls if you add a little grain at a time, mix, add more grain and repeat until all the grains are mixed
if you don’t have a mash tun with heating then ensure after you have finished mixing the grains in to insulate your mash tun (thick neoprene or heavy blankets both work well)
Step 3 (optional) – Sparging
- if your setup has the capability to sparge then do so with 15L (4 gal) sparge water at 78°C (172°F)
- if you are not sparging and using a BIAB (brew in a bag) method then remove grains from mash tun and twist and squeeze the bag to get as much liquid out of the grains as possible
- as you start sparging (or straining your BIAB bag) begin raising the temperature of your wort to a boil
Step 4 – Boiling
- once your wort begins to boil start a timer for a 60-minute boil and add your bittering hops, 20g (0.7 oz) of East Kent Goldings Hops
- at 15 minutes left in the boil add 1 whirlfloc tablet (OR granulated whirlfloc 0.7g (0.025 oz)
- at 5 minutes left in the boil add 28g (1 oz) each of Fuggles and East Kent Goldings
Step 5 – Whirlpooling / cooling
- After 60 mins of boil turn off your heat and start cooling the wort
- Once you’ve reached yeast pitching temperature take an original gravity reading of your wort
Step 6 – Yeast Pitching
- It is best to make a yeast starter before beginning your brew day (ideally 1 day before) to ensure your yeast are as active and healthy as possible before pitching, but not completely necessary – you could also just rehydrate yeast 30 minutes before pitching.
- Wort Aeration (Optional) if you have a paint mixer give your wort a quick blitz before pitching yeast to help add more dissolved oxygen into the wort to help the yeast have a healthier kick start into fermentation
- Now add your tincture of Vanilla extract! (or you can wait till end of fermentation if you prefer)
- Pitch yeast in wort a degree or two higher than the target fermentation temperature to help yeast take off more aggressively
- To make a yeast starter you can use either:
- DME (dry malt extract) at a ratio of approx. 100g per 1L water (3.5 oz per 33 fluid ounces) for gravity of approx. 1.040
- some unfermented wort kept cold and sanitary from a previous brew day
- 70g of table sugar per 1L water (2.5 oz per 33 fluid ounces) – however, it is best to use malt sugar (wort / DME) whenever possible to reduce the chance of shocking the yeast with a different food source from starter to wort pitching
- To rehydrate yeast
- Add yeast to approx. 10 times as much room temperature water as the weight of the yeast e.g. 10g yeast in 100 ml water (0.35 oz yeast in 3.5 fluid ounces water)
Step 7 – Fermentation
- Allow yeast to ferment over the next two weeks (aprox)
- If you have a temperature-controlled system keep the fermenter temperature to the recommended fermentation temperature for each yeast strain (stated in the yeast ingredients section above)
- It's important to note that fermentation times will vary based on your circumstances like temperature, amount of yeast pitched, the healthiness of yeast, the gravity of the wort, pH, etc. so don’t stress be patient and know that these times are just a rough guide
- If you have temp control then when there are 2 days left of fermentation raise the temperature by 2 degrees for a diacetyl rest (once gravity reaches roughly 1.01) & gravity is the same 3 days in a row move onto cold crashing and adding gelatin! (Dont worry cold crashing & gelatin are both optional steps to help clarify your beer)
Step 8 (optional) – Cold crashing & Gelatin
- begin cold crashing your fermenter (bring the temperature of your fermenter down to as close to 0°C (32°F) as possible, for 2 days to a week depending on how patient you are, and add 1-2 teaspoons of gelatin dissolved in boiling water and allowed to cool a bit to your fermenter
- If you don’t have a temp-controlled fermenter, you can cold crash by putting your fermenter in a fridge or temp-controlled chest freezer
- After you have finished cold crashing it's time to keg/bottle your beer! If you are bottling your beer from the fermenter uncarbonated, remember to add about 5-7 grams (0.17 - 0.24 oz) of priming sugar to your bottles to carbonate your beer.
.jpg)
So... What is it?
This new world pilsner takes all the best aspects of old school European lagers, but adds a fantastic Kiwi twist! Hopped up on a variety of punchy new world NZ hops, it makes the resulting beer a beautiful golden straw coloured spectacle of tropical fruits, like passionfruit, lime zest, mango and generic fruit salad! Ours comes in at 5.4% and still has a subtle maltiness and decent bitterness to make this not just refreshing, but complex and layered with NZ beery goodness!
Batch Size & Stats
- 38L (2 19L corny kegs) / 10 gal finished beer
- 47L (12.4 gal) wort
- For a smaller 19L (5 gal) batch size simply half the ingredients of this recipe
- Starting gravity – 1.051
- Final gravity 1.001
- ABV – 5.4%
- IBU - 30
- Colour - 7.1 EBC
- Mash Efficiency - 83%
What ingredients?
Water
With sparging
- 30L (7.9 gal) Mash temp 65°C (149°F) 1 hour. use our calculator to determine your strike water temp
- 30L (7.9 gal) sparge water at 78°C (172°F)
Without sparging
- 60L (15.8 gal) Mash temp 65°C (149°F) 1 hour. use our calculator to determine your strike water temp
Malts: 9kg (19.8 lb)
- Gladfield Pilsner Malt – 8kg (17.6 lb) - 88.9%
- Gladfield Malt Gladfield Vienna Malt – 1kg (2.2 lb) - 11.1%
Hops & whirlfloc tablets
Motueka
- 28g (1 oz) - 11IBU's - 60 minutes left in the boil
- 70g (2.5 oz) - 6 IBU's) - 5 minutes left in the boil
Nelson Sauvin
- 70g (2.5 oz) - 10 IBU's) - 5 minutes left in the boil
Riwaka
- 70g (2.5 oz) - 4 IBU's) - 5 minutes left in the boil
Whirlfloc tablets
- 1.5g (0.052 oz) / 2 tablets – 15 minutes left in the boil
Yeast options & fermentation temperatures
- 23g SafLager S-23 – ferment at 14°C (57 F)
- 23g SafLager W-34/70 – ferment at 14°C (57 F)
Water Profile
- Ca2+24
- Mg2+ 5
- Na+ 15
- Cl- 31
- SO42- 36
- HCO3- 57
Step by step process
Step 1 – Milling
- Mill grains to medium crush (set mill rollers to a gap of approx. 1.05mm / 0.041 inches)
- Just keep in mind roller gap settings are not universal so as you brew more batches you will find the ideal crush size for your setup
- Alternatively if you don’t have a grain mill you can order your grains crushed from most homebrew stores, both online and in person
Step 2 – Mashing
- Mash for 60 minutes at 65°C (149°F)
- Set your strike water to a few degrees above the target mash temperature, you can use our calculator to determine what your strike temperature should be
- ensure you mix in the grains thoroughly with a mash paddle to prevent dough balls from forming (big spoons, spatulas or whisks will also work)
- its easier to mash the grains and prevent dough balls if you add a little grain at a time, mix, add more grain and repeat until all the grains are mixed
- if you don’t have a mash tun with heating then ensure after you have finished mixing the grains in to insulate your mash tun (thick neoprene or heavy blankets both work well)
Step 3 (optional) – Sparging
- if your setup has the capability to sparge then do so with 30L (7.9 gal) sparge water at 78°C (172°F)
- if you are not sparging and using a BIAB (brew in a bag) method then remove grains from mash tun and twist and squeeze the bag to get as much liquid out of the grains as possible
- as you start sparging (or straining your BIAB bag) begin raising the temperature of your wort to a boil
Step 4 – Boiling
- once your wort begins to boil start a timer for a 60-minute boil and add your bittering hops, 28g (1 oz) of Motueka
- at 15 minutes left in the boil add 2 whirlfloc tablets
- With 5 minutes left in the boil add 70g (2.5 oz) each of Motueka, Riwaka, and Nelson Sauvin
Step 5 – Whirlpooling / cooling
- once wort has been boiling for 60 minutes in total turn off your heat source and begin chilling wort down to yeast pitching temperature
- once you’ve reached yeast pitching temperature take an original gravity reading of your wort
Step 6 – Yeast Pitching
- It is best to make a yeast starter before beginning your brew day (ideally 1 day before) to ensure your yeast are as active and healthy as possible before pitching, but not completely necessary – you could also just rehydrate yeast 30 minutes before pitching.
- Pitch yeast in wort a degree or two higher than the target fermentation temperature to help yeast take off more aggressively
- To make a yeast starter you can use either:
- DME (dry malt extract) at a ratio of approx. 100g per 1L water (3.5 oz per 33 fluid ounces) for gravity of approx. 1.040
- some unfermented wort kept cold and sanitary from a previous brew day
- 70g of table sugar per 1L water (2.5 oz per 33 fluid ounces) – however, it is best to use malt sugar (wort / DME) whenever possible to reduce the chance of shocking the yeast with a different food source from starter to wort pitching
- To rehydrate yeast
- Add yeast to approx. 10 times as much room temperature water as the weight of the yeast e.g. 10g yeast in 100 ml water (0.35 oz yeast in 3.5 fluid ounces water)
Step 7 – Fermentation & dry hopping
- Allow yeast to ferment over the next two weeks (aprox)
- If you have a temperature-controlled system keep the fermenter temperature to the recommended fermentation temperature for each yeast strain (stated in the yeast ingredients section above)
- Monitor the fermentation activity over the first 10-12 days by the bubbling of the blow-off tube/airlock of your fermenter, as the bubbling slows down (roughly around day 10-12) take a gravity reading. When the gravity reaches around 1.010 raise the temperature of your fermenter by 1-2 degrees for 2-3 days for a diacetyl rest (if you don’t have temperature control don’t worry about this step, it's not the end of the world!)
- It's important to note that fermentation times will vary based on your circumstances like temperature, amount of yeast pitched, the healthiness of yeast, the gravity of the wort, pH, etc. so don’t stress be patient and know that these times are just a rough guide
- On day 2 of the diacetyl rest (once gravity reaches roughly 1.009) & gravity is the same 2 days in a row move onto cold crashing! (If you can’t / don’t want to cold crash go straight to kegging/bottling your beer!)
Step 8 (optional) – Cold crashing
- begin cold crashing your fermenter (bring the temperature of your fermenter down to as close to 0°C (32°F) as possible, for 2 days to a week depending on how patient you are
- If you don’t have a temp-controlled fermenter, you can cold crash by putting your fermenter in a fridge or temp-controlled chest freezer
- After you have finished cold crashing it's time to keg/bottle your beer! If you are bottling your beer from the fermenter uncarbonated remember to add about 5-7 grams (0.17 - 0.24 oz) of priming sugar to your bottles to carbonate your beer.
.jpg)
So... What is it?
We love beer! But sometimes you need a beer that wont blow your socks off with booze! so here we made an easy drinking, full flavoured pale ale... but made is sessionable! Imagine a hoppy Australian pale ale, with all the soft maltiness and hoppy punch you know and love, but only 3.3% alcohol! Thats exactly what this is, so you can enjoy it all night long, having a good time with your mates, but still be able to function the next day!
Batch Size & Stats
- 19L / 5 gal finished beer
- 21L (5.5 gal) wort
- Starting gravity – 1.031
- Final gravity 1.006
- ABV – 3.3%
- Brewhouse Efficiency 74%
- EBC - 13.6
- IBU - 19
What ingredients?
Water
With sparging
- 14L (3.7 gal) strike water approx. 67°C (152.6°F) for 60 mins, then mash out at 77°C (170°F) for 15 mins
- 14L (3.7 gal) sparge water at 78°C (172°F)
Without sparging
- 24L (6.3 gal) strike water approx. 64°C (152.6°F) for 60 mins, then mash out at 77°C (170°F) for 15 mins
Malts
Total Grain Bill 5kg (11 4lb)
- 2.54 kg / 5.6 lb (90.7%) — Pilsner Malt
- 140 g / 4.9 oz (5%) — Gladiator Malt / Dextrin Malt
- 120 g / 4.23 oz (4.3%) — Medium Crystal Malt
Hops & whirlfloc tablets
Northern Brewer (8.5% Alpha Acid)
- 5g (0.17 oz) 6 IBU - 60 mins
Huell Melon (7.2% Alpha Acid)
- 30g (1 oz) 3 IBU - 2 mins
Lupomax Citra (18.5% Alpha Acid)
- 30g (1 oz) 6 IBU - 2 mins
Mosaic (12.25% Alpha Acid)
- 30g (1 oz) 4 IBU - 2 mins
Whirlfloc
- 0.75g (0.026 oz) / 1 tablets – 15 minutes left in the boil
Water Profile
- Ca2+87
- Mg2+ 5
- Na+ 15
- Cl- 72
- SO42- 131
- HCO3- 57
Yeast options & fermentation temperatures
- US-05 – ferment at 20°C (68°F) 11g (0.38 oz) / (1 packet)
- AUS-05 – ferment at 20°C (68°F) 11g (0.38 oz) / (1 packet)
- S-04 – ferment at 18°C (64.4°F) 11g (0.38 oz) / (1 packet)
Step by step process
Step 1 – Milling
- Mill grains to medium crush (set mill rollers to a gap of approx. 1.00mm / 0.039 inches (credit card width)
- Just keep in mind roller gap settings are not universal so as you brew more batches you will find the ideal crush size for your setup
- Alternatively if you don’t have a grain mill you can order your grains crushed from most homebrew stores, both online and in person
Step 2 – Mashing
Mash at 67°C (152.6°F) for 60 mins, then mash out at 77°C (170°F) for 15 mins
- Set your strike water to a few degrees above the target mash temperature (you can use the calculator in our website for this)
- ensure you mix in the grains thoroughly with a mash paddle to prevent dough balls from forming (big spoons, spatulas or whisks will also work)
- its easier to mash the grains and prevent dough balls if you add a little grain at a time, mix, add more grain and repeat until all the grains are mixed
if you don’t have a mash tun with heating then ensure after you have finished mixing the grains in to insulate your mash tun (thick neoprene or heavy blankets both work well)
Step 3 (optional) – Sparging
- if your setup has the capability to sparge then do so with 14L (3.7 gal) sparge water at 78°C (172°F)
- if you are not sparging and using a BIAB (brew in a bag) method then remove grains from mash tun and twist and squeeze the bag to get as much liquid out of the grains as possible
- as you start sparging (or straining your BIAB bag) begin raising the temperature of your wort to a boil
Step 4 – Boiling
- once your wort begins to boil start a timer for a 60-minute boil and add your bittering hops, 5g (0.17 oz) of Northern Brewer
- at 15 minutes left in the boil add 1 whirlfloc tablet (OR granulated whirlfloc 0.7g (0.025 oz)) and at 2 mins left add 30g (1 oz) each of Huel Melon, Lupomax Citra and Mosaic
Step 5 – Whirlpooling / cooling
- After 60 mins of boiling turn off your heat source and start cooling wort down
- Once you’ve reached yeast pitching temperature take an original gravity reading of your wort
Step 6 – Yeast Pitching
- It is best to make a yeast starter before beginning your brew day (ideally 1 day before) to ensure your yeast are as active and healthy as possible before pitching, but not completely necessary – you could also just rehydrate yeast 30 minutes before pitching.
- Wort Aeration (Optional) if you have a paint mixer give your wort a quick blitz before pitching yeast to help add more dissolved oxygen into the wort to help the yeast have a healthier kick start into fermentation
- Now add your tincture of Vanilla extract! (or you can wait till end of fermentation if you prefer)
- Pitch yeast in wort a degree or two higher than the target fermentation temperature to help yeast take off more aggressively
- To make a yeast starter you can use either:
- DME (dry malt extract) at a ratio of approx. 100g per 1L water (3.5 oz per 33 fluid ounces) for gravity of approx. 1.040
- some unfermented wort kept cold and sanitary from a previous brew day
- 70g of table sugar per 1L water (2.5 oz per 33 fluid ounces) – however, it is best to use malt sugar (wort / DME) whenever possible to reduce the chance of shocking the yeast with a different food source from starter to wort pitching
- To rehydrate yeast
- Add yeast to approx. 10 times as much room temperature water as the weight of the yeast e.g. 10g yeast in 100 ml water (0.35 oz yeast in 3.5 fluid ounces water)
Step 7 – Fermentation
- Allow yeast to ferment over the next week to two weeks (aprox)
- If you have a temperature-controlled system keep the fermenter temperature to the recommended fermentation temperature for each yeast strain (stated in the yeast ingredients section above)
- It's important to note that fermentation times will vary based on your circumstances like temperature, amount of yeast pitched, the healthiness of yeast, the gravity of the wort, pH, etc. so don’t stress be patient and know that these times are just a rough guide
- If you have temp control then when there are 2 days left of fermentation raise the temperature by 2 degrees for a diacetyl rest (once gravity reaches roughly 1.08) & if gravity is the same 3 days in a row move onto cold crashing and adding gelatin! (Dont worry cold crashing & gelatin are both optional steps to help clarify your beer)
Step 8 (optional) – Cold crashing & Gelatin
- begin cold crashing your fermenter (bring the temperature of your fermenter down to as close to 0°C (32°F) as possible, for 2 days to a week depending on how patient you are, and add 1-2 teaspoons of gelatin dissolved in boiling water and allowed to cool a bit to your fermenter
- If you don’t have a temp-controlled fermenter, you can cold crash by putting your fermenter in a fridge or temp-controlled chest freezer
- After you have finished cold crashing it's time to keg/bottle your beer! If you are bottling your beer from the fermenter uncarbonated, remember to add about 5-7 grams (0.17 - 0.24 oz) of priming sugar to your bottles to carbonate your beer.
.jpg)
So... What is it?
The Cold IPA" is a variant of the classic West Coast IPA invented by Kevin Davey from Wayfinder Beer in Portland, Oregon. This beer strips back all the malt character, and leaves it clean finishing using lager yeast, which allows the symphony of hops to truly shine completely unimpeded by malt are yeast characteristics! Leaving you with the purest form of hoppy beer!
What's ours like?
This is a truly sensational expression of pure hoppy goodness! the malt profile is extremely subdued and dry finishing curtesy of the rice (which we learned from our Japanese lager) and dextrose, and the yeast profile helps to keep everything clean but doesn't throw off any esters that get in the way of the final product. Leaving us with a 7.5% old school style hop bomb! Packed full of resinous character and pine notes, followed by west coast style grapefruit forward citrus and finishing with a slightly zesty orange note, making this an awesome way to see what these hops are really capable of!
Batch Size & Stats
- 38L (2 19L corny kegs) / 10 gal finished beer
- 45L (11.9 gal) wort
- For a smaller 19L (5 gal) batch size simply half the ingredients of this recipe
- Starting gravity – 1.066
- Final gravity 1.009
- ABV – 7.5%
- IBU - 53
- Colour - 6.1 EBC
- Mash Efficiency - 85.7%
What ingredients?
Water
With sparging
- 32L (8.45 gal) for a 30 minute mash at 63°C (145°F) followed by 30 minutes at 70°C (158°F) then a mash out at 77°C (170°F)
- 30L (7.9 gal) sparge water at 78°C (172°F)
Without sparging
- 55L (14.5 gal) for a 30 minute mash at 63°C (145°F) followed by 30 minutes at 70°C (158°F) then a mash out at 77°C (170°F)
Malts: Total 13.6 kg / 30 lb
- Pilsner malt – 8.38 kg (18.5 lb) - 74.3%
- Flaked Rice – 1.9g (4.2 lb) - 16.8%
- Dextrose Powder - 1kg (2.2lb) - 8.9%
Hops & whirlfloc tablets
Centennial
- 22.2g (0.78 oz) - 11 IBU's - 60 minutes left in the boil
- 57g (2 oz) - 11 IBU's - 10 min
- 57g (2 oz) - 0 min
- 114g (4 oz) - Dry Hops - day 15 / near final gravity
Lupomax Citra
- 57g (2 oz) - 20 IBU's - 10 min
- 57g (2 oz) - 0 min
- 114g (4 oz) - Dry Hops - day 15 / near final gravity
Simcoe
- 57g (2 oz) - 14 IBU's - 10 min
- 57g (2 oz) - 0 min
- 114g (4 oz) - Dry Hops - day 15 / near final gravity
Whirlfloc tablets
- 1.5g (0.052 oz) / 2 tablets – 15 minutes left in the boil
Yeast options & fermentation temperatures
- 23g (0.8 oz) Saflager s-23 at 13.5°C / 56.3°F for 15 days, followed by diacetyle rest for 2 days at 15°C / 59°F then a cold crash
- 23g (0.8 oz) Saflager W-34/70 at 13.5°C / 56.3°F for 15 days, followed by diacetyle rest for 2 days at 15°C / 59°F then a cold crash
Water Profile
- Ca2+110
- Mg2+ 18
- Na+ 16
- Cl- 100
- SO42- 200
- HCO3- 57
Step by step process
Step 1 – Milling
- Mill grains to medium crush (set mill rollers to a gap of approx. 1.00mm / 0.039 inches)
- Just keep in mind roller gap settings are not universal so as you brew more batches you will find the ideal crush size for your setup
- Alternatively if you don’t have a grain mill you can order your grains crushed from most homebrew stores, both online and in person
Step 2 – Mashing
- Mash for 30 minutes at 63°C (145°F) followed by 30 minutes at 70°C (158°F) then a mash out at 77°C (170°F)
- Set your strike water to a few degrees above the target mash temperature, you can use our calculator to determine what your strike temperature should be
- ensure you mix in the grains thoroughly with a mash paddle to prevent dough balls from forming (big spoons, spatulas or whisks will also work)
- its easier to mash the grains and prevent dough balls if you add a little grain at a time, mix, add more grain and repeat until all the grains are mixed
- if you don’t have a mash tun with heating then ensure after you have finished mixing the grains in to insulate your mash tun (thick neoprene or heavy blankets both work well)
- after 60 minutes of mashing raise the temp to 77°C (170°F) for 10-15 minutes to mash out, and deactivate the enzymes breaking down the sugars
Step 3 (optional) – Sparging
- if your setup has the capability to sparge then do so with 30L (7.9 gal) sparge water at 78°C (172°F)
- if you are not sparging and using a BIAB (brew in a bag) method then remove grains from mash tun and twist and squeeze the bag to get as much liquid out of the grains as possible
- as you start sparging (or straining your BIAB bag) begin raising the temperature of your wort to a boil
Step 4 – Boiling
- once your wort begins to boil start a timer for a 60-minute boil and add your bittering hops, 22.2g (0.78 oz) of Centennial
- at 15 minutes left in the boil add 2.5 whirlfloc tablets
- at 10 minutes left in the boil add 57g (2 oz) each of Centennial, Lupomax Citra and simcoe
- at Flameout / 0 minutes left in the boil add 57g (2oz) of the same hops
Step 5 – Cooling
- After 1 hour of boiling start cooling wort down to yeast pitching temperature
- once you’ve reached yeast pitching temperature take an original gravity reading of your wort
Step 6 – Yeast Pitching
- It is best to make a yeast starter before beginning your brew day (ideally 1 day before) to ensure your yeast are as active and healthy as possible before pitching, but not completely necessary – you could also just rehydrate yeast 30 minutes before pitching.
- Pitch yeast in wort a degree or two higher than the target fermentation temperature to help yeast take off more aggressively
- To make a yeast starter you can use either:
- DME (dry malt extract) at a ratio of approx. 100g per 1L water (3.5 oz per 33 fluid ounces) for gravity of approx. 1.040
- some unfermented wort kept cold and sanitary from a previous brew day
- 70g of table sugar per 1L water (2.5 oz per 33 fluid ounces) – however, it is best to use malt sugar (wort / DME) whenever possible to reduce the chance of shocking the yeast with a different food source from starter to wort pitching
- To rehydrate yeast
- Add yeast to approx. 10 times as much room temperature water as the weight of the yeast e.g. 10g yeast in 100 ml water (0.35 oz yeast in 3.5 fluid ounces water)
Step 7 – Fermentation & Dry Hopping
- Allow yeast to ferment over the next week to two weeks
- If you have a temperature controlled system keep the fermenter temperature to the recommended fermentation temperature for each yeast strain (stated in the yeast ingredients section above)
- Monitor the fermentation activity over the first 14 days by the bubbling of the blow off tube / airlock of your fermenter, as the bubbling slows down (roughly around day 7) take a gravity reading. When the gravity reaches around 1.011 raise the temperature of your fermenter by 1-2 degrees for 2 days for a diacetyl rest (if you don’t have temperature control don’t worry about this step, its not the end of the world!)
- On day 2 of the diacetyl rest its time to Dry Hop, add 114g (4 oz) each of Lupomax citra, Centennial and simcoe to the fermenter
- Its important to note that fermentation times will vary based on your circumstances like, temperature, amount of yeast pitched, healthiness of yeast, gravity of wort, pH etc. so don’t stress be patient and know that these times are just a rough guide
- Once the gravity is the same 2 days in a row move onto cold crashing! (If you can’t / don’t want to cold crash go straight to kegging/bottling your beer!)
Step 8 (optional) – Cold crashing
- begin cold crashing your fermenter (bring the temperature of your fermenter down to as close to 0°C (32°F) as possible, for 2 days to a week depending on how patient you are
- If you don’t have a temp-controlled fermenter, you can cold crash by putting your fermenter in a fridge or temp-controlled chest freezer
- After you have finished cold crashing it's time to keg/bottle your beer! If you are bottling your beer from the fermenter uncarbonated remember to add about 5-7 grams (0.17 - 0.24 oz) of priming sugar to your bottles to carbonate your beer.
.png)
So... What is it?
The Berliner Weisse is a sour wheat beer from (you guessed it) Berlin, Germany! characterized by its slightly sour character and light abv (normally around 3-3.5%) it's a fantastic drop for summer in the beer garden, typically having a very light body, tartness on the tongue, and fresh fruity character. This also makes it a fantastic beer for fruit infusions!
What is ours like?
This doesn't feel like beer! This is an acai berry smoothie with booze! Its a cheat code to feeling healthy while you drink beer, because you arn't drinking, you're "detoxing"! The mouthfeel is slightly tart, the bitterness noticeable, and the hop character subdued, because the star of the show is the sweet medley of Blueberries, Strawberries, Blackberries, Raspberries and of course HEAPS of Acai Berries! Its sweet but less so than the Raspberry sour, leaning more towards an earthy resinous sweetness which actually makes it super refreshing and moreish! Coming in around 4.5-5% its an excellent thirst quencher for the "healthy" Brewer!
Batch size & ABV
- 25L / 5 gal finished beer
- 30L (6 gal) wort
- Starting gravity – 1.042
- Final gravity 1.008
- ABV – 4.5%
- Brewhouse Efficiency 88%
- IBU 9
- Pre Sour pH 5.8
- Post Sour pH 3.41
Ingredients
Water
With sparging
- 15.5L (4 gal) strike water, Mash at 65°C (149°F) for 60 mins, strike temp approx. 69°C (156°F) use our calculator for this
- 15.5L (4 gal) sparge water at 78°C (172°F)
Without sparging
- 28L (7.4 gal) strike water, Mash at 66°C (151°F) for 60 mins, strike temp approx. 65°C (149°F) use our calculator for this
Malts - 3.751kg (8.27 lb)
- Pilsner malt – 1.988kg (4.38 lb) - 53%
- Wheat malt – 1.763kg (3.9 lb) - 47%
- Rice Hulls – 170g (0.5 lb)
Fruit Addition
- 2 kg (4.4 lb) Acai Berry Puree (around 1.01 / 7 days)
- 1 kg (1.2 lb) Pureed Mixed Berries - Blueberries, Strawberries, Blackberries, Raspberries (around 1.01 / 7 days)
Hops & whirlfloc tablets
Hallertau Huell Melon
- 6g (0.21 oz) - 6 IBU's - 60 minutes left in the boil
Hallertau Huell Melon
- 15g (0.53 oz) - 2 IBU's - 5 minutes left in the boil
Whirlfloc Tablets
- 1 tablet – 15 minutes left in the toil OR granulated whirlfloc 0.7g (0.025 oz)
Yeast & Lactobacillus fermentation temperature
- For the kettle souring we pitched 6 bottles of Yakult and allowed it to sour for 24 hours to reach a pH of 3.41
- US-05 – ferment at 20°C (68°F) to 25°C (77°F) 22g (2 packets)
Water Profile
- Ca2+46
- Mg2+ 5
- Na+ 15
- Cl- 55
- SO42- 55
- HCO3- 57
Step by step process
Step 1 – Milling
- Mill grains to medium crush (set mill rollers to a gap of approx. 1.00mm / 0.039 inches)
- Just keep in mind roller gap settings are not universal so as you brew more batches you will find the ideal crush size for your setup
- Alternatively if you don’t have a grain mill you can order your grains crushed from most homebrew stores, both online and in person
Step 2 – Mashing
- Mash for 60 minutes at 65°C (149°F)
- Set your strike water to a few degrees above the target mash temperature, you can use our calculator to determine what your strike temperature should be
- ensure you mix in the grains thoroughly with a mash paddle to prevent dough balls from forming (big spoons, spatulas or whisks will also work)
- its easier to mash the grains and prevent dough balls if you add a little grain at a time, mix, add more grain and repeat until all the grains are mixed
- if you don’t have a mash tun with heating then ensure after you have finished mixing the grains in to insulate your mash tun (thick neoprene or heavy blankets both work well)
Step 3 (optional) – Sparging
- if your setup has the capability to sparge then do so with 15.5L (4 gal) sparge water at 78°C (172°F)
- if you are not sparging and using a BIAB (brew in a bag) method then remove grains from mash tun and twist and squeeze the bag to get as much liquid out of the grains as possible
- as you start sparging (or straining your BIAB bag) begin raising the temperature of your wort to a boil
Step 4 Souring!
- At this point allow your wort to cool down to 33°C (86-91.4°F) and then pitch 6 bottles (390mL / 13 oz) of Yakult into the wort, this will pitch around 390 billion cells!
- If you can keep the temp around 33°C (91.4°F) whilst it sours, and at this point you are at the mercy of the lacto!
- Check the pH using a pH meter every 6-12 hours until it reaches your desired level and then immediately move on to boiling!
- We allowed ours to reach 3.41, but aim for anywhere between 3.3 - 3.6
Step 5 – Boiling
- once your wort begins to boil start a timer for a 60-minute boil and add your bittering hops, 6g (0.21 oz) of Northern Brewer
- at 15 minutes left in the boil add 1 whirlfloc tablet (OR granulated whirlfloc 0.7g (0.025 oz)) and 15g (0.53 oz) of Hallertau Huell Melon
Step 6 – Whirlpooling / cooling
- once wort has been boiling for 60 minutes in total turn off your heat source and begin chilling wort down to yeast pitching temperature
- once you’ve reached yeast pitching temperature take an original gravity reading of your wort
Step 7 – Yeast Pitching
- It is best to make a yeast starter before beginning your brew day (ideally 1 day before) to ensure your yeast are as active and healthy as possible before pitching, but not completely necessary – you could also just rehydrate yeast 30 minutes before pitching.
- Wort Aeration (Optional) if you have a paint mixer give your wort a quick blitz before pitching yeast to help add more dissolved oxygen into the wort to help the yeast have a healthier kick start into fermentation
- Pitch yeast in wort a degree or two higher than the target fermentation temperature to help yeast take off more aggressively
- To make a yeast starter you can use either:
- DME (dry malt extract) at a ratio of approx. 100g per 1L water (3.5 oz per 33 fluid ounces) for gravity of approx. 1.040
- some unfermented wort kept cold and sanitary from a previous brew day
- 70g of table sugar per 1L water (2.5 oz per 33 fluid ounces) – however, it is best to use malt sugar (wort / DME) whenever possible to reduce the chance of shocking the yeast with a different food source from starter to wort pitching
- To rehydrate yeast
- Add yeast to approx. 10 times as much room temperature water as the weight of the yeast e.g. 10g yeast in 100 ml water (0.35 oz yeast in 3.5 fluid ounces water)
Step 8 – Fermentation & Fruit additions!
- Allow yeast to ferment over the next week (aprox)
- If you have a temperature-controlled system keep the fermenter temperature to the recommended fermentation temperature for each yeast strain (stated in the yeast ingredients section above)
- Monitor the fermentation activity over the first 7 days by the bubbling of the blow-off tube/airlock of your fermenter, as the bubbling slows down (roughly around day 5-7) take a gravity reading. When the gravity reaches around 1.012 raise the temperature of your fermenter by 1-2 degrees for 2 days for a diacetyl rest (if you don’t have temperature control don’t worry about this step, it's not the end of the world!)
Time to add FRUIT!
2 kg (4.4 lb) Acai Berry Puree (around 1.01 / 7 days)
1 kg (1.2 lb) Pureed Mixed Berries - Blueberries, Strawberries, Blackberries, Raspberries (around 1.01 / 7 days)
- It's important to note that fermentation times will vary based on your circumstances like temperature, amount of yeast pitched, the healthiness of yeast, the gravity of the wort, pH, etc. so don’t stress be patient and know that these times are just a rough guide
- On day 2 of the diacetyl rest (once gravity reaches roughly 1.008-1.01) & gravity is the same 3 days in a row move onto cold crashing! (If you can’t / don’t want to cold crash go straight to kegging/bottling your beer!)
Step 9 (optional) – Cold crashing
- begin cold crashing your fermenter (bring the temperature of your fermenter down to as close to 0°C (32°F) as possible, for 2 days to a week depending on how patient you are
- If you don’t have a temp-controlled fermenter, you can cold crash by putting your fermenter in a fridge or temp-controlled chest freezer
- After you have finished cold crashing it's time to keg/bottle your beer! If you are bottling your beer from the fermenter uncarbonated remember to add about 5-7grams (0.17 - 0.24 oz) of priming sugar to your bottles to carbonate your beer.
.png)
So... What is it?
This is an ancient style (or as close as we can get) of Norwegian farmhouse ale, so the focus is all about amazing kveik yeast expression, pine tree resinous flavours and beautiful malty mouthfeel and character! To make this beer we ran a 4 hour boil, we cut down and made a pine tree luge and we ran an open fermentation! So this was a lot of firsts for us, but boy this beer does not dissapoint! Its packed full of sweet and complex malt character, almost like a decoction mash Marzen, but bursting with tropical fruits like mango, orange citrus and guava from the Kveik yeast, and underneath it all there's hints of the forest from the pine tree infusion. This is truely on of my favourite brews ever, and it was made with the symbol of Christmas!
Batch Size & ABV
- 38L (2 19L corny kegs) / 10 gal finished beer
- 48L (12.7 gal) wort
- For a smaller 19L (5 gal) batch size simply half the ingredients of this recipe
- Starting gravity – 1.077
- Final gravity 1.01
- ABV – 8.8%
- IBU - 34
- Mash Efficiency - 81%
Ingredients
Water
- With sparging
- 50L (13.2 gal) strike water approx. for a 60 min mash at 67°C (152.6°F) with a 10 min mash out step at the end at 77°C (170°F)
- 30L (7.9 gal) sparge water at 78°C (172°F)
- Without sparging
- 70L (18.5 gal) strike water approx. for a 60 min mash at 67°C (152.6°F) with a 10 min mash out step at the end at 77°C (170°F)
Malts: 14kg (30.9 lb)
- 14 kg - 30.9 lb (63%) — Pilsner Malt
Hops & whirlfloc tablets
70 g - 2.5 oz (4 IBU) — East Kent Goldings 5% — Mash
58 g - 2 oz (14 IBU) — East Kent Goldings 5% — 60 Min Boil
70 g - 2.5 oz (6 IBU) — East Kent Goldings 5% — 10 Min Boil
70 g - 2.5 oz (6 IBU) — Fuggles 4.5% — 10 Min Boil
Adjuncts
250 g (8.8 oz)— Pine Shoots - Mash
250 g (14.1 oz) — Pine Shoots - Boil 10 min
1 Pine tree Luge - Mash
Yeast options & fermentation temperatures
- 33 g — Lallemand (LalBrew) Voss Kveik - 34 °C (93 °F)
Water Profile
Ca2+ 61
Mg2+ 9
Na+ 20
Cl- 50
SO42- 44
HCO3- 155
Step by step process
Step 1 – Milling
- Mill grains to medium crush (set mill rollers to a gap of approx. 1mm / 0.039 inches) (BUT DONT crush the rice hulls or oats, add them into your grain separately after crushing them)
- Just keep in mind roller gap settings are not universal so as you brew more batches you will find the ideal crush size for your setup
- Alternatively if you don’t have a grain mill you can order your grains crushed from most homebrew stores, both online and in person
Step 1.1 – Cut your Tree!
- Using a saw cut down a pine tree of your choice and slice off the branches of the tree from the trunk
- Then cut a channel through the centre of the trunk to make a luge to flow the hot wort through during the mashing step
- seperate your pine needles (shoots) to be used for both mashing and boiling
Step 2 – Mashing
- Add your brewing salts and mix to ensure they are fully dissolved prior to mashing in grains
- Mash for 60 minutes at 67°C (152.6°F)
- ensure you mix in the grains thoroughly with a mash paddle to prevent dough balls from forming (big spoons, spatulas or whisks will also work)
- its easier to mash the grains and prevent dough balls if you add a little grain at a time, mix, add more grain and repeat until all the grains are mixed
- now add your mash hops!! This is going to free a bunch of bound thiols from your hops and make this beer even more juicy! I would recommend adding these in a hop bag to make sure you can remove all the hop particles before you start boiling so you don't get extra unaccounted bitterness
- Now begin recirculating your wort through your pine tree luge and add your mash pine needles!
- if you don’t have a mash tun with heating then ensure after you have finished mixing the grains in to insulate your mash tun (thick neoprene or heavy blankets both work well)
- after 60 minutes of mashing raise temperature to 77°C (170°F) for 10 minutes to Mash out
Step 3 (optional) – Sparging
- if your setup has the capability to sparge then do so with 30L (7.9 gal) of sparge water at 78 °C (172°F)
- if you are not sparging and using a BIAB (brew in a bag) method then remove grains from mash tun and twist and squeeze the bag to get as much liquid out of the grains as possible
- as you start sparging (or straining your BIAB bag) begin raising the temperature of your wort to a boil
Step 4 – Boiling
- once your wort begins to boil start a timer for a 4 hours!! we want a nice long boil to raise our original gravity and create complex Maillard reactions to produce melanoidins in our beer and help change the colour!
- After 3 hours of boiling add your 60 minute boil addition of hops, 58 g - 2 oz of East Kent Goldings
- With 10 minutes of boiling left add your final flavour & aroma hops, 70 g - 2.5 oz each of East Kent Goldings & Fuggles as well as your boil addition of pine needles, 400g / 14.1 oz
Step 5 – Cooling & Transferring
- After the full 4 hours of boil, begin cooling the wort down to yeast pitching temperature, around 34 °C (93 °F)
- once you’ve reached yeast pitching temperature take an original gravity reading of your wort
Step 6 – Yeast Pitching
- It is best to make a yeast starter before beginning your brew day (ideally 1 day before) to ensure your yeast are as active and healthy as possible before pitching, but not completely necessary – you could also just rehydrate yeast 30 minutes before pitching.
- Pitch yeast in wort a degree or two higher than the target fermentation temperature to help yeast take off more aggressively
- To make a yeast starter you can use either:
- DME (dry malt extract) at a ratio of approx. 100g per 1L water (3.5 oz per 33 fluid ounces) for gravity of approx. 1.040
- some unfermented wort kept cold and sanitary from a previous brew day
- 70g of table sugar per 1L water (2.5 oz per 33 fluid ounces) – however, it is best to use malt sugar (wort / DME) whenever possible to reduce the chance of shocking the yeast with a different food source from starter to wort pitching
- To rehydrate yeast
- Add yeast to approx. 10 times as much room temperature water as the weight of the yeast e.g. 10g yeast in 100 ml water (0.35 oz yeast in 3.5 fluid ounces water)
Step 7 – Fermentation
- Allow yeast to ferment over the next 5 days to two weeks
- If you have a temperature-controlled system keep the fermenter temperature to the recommended fermentation temperature for each yeast strain (stated in the yeast ingredients section above)
- Monitor the fermentation activity over the first 7 days by the bubbling of the blow-off tube/airlock of your fermenter, as the bubbling slows down (roughly around day 7) take a gravity reading. When the gravity is the same 2-3 days in a row fermentation is finished
Step 8 (optional) – Cold crashing
- begin cold crashing your fermenter (bring the temperature of your fermenter down to as close to 0°C (32°F) as possible, for 2 days to a week depending on how patient you are
- If you don’t have a temp-controlled fermenter, you can cold crash by putting your fermenter in a fridge or temp-controlled chest freezer
- After you have finished cold crashing it's time to keg/bottle your beer! If you are bottling your beer from the fermenter uncarbonated remember to add about 5-7 grams (0.17 - 0.24 oz) of priming sugar to your bottles to carbonate your beer.
.png)
So... What is it?
Our Thiolized Juicy NEIPA was amazing, so how can we make it more juicy, more hazy and more challenging? By using 100% Oats!! This is the Thiolized juicy NEIPA on hard mode! It comes in at 7% and is loaded up with all the same juicy punch characteristics of the original recipe, featuring mango, pineapple, and fresh orange zest and candy-like sweetness! The body is certainly creamy, however has a drier finish than expected, so we recommend using half the enzymes we did in our brew-day video to keep that body thick and voluptuous!
Batch Size & ABV
- 19L (1 corny kegs) / 5 gal finished beer
- 23L (6 gal) wort
- Starting gravity – 1.059
- Final gravity 1.006
- ABV – 7%
- IBU - 38
- Colour - 9.5 EBC
- Mash Efficiency - 80%
Ingredients
Water
With sparging
- 22L (5.8 gal) strike water approx. for a 60 min mash at 68°C (154.4°F) with a 10 min mash out step at the end at 77°C (170°F)
- 15L (4 gal) sparge water at 78°C (172°F)
Without sparging
- 30L (7.9 gal) strike water approx. for a 60 min mash at 68°C (154.4°F) with a 10 min mash out step at the end at 77°C (170°F)
Malts: 7.5kg (16.5 lb) of fermentable's [8kg (17.6lb) with rice hulls]
- 6.5 kg - 22.9 lb (86.7%) — Big O Malted Oats
- 1 kg - 5.4lb (13.3%) — Rolled Oats
- 0.5 kg (1.1 lb) — Rice Hulls
Hops & whirlfloc tablets
19 g / 0.67 oz (10 IBU) — Lupomax Citra 18.5% — Mash
43.8 g / 1.55 oz (5 IBU) — El Dorado 11.6% — Aroma — 20 min hopstand @ 75 °C
43.8 g / 1.55 oz (6 IBU) — Lupomax Amarillo 13.5% — Aroma — 20 min hopstand @ 75 °C
43.8 g / 1.55 oz (8 IBU) — Lupomax Citra 18.5% — Aroma — 20 min hopstand @ 75 °C
43.8 g / 1.55 oz (8 IBU) — Lupomax Sabro 19% — Aroma — 20 min hopstand @ 75 °C
37.5 g / 1.3 oz — El Dorado 11.6% — Dry Hop — day 7
37.5 g / 1.3 oz — Lupomax Amarillo 13.5% — Dry Hop — day 7
37.5 g / 1.3 oz — Lupomax Citra 18.5% — Dry Hop — day 7
37.5 g / 1.3 oz — Lupomax Sabro 19% — Dry Hop — day 7
Enzymes! (I recommend using half of the below rates to retain more body & finish with a higher gravity)
- Benzyme AA 4X - 1ml / 0.035 oz
- Benzyme Glucoamylase - 6.5ml / 0.23 oz
- Novozymes Ultraflo Max (optional) - 1.8ml / 0.06 oz
Yeast options & fermentation temperatures
- 11.5 g (0.4 oz) — Lallemand (LalBrew) Pomona - 22 °C (71.6 °F)
alternatives below
- 23g (0.8 oz) Lallmand East Coast New England Ale Yeast ferment at 25°C (55°F)
- 23g (0.8 oz) Kveik (we used a Omega yeats Espe Kveik, but any kveik is great!) ferment at 32°C
- 23g (0.8 oz) US-05 – ferment at 20°C
- 23g (0.8 oz) S-04 – ferment at 19°C
Water Profile
Ca2+ 141
Mg2+ 9
Na+ 15
Cl- 202
SO42- 100
HCO3- 57
Step by step process
Step 1 – Milling
- Mill grains to medium crush (set mill rollers to a gap of approx. 1mm / 0.039 inches) (BUT DONT crush the rice hulls or oats, add them into your grain separately after crushing them)
- Just keep in mind roller gap settings are not universal so as you brew more batches you will find the ideal crush size for your setup
- Alternatively if you don’t have a grain mill you can order your grains crushed from most homebrew stores, both online and in person
Step 2 – Mashing & Enzymes!
- Add your brewing salts and mix to ensure they are fully dissolved prior to mashing in grains
- Mash for 60 minutes at 68°C (154.4°F)
- ensure you mix in the grains thoroughly with a mash paddle to prevent dough balls from forming (big spoons, spatulas or whisks will also work)
- Mash in aprox 15% of your total grain bill then add the Enzymes listed above!! These will ensure you can actually convert sugars from the Oats because they have zero diastatic power of their own!
- its easier to mash the grains and prevent dough balls if you add a little grain at a time, mix, add more grain and repeat until all the grains are mixed
- now add your mash hops!! This is going to free a bunch of bound thiols from your hops and make this beer even more juicy! I would recommend adding these in a hop bag to make sure you can remove all the hop particles before you start boiling so you don't get extra unaccounted bitterness
- if you don’t have a mash tun with heating then ensure after you have finished mixing the grains in to insulate your mash tun (thick neoprene or heavy blankets both work well)
- after 60 minutes of mashing raise temperature to 77°C (170°F) for 10 minutes to Mash out
Step 3 (optional) – Sparging
- if your setup has the capability to sparge then do so with 15L (4 gal) of sparge water at 78 °C (172°F)
- if you are not sparging and using a BIAB (brew in a bag) method then remove grains from mash tun and twist and squeeze the bag to get as much liquid out of the grains as possible
- as you start sparging (or straining your BIAB bag) begin raising the temperature of your wort to a boil
Step 4 – Boiling
- once your wort begins to boil start a timer for a 90-minutes
- after 90 minutes of boiling turn of the heat and chill the temperature of the wort down to 75°C (167°F) and begin whirlpooling
- if you don’t have a wort chiller you could rest your boil kettle in an ice bucket
- if your system can’t whirlpool you can also achieve this with a mash paddle and a power drill, if you don’t have this either don’t worry about whirlpooling it’s not completely necessary
Step 5 – Whirlpooling / whirlpool hop additions
- once temperature reaches 75°C (167°F) and you have started whirlpooling add your whirlpool hops,43.8 g / 1.55 oz each of Lupomax versions of Amarillo, Sabro, citra and El Dorado
- allow hops to whirlpool in the wort for 20 minutes and then begin chilling wort again down to yeast pitching temperature
- once you’ve reached yeast pitching temperature take an original gravity reading of your wort
Step 6 – Yeast Pitching
- It is best to make a yeast starter before beginning your brew day (ideally 1 day before) to ensure your yeast are as active and healthy as possible before pitching, but not completely necessary – you could also just rehydrate yeast 30 minutes before pitching.
- Pitch yeast in wort a degree or two higher than the target fermentation temperature to help yeast take off more aggressively
- To make a yeast starter you can use either:
- DME (dry malt extract) at a ratio of approx. 100g per 1L water (3.5 oz per 33 fluid ounces) for gravity of approx. 1.040
- some unfermented wort kept cold and sanitary from a previous brew day
- 70g of table sugar per 1L water (2.5 oz per 33 fluid ounces) – however, it is best to use malt sugar (wort / DME) whenever possible to reduce the chance of shocking the yeast with a different food source from starter to wort pitching
- To rehydrate yeast
- Add yeast to approx. 10 times as much room temperature water as the weight of the yeast e.g. 10g yeast in 100 ml water (0.35 oz yeast in 3.5 fluid ounces water)
Step 7 – Fermentation, dry hopping and Soft Crashing (optional)
- Allow yeast to ferment over the next 5 days to two weeks
- If you have a temperature-controlled system keep the fermenter temperature to the recommended fermentation temperature for each yeast strain (stated in the yeast ingredients section above)
- Monitor the fermentation activity over the first 7 days by the bubbling of the blow-off tube/airlock of your fermenter, as the bubbling slows down (roughly around day 7) take a gravity reading. When the gravity reaches around 1.016 raise the temperature of your fermenter by 1-2 degrees for 2 days for a diacetyl rest (if you don’t have temperature control don’t worry about this step, it's not the end of the world!)
- It's important to note that fermentation times will vary based on your circumstances like temperature, amount of yeast pitched, the healthiness of yeast, the gravity of the wort, pH, etc. so don’t stress be patient and know that these times are just a rough guide
- On day 2 of the diacetyl rest (once gravity reaches roughly 1.01) "Soft Crash" your beer (optional, if you cant temp control move onto dry hopping), by reducing temperature to 13°C (55.4°F)
- After 1 day of soft crashing add your dry hops, 37.5 g / 1.3 oz oz each of Lupomax versions of Amarillo, Sabro, citra and El Dorado and allow the temperature of fermentation to rise again up to 22 °C (71.6 °F)
- 1 to 2 days after dry hopping move on to cold crashing and dump trub / remove hops and take a final gravity reading
- (If you can’t / don’t want to cold crash go straight to kegging/bottling your beer!)
Step 8 (optional) – Cold crashing
- begin cold crashing your fermenter (bring the temperature of your fermenter down to as close to 0°C (32°F) as possible, for 2 days to a week depending on how patient you are
- If you don’t have a temp-controlled fermenter, you can cold crash by putting your fermenter in a fridge or temp-controlled chest freezer
- After you have finished cold crashing it's time to keg/bottle your beer! If you are bottling your beer from the fermenter uncarbonated remember to add about 5-7 grams (0.17 - 0.24 oz) of priming sugar to your bottles to carbonate your beer.
.png)
So... What is it?
Ginger beer! The sweet sticky refreshing crowd pleaser hiding some boozy goodness! Made from the fermentation of sugar and fresh chopped ginger, it makes for a delightfully refreshing, slightly spicy and zingy palate cleanser, especially in the warmer weather. So here is our super easy ginger beer recipe with a slight twist to add a bit of extra zing and flavour to make you feel refreshed and thirst quenched!
Batch Size & Cook Time
- 19L Keg (5 gal)
- 5.3% Alcohol
- prep time 30-45 mins
- Fermentation time 1 week
What ingredients?
Fermentation ingredients
- 33g (1 oz) yeast nutrient (I used yeast O-ife)
- 400g (0.88 lb) sultanas / raisins
- 2kg (4.4 lb) Raw Sugar
- 1.355 kg (2.99 lb) ginger
- 4 juiced lemons
- 4 lemons zest
- 15g Lalvin - EC-1118 Yeast (any bakers or brewers yeast will also work)
- 21L (5.54 gal) of water
Post fermentation sweeteners
- 345g (0.76 lb) agave syrup
- 1.065kg (2.35 lb) raw sugar
- 14.25g potassium sorbate (0.75g per liter / 0.096 oz per gal)
- 1.79g potassium metabisulfite (0.094g per liter / 0.012 oz per gal)
Step by step process
Step 1 – Prepping the fruits and ginger
- peel the skins off of all the ginger with a spoon or a peeler and finely chop all the ginger and sultanas/raisins in a food processor
- peel the lemons being careful not to peel too much pith with the skins (the skins provide zestiness but the white pith can be bitter) and mix them in with the ginger and sultanas/raisins
- after peeling the lemons squeeze the juice out of them and set it aside
Step 2 – Mixing the ingredients
- take 1 liter (0.3 gal) of the the total water and boil it, then dissolve all the raw sugar for fermentation with the hot water and mix until fully dissolved
- mix into the hot sugar water the yeast nutrients and allow them to dissolve
- now mix together the rest of the 20L (5.3 gal) of water with all the prepped ingredients, lemon juice etc and pour it all into your fermenter (you can use a bucket with an airlock for this, link here to see how you can make a basic fermenter from a hardware store)
- after all the ingredients have been added, its time finally to add your yeast, we used 15g (0.5 oz) Lalvin - EC-1118 but any brewers or bakers yeast will also work, it will just provide a different flavour
Step 3 Fermentation
- Fermentation will take about 1 to 2 weeks, towards the end of fermentation take a gravity reading with a hydrometer, when you get the same gravity reading 3 days in a row fermentation is finished and you are ready to back sweeten your ginger beer!
Step 4 Back Sweetening and packaging - Option 1 (kegging option)
- To back sweeten (which basically means add sweetness after fermentation) you need a way to stop the yeast from fermenting the additional sugar you add to the beer, to do this we are going to do a couple of things.
- firstly we will let all the yeast settle out to the bottom of the fermenter and let the beer clear up before transferring it to our keg, this way at least 90% of the yeast is going to be left behind in the fermenter
- secondly by dropping the temperature of the beer to 1-2 degrees after kegging it any yeast that made its way over will fall asleep and no longer be active
- finally we will also add 1.79g potassium metabisulfite & 14.25g potassium sorbate, which together will prevent the yeast from further multiplying and growing, helping us to protect the sugar we add from the yeast so that the sweetness stays in the beer!
- No to add our sweetness we are going to dissolved the additional 1.065kg (2.35 lb) of raw sugar and 345g (0.76 lb) of agave syrup in a small amount of boiling water, then add this sugary syrup to the keg we will transfer the beer into
- after adding the sugars burp / purge the keg of oxygen by filling it with CO2 and releasing the CO2 from the PRV (pressure release valve) in intervals
- finally transfer the beer into the keg by connecting the tap of the fermenter to the beer out post of the keg and the gas in post of the keg to the airlock hole of the fermenter. This creates a closed loop so you can perform a zero oxygen transfer
- after all the beer has been transferred force carbonate the beer by connecting it to a gas tank on 30 psi for 3 days at serving temperature, then release the gas and re-pressurize to serving pressure (12 psi) before drinking!
Step 4 Back Sweetening and packaging - Option 2 (Bottling option)
- To back sweeten without kegs or taps you can also bottle, but this will mean you cant add sugar the same way you can with the kegging option, because in this case we want the yeast to produce a bit more fermentation after entering the bottles to gas up our ginger beer. So this time you will add about a teaspoon of sugar to each bottle (1 teaspoon for about a 330-375ml bottle / 12.6 oz bottles) which will provide fuel for the yeast to carbonate the bottle
- However, to add sweetness you will instead need to add a non-sugar based sweetener, such as stevia, I recommend about 15g (0.5 oz) per 330-375ml bottle / 12.6 oz bottle, however you can use less or more to taste
- Its important to note! this option will provide a different, and slightly more artificial taste to the final product than the kegging sugar option!
- after filling all the bottle, allow them to condition for about 2 weeks, at which point you can whack them in the fridge and enjoy!
Enjoy your zesty refreshing ginger beer!
.png)
So... What is it?
Blonde ale is a refreshing, easy-drinking beer that's all about balance! Light in body and golden in color, it’s the kind of beer that invites you to take a sip and savor its subtle flavors, such as hints of honey, biscuit and light hoppiness. Born in the U.S. in the 1980s as a lighter, more approachable alternative to hop-heavy brews, it was designed to be a crowd-pleaser for both seasoned beer drinkers and newcomers alike!
What's ours like?
Coming in at 5.1% its sessionable & delicious so you can enjoy this beautiful blond all night long! ;) Brewed with moderation and balance in mind, it showcases a light malt profile with a subtle biscuit character and honey like sweetness, followed by gentle bitterness and a subtle herbal and floral hop finish leaving you wanting another sip!
Batch Size & Stats
- 19L / 5 gal finished beer
- 22L (6.8 gal) wort
- Starting gravity – 1.048
- Final gravity 1.009
- ABV – 5.1%
- Brewhouse Efficiency 80%
- EBC - 8.5
- IBU - 18
What ingredients?
Water
With sparging
- 20L (5.3 gal) strike water approx. 64°C (147°F) for 30 mins then 70°C (158°F) for 30 mins, then mash out at 77°C (170°F) for 15 mins
- 15.2L (4 gal) sparge water at 78°C (172°F)
Without sparging
- 30L (7.9 gal) strike water approx. 64°C (147°F) for 30 mins then 70°C (158°F) for 30 mins, then mash out at 77°C (170°F) for 15 mins
Malts
Total Grain Bill 5kg (11 4lb)
- 4.059 kg / 8.9 lb (84.5%) — Pilsner Malt
- 472 g / 1lb (9.8%) — Wheat Malt
- 150 g / 5.3 oz (3.1%) — Gladiator Malt / Dextrin Malt
- 125 g / 4.4 oz (2.6%) — Medium Crystal Malt
Hops & whirlfloc tablets
Hallertauer Mittelfrueh (3% Alpha Acid)
- 28g (1 oz) 9 IBU - 60 mins
- 56g (2 oz) 9 IBU - 15 mins
Whirlfloc
- 0.75g (0.026 oz) / 1 tablets – 15 minutes left in the boil
Water Profile
- Ca2+24
- Mg2+ 5
- Na+ 15
- Cl- 31
- SO42- 36
- HCO3- 57
Yeast options & fermentation temperatures
- US-05 – ferment at 20°C (68°F) 11g (0.38 oz) / (1 packet)
- AUS-05 – ferment at 20°C (68°F) 11g (0.38 oz) / (1 packet)
- S-04 – ferment at 18°C (64.4°F) 11g (0.38 oz) / (1 packet)
Step by step process
Step 1 – Milling
- Mill grains to medium crush (set mill rollers to a gap of approx. 1.00mm / 0.039 inches (credit card width)
- Just keep in mind roller gap settings are not universal so as you brew more batches you will find the ideal crush size for your setup
- Alternatively if you don’t have a grain mill you can order your grains crushed from most homebrew stores, both online and in person
Step 2 – Mashing
Mash at 64°C (147°F) for 30 mins then 70°C (158°F) for 30 mins, then mash out at 77°C (170°F) for 15 mins
- Set your strike water to a few degrees above the target mash temperature (you can use the calculator in our website for this)
- ensure you mix in the grains thoroughly with a mash paddle to prevent dough balls from forming (big spoons, spatulas or whisks will also work)
- its easier to mash the grains and prevent dough balls if you add a little grain at a time, mix, add more grain and repeat until all the grains are mixed
if you don’t have a mash tun with heating then ensure after you have finished mixing the grains in to insulate your mash tun (thick neoprene or heavy blankets both work well)
Step 3 (optional) – Sparging
- if your setup has the capability to sparge then do so with 15L (4 gal) sparge water at 78°C (172°F)
- if you are not sparging and using a BIAB (brew in a bag) method then remove grains from mash tun and twist and squeeze the bag to get as much liquid out of the grains as possible
- as you start sparging (or straining your BIAB bag) begin raising the temperature of your wort to a boil
Step 4 – Boiling
- once your wort begins to boil start a timer for a 60-minute boil and add your bittering hops, 28g (1 oz) of Hallertauer Mittelfrueh
- at 15 minutes left in the boil add 1 whirlfloc tablet (OR granulated whirlfloc 0.7g (0.025 oz)) and 56g (2 oz) of Hallertauer Mittelfrueh
Step 5 – Whirlpooling / cooling
- After 60 mins of boiling turn off your heat source and start cooling wort down
- Once you’ve reached yeast pitching temperature take an original gravity reading of your wort
Step 6 – Yeast Pitching
- It is best to make a yeast starter before beginning your brew day (ideally 1 day before) to ensure your yeast are as active and healthy as possible before pitching, but not completely necessary – you could also just rehydrate yeast 30 minutes before pitching.
- Wort Aeration (Optional) if you have a paint mixer give your wort a quick blitz before pitching yeast to help add more dissolved oxygen into the wort to help the yeast have a healthier kick start into fermentation
- Now add your tincture of Vanilla extract! (or you can wait till end of fermentation if you prefer)
- Pitch yeast in wort a degree or two higher than the target fermentation temperature to help yeast take off more aggressively
- To make a yeast starter you can use either:
- DME (dry malt extract) at a ratio of approx. 100g per 1L water (3.5 oz per 33 fluid ounces) for gravity of approx. 1.040
- some unfermented wort kept cold and sanitary from a previous brew day
- 70g of table sugar per 1L water (2.5 oz per 33 fluid ounces) – however, it is best to use malt sugar (wort / DME) whenever possible to reduce the chance of shocking the yeast with a different food source from starter to wort pitching
- To rehydrate yeast
- Add yeast to approx. 10 times as much room temperature water as the weight of the yeast e.g. 10g yeast in 100 ml water (0.35 oz yeast in 3.5 fluid ounces water)
Step 7 – Fermentation
- Allow yeast to ferment over the next two weeks (aprox)
- If you have a temperature-controlled system keep the fermenter temperature to the recommended fermentation temperature for each yeast strain (stated in the yeast ingredients section above)
- It's important to note that fermentation times will vary based on your circumstances like temperature, amount of yeast pitched, the healthiness of yeast, the gravity of the wort, pH, etc. so don’t stress be patient and know that these times are just a rough guide
- If you have temp control then when there are 2 days left of fermentation raise the temperature by 2 degrees for a diacetyl rest (once gravity reaches roughly 1.01) & gravity is the same 3 days in a row move onto cold crashing and adding gelatin! (Dont worry cold crashing & gelatin are both optional steps to help clarify your beer)
Step 8 (optional) – Cold crashing & Gelatin
- begin cold crashing your fermenter (bring the temperature of your fermenter down to as close to 0°C (32°F) as possible, for 2 days to a week depending on how patient you are, and add 1-2 teaspoons of gelatin dissolved in boiling water and allowed to cool a bit to your fermenter
- If you don’t have a temp-controlled fermenter, you can cold crash by putting your fermenter in a fridge or temp-controlled chest freezer
- After you have finished cold crashing it's time to keg/bottle your beer! If you are bottling your beer from the fermenter uncarbonated, remember to add about 5-7 grams (0.17 - 0.24 oz) of priming sugar to your bottles to carbonate your beer.
.png)
So... What is it?
The Hazy IPA (also called NEIPA) is a super fruity low bitterness style of IPA that typically sits around the 5.5-7.5% ABV mark. This time we turned the voltage way up, making a 8.7% juice bomb! Huge punchy flavours of mango, pineapple, and fresh orange zest and candy-like sweetness make this a super drinkable boozy juice! You dont need your breakfast OJ anymore, this bad boy has you covered!
Batch Size & ABV
- 38L (2 19L corny kegs) / 10 gal finished beer
- 50L (13.2 gal) wort
- For a smaller 19L (5 gal) batch size simply half the ingredients of this recipe
- Starting gravity – 1.080
- Final gravity 1.0135
- ABV – 8.7%
- IBU - 38
- Colour - 12.6 EBC
- Mash Efficiency - 80%
Ingredients
Water
- With sparging
- 45L (11.9 gal) strike water approx. for a 60 min mash at 68°C (154.4°F) with a 10 min mash out step at the end at 77°C (170°F)
- 25L (6.6 gal) sparge water at 78°C (172°F)
- Without sparging
- 65L (17.2 gal) strike water approx. for a 60 min mash at 68°C (154.4°F) with a 10 min mash out step at the end at 77°C (170°F)
Malts: 14.5kg (32 lb) of fermentable's 16.5kg (36.4lb) with rice hulls
- 10.395 kg - 22.9 lb (63%) — Ale Malt
- 2.475 kg - 5.4lb (15%) — Gladfield Rolled Oats
- 1.98 kg - 4.36 lb (12%) — Wheat Malt
- 990 g - 2.2 lb (6%) — Rolled Wheat
- 660 g - 1.45 lb (4%) — Gladiator Malt
- 1 kg (2.2 lb) — Rice Hulls
Hops & whirlfloc tablets
50 g - 1.76 oz (9 IBU) — Lupomax Citra 18.5% — Mash
87.5 g - 3 oz (5 IBU) — El Dorado 11.6% — Aroma — 20 min hopstand @ 78 °C
87.5 g - 3 oz (6 IBU) — Lupomax Amarillo 13.5% — Aroma — 20 min hopstand @ 78 °C
87.5 g - 3 oz (8 IBU) — Lupomax Citra 18.5% — Aroma — 20 min hopstand @ 78 °C
87.5 g - 3 oz (8 IBU) — Lupomax Sabro 19% — Aroma — 20 min hopstand @ 78 °C
75 g - 2.6 oz — Lupomax Amarillo 13.5% — Dry Hop — day 7
75 g - 2.6 oz — Lupomax Citra 18.5% — Dry Hop — day 7
75 g - 2.6 oz — Lupomax El Dorado 18% — Dry Hop — day 7
75 g - 2.6 oz — Lupomax Sabro 19% — Dry Hop — day 7
Yeast options & fermentation temperatures
- 33 g — Lallemand (LalBrew) Pomona - 22 °C (71.6 °F)
alternatives below
- 23g (0.8 oz) Lallmand East Coast New England Ale Yeast ferment at 25°C (55°F)
- 23g (0.8 oz) Kveik (we used a Omega yeats Espe Kveik, but any kveik is great!) ferment at 32°C
- 23g (0.8 oz) US-05 – ferment at 20°C
- 23g (0.8 oz) S-04 – ferment at 19°C
Water Profile
Ca2+ 130
Mg2+ 16
Na+ 15
Cl- 202
SO42- 100
HCO3- 57
Step by step process
Step 1 – Milling
- Mill grains to medium crush (set mill rollers to a gap of approx. 1mm / 0.039 inches) (BUT DONT crush the rice hulls or oats, add them into your grain separately after crushing them)
- Just keep in mind roller gap settings are not universal so as you brew more batches you will find the ideal crush size for your setup
- Alternatively if you don’t have a grain mill you can order your grains crushed from most homebrew stores, both online and in person
Step 2 – Mashing
- Add your brewing salts and mix to ensure they are fully dissolved prior to mashing in grains
- Mash for 60 minutes at 68°C (154.4°F)
- ensure you mix in the grains thoroughly with a mash paddle to prevent dough balls from forming (big spoons, spatulas or whisks will also work)
- its easier to mash the grains and prevent dough balls if you add a little grain at a time, mix, add more grain and repeat until all the grains are mixed
- now add your mash hops!! This is going to free a bunch of bound thiols from your hops and make this beer even more juicy! I would recommend adding these in a hop bag to make sure you can remove all the hop particles before you start boiling so you don't get extra unaccounted bitterness
- if you don’t have a mash tun with heating then ensure after you have finished mixing the grains in to insulate your mash tun (thick neoprene or heavy blankets both work well)
- after 60 minutes of mashing raise temperature to 77°C (170°F) for 10 minutes to Mash out
Step 3 (optional) – Sparging
- if your setup has the capability to sparge then do so with 25L (6.6 gal) of sparge water at 78 °C (172°F)
- if you are not sparging and using a BIAB (brew in a bag) method then remove grains from mash tun and twist and squeeze the bag to get as much liquid out of the grains as possible
- as you start sparging (or straining your BIAB bag) begin raising the temperature of your wort to a boil
Step 4 – Boiling
- once your wort begins to boil start a timer for a 60-minutes
- after 60 minutes of boiling turn of the heat and chill the temperature of the wort down to 75°C (167°F) and begin whirlpooling
- if you don’t have a wort chiller you could rest your boil kettle in an ice bucket
- if your system can’t whirlpool you can also achieve this with a mash paddle and a power drill, if you don’t have this either don’t worry about whirlpooling it’s not completely necessary
Step 5 – Whirlpooling / whirlpool hop additions
- once temperature reaches 75°C (167°F) and you have started whirlpooling add your whirlpool hops, 87.5 g - 3 oz each of Lupomax versions of Amarillo, Sabro, citra and El Dorado
- allow hops to whirlpool in the wort for 20 minutes and then begin chilling wort again down to yeast pitching temperature
- once you’ve reached yeast pitching temperature take an original gravity reading of your wort
Step 6 – Yeast Pitching
- It is best to make a yeast starter before beginning your brew day (ideally 1 day before) to ensure your yeast are as active and healthy as possible before pitching, but not completely necessary – you could also just rehydrate yeast 30 minutes before pitching.
- Pitch yeast in wort a degree or two higher than the target fermentation temperature to help yeast take off more aggressively
- To make a yeast starter you can use either:
- DME (dry malt extract) at a ratio of approx. 100g per 1L water (3.5 oz per 33 fluid ounces) for gravity of approx. 1.040
- some unfermented wort kept cold and sanitary from a previous brew day
- 70g of table sugar per 1L water (2.5 oz per 33 fluid ounces) – however, it is best to use malt sugar (wort / DME) whenever possible to reduce the chance of shocking the yeast with a different food source from starter to wort pitching
- To rehydrate yeast
- Add yeast to approx. 10 times as much room temperature water as the weight of the yeast e.g. 10g yeast in 100 ml water (0.35 oz yeast in 3.5 fluid ounces water)
Step 7 – Fermentation, dry hopping and Soft Crashing (optional)
- Allow yeast to ferment over the next 5 days to two weeks
- If you have a temperature-controlled system keep the fermenter temperature to the recommended fermentation temperature for each yeast strain (stated in the yeast ingredients section above)
- Monitor the fermentation activity over the first 7 days by the bubbling of the blow-off tube/airlock of your fermenter, as the bubbling slows down (roughly around day 7) take a gravity reading. When the gravity reaches around 1.016 raise the temperature of your fermenter by 1-2 degrees for 2 days for a diacetyl rest (if you don’t have temperature control don’t worry about this step, it's not the end of the world!)
- It's important to note that fermentation times will vary based on your circumstances like temperature, amount of yeast pitched, the healthiness of yeast, the gravity of the wort, pH, etc. so don’t stress be patient and know that these times are just a rough guide
- On day 2 of the diacetyl rest (once gravity reaches roughly 1.013 – 1.014) "Soft Crash" your beer (optional, if you cant temp control move onto dry hopping), by reducing temperature to 13°C (55.4°F)
- After 1 day of soft crashing add your dry hops, 75 g - 2.6 oz each of Lupomax versions of Amarillo, Sabro, citra and El Dorado and allow the temperature of fermentation to rise again up to 22 °C (71.6 °F)
- 1 to 2 days after dry hopping move on to cold crashing and dump trub / remove hops and take a final gravity reading
- (If you can’t / don’t want to cold crash go straight to kegging/bottling your beer!)
Step 8 (optional) – Cold crashing
- begin cold crashing your fermenter (bring the temperature of your fermenter down to as close to 0°C (32°F) as possible, for 2 days to a week depending on how patient you are
- If you don’t have a temp-controlled fermenter, you can cold crash by putting your fermenter in a fridge or temp-controlled chest freezer
- After you have finished cold crashing it's time to keg/bottle your beer! If you are bottling your beer from the fermenter uncarbonated remember to add about 5-7 grams (0.17 - 0.24 oz) of priming sugar to your bottles to carbonate your beer.
.jpg)
So... What is it?
The Porter is a dark beer originating from London in the early 18th century, named after the working-class porters who favored it. Historically, porters were one of the first mass-produced beers and evolved over time, leading to variations like the stout, which was originally a stronger version of the porter. While porters feature chocolate, caramel and coffee flavours they tend to be smoother and less bitter than stouts, which often have a more robust, bitter profile.
What's ours like?
This one takes all the best aspects of the old school porter, with a fantastic chocolate and peanut butter filled twist! Working peanut butter flavours into beer is notoriously difficult, and we learnt that first hand with this experience! Our first batch was brilliant right up until we dry hopped the PB Fit powder, so dont do that! In our second batch we dissolved the powder into the beer at the end of the boil and oh boy did it deliver! The second version came out as an 8.3% peanut butter bomb! Creamy flavours of malty nuttiness and chocolate layer with the PB beautifully making this just so damn addictive! I am certainly going to experiment with peanut butter more in future! Happy Halloween!
Batch Size & Stats
First batch (on camera failed batch!)
- 38L (2 19L corny kegs) / 10 gal finished beer
- 47L (12.4 gal) wort
- For a smaller 19L (5 gal) batch size simply half the ingredients of this recipe
- Starting gravity – 1.067
- Final gravity 1.016
- ABV – 6.7%
- IBU - 25
- Colour - 74.5 EBC
- Mash Efficiency - 73%
Brewfather link - 1st version (on camera)
second batch (Off Camera re-brew)
- 19L / 5 gal finished beer
- 25L (6.6 gal) wort
- For a smaller 19L (5 gal) batch size simply half the ingredients of this recipe
- Starting gravity – 1.081
- Final gravity 1.018
- ABV – 8.3%
- IBU - 19
- Colour - 77 EBC
- Mash Efficiency - 78%
Brewfather link - 2nd version (brewed off camera) - This recipe was better!!
What ingredients?
Water
With sparging
- 37L (9.77 gal) for a 68°C (154.4°F) mash (you can use our strike water calculator to find your ideal strike temp)
- 30L (7.9 gal) sparge water at 78°C (172°F) - fermenter topped up with 4L (1 gal) post boil to reduce OG
Without sparging
- 55L (14.5 gal) for a 68°C (154.4°F) mash (you can use our strike water calculator to find your ideal strike temp)
Malts: Total 13.01 kg / 28.68 lb
- 9.05 kg / 20 lb (69.6%) — Ale Malt
- 1.48 kg / 3.3 lb(11.4%) — Dark Munich Malt
- 990 g / 2.18lb (7.6%) — Light Chocolate Malt
- 870 g / 1.92 lb(6.7%) — Medium Crystal 240
- 620 g / 1.37lb (4.8%) — Gladiator Malt (Dextrin malt)
Adjuncts
- 2.77 kg (6.1 lb) — reeces peices peanut butter cups 20min left in boil step
- 430g (0.95 lb) — PB Fit Peanut Butter Powder (changed from video, i recommend dissolving this in hot wort towards the end of boil and adding it in just before flameout)
Hops & whirlfloc tablets
Northern Brewer
- 28g (10 IBU) (1 oz) – 60 mins
- 50g (9 IBU) (1.76 oz) – 15 mins
Fuggles
- 50g (5 IBU) (1.76 oz) – 15 mins
Whirlfloc tablets
- 1.5g (0.052 oz) / 2 tablets – 15 minutes left in the boil
Yeast options & fermentation temperatures
- 20g (0.7 oz) Lallemand (LalBrew) Nottingham Yeast – ferment at 18°C / 64.4°F
- 23g (0.8 oz) Aus-05– ferment at 18°C / 64.4°F
- 23g (0.8 oz) US-05 – ferment at 18°C / 64.4°F
- 23g (0.8 oz) S-04 – ferment at 18°C / 64.4°F
Water Profile
- Ca2+85
- Mg2+ 9
- Na+ 26
- Cl- 100
- SO42- 50
- HCO3- 154
Step by step process
Step 1 – Milling
- Mill grains to medium crush (set mill rollers to a gap of approx. 1.00mm / 0.039 inches)
- Just keep in mind roller gap settings are not universal so as you brew more batches you will find the ideal crush size for your setup
- Alternatively if you don’t have a grain mill you can order your grains crushed from most homebrew stores, both online and in person
Step 2 – Mashing
- Mash for 60 mins at 68°C (154.4°F)
- Set your strike water to a few degrees above the target mash temperature, you can use our calculator to determine what your strike temperature should be
- ensure you mix in the grains thoroughly with a mash paddle to prevent dough balls from forming (big spoons, spatulas or whisks will also work)
- its easier to mash the grains and prevent dough balls if you add a little grain at a time, mix, add more grain and repeat until all the grains are mixed
- if you don’t have a mash tun with heating then ensure after you have finished mixing the grains in to insulate your mash tun (thick neoprene or heavy blankets both work well)
- after 60 minutes of mashing raise the temp to 77°C (170°F) for 10-15 minutes to mash out, and deactivate the enzymes breaking down the sugars
Step 3 (optional) – Sparging
- if your setup has the capability to sparge then do so with 30L (7.9 gal) sparge water at 78°C (172°F)
- if you are not sparging and using a BIAB (brew in a bag) method then remove grains from mash tun and twist and squeeze the bag to get as much liquid out of the grains as possible
- as you start sparging (or straining your BIAB bag) begin raising the temperature of your wort to a boil
Step 4 – Boiling
- once your wort begins to boil start a timer for a 60-minute boil and add your bittering hops, 28g (1 oz) of Northern Brewer
- at 20 minutes left in the boil add your 2.77 kg (6.1 lb) — reeces peices peanut butter cups
- at 15 minutes left in the boil add 2 whirlfloc tablets (or 1.5g of granulated whirlfloc) and 50g (1.76 oz) each of Fuggles & Northern Brewer
- at Flameout add the 430g (0.95 lb) of PB fit peanut butter powder (it helps to have a seperate bucket to pull out some hot wort to dissolve the powder seperately before adding it all back to the main boil)
Step 5 – Cooling
- After 1 hour of boiling start cooling wort down to yeast pitching temperature
- once you’ve reached yeast pitching temperature take an original gravity reading of your wort
Step 6 – Yeast Pitching
- It is best to make a yeast starter before beginning your brew day (ideally 1 day before) to ensure your yeast are as active and healthy as possible before pitching, but not completely necessary – you could also just rehydrate yeast 30 minutes before pitching.
- Pitch yeast in wort a degree or two higher than the target fermentation temperature to help yeast take off more aggressively
- To make a yeast starter you can use either:
- DME (dry malt extract) at a ratio of approx. 100g per 1L water (3.5 oz per 33 fluid ounces) for gravity of approx. 1.040
- some unfermented wort kept cold and sanitary from a previous brew day
- 70g of table sugar per 1L water (2.5 oz per 33 fluid ounces) – however, it is best to use malt sugar (wort / DME) whenever possible to reduce the chance of shocking the yeast with a different food source from starter to wort pitching
- To rehydrate yeast
- Add yeast to approx. 10 times as much room temperature water as the weight of the yeast e.g. 10g yeast in 100 ml water (0.35 oz yeast in 3.5 fluid ounces water)
Step 7 – Fermentation
- Allow yeast to ferment over the next week to two weeks
- If you have a temperature controlled system keep the fermenter temperature to the recommended fermentation temperature for each yeast strain (stated in the yeast ingredients section above)
- Monitor the fermentation activity over the first 7 days by the bubbling of the blow off tube / airlock of your fermenter, as the bubbling slows down (roughly around day 7) take a gravity reading. When the gravity reaches around 1.014 raise the temperature of your fermenter by 1-2 degrees for 2 days for a diacetyl rest (if you don’t have temperature control don’t worry about this step, its not the end of the world!)
- Once the gravity is the same 2 days in a row move onto cold crashing! (If you can’t / don’t want to cold crash go straight to kegging/bottling your beer!)
Step 8 (optional) – Cold crashing
- begin cold crashing your fermenter (bring the temperature of your fermenter down to as close to 0°C (32°F) as possible, for 2 days to a week depending on how patient you are
- If you don’t have a temp-controlled fermenter, you can cold crash by putting your fermenter in a fridge or temp-controlled chest freezer
- After you have finished cold crashing it's time to keg/bottle your beer! If you are bottling your beer from the fermenter uncarbonated remember to add about 5-7 grams (0.17 - 0.24 oz) of priming sugar to your bottles to carbonate your beer.
.jpg)
So... What is it?
Sourdough focaccia is by far my favorite style of bread! it can be used for sandwich's, pizza or just with some fresh olive oil as a dip! It's light, airy, and flavorful Italian flatbread made with a naturally leavened sourdough starter instead of commercial yeast. It combines the tangy, slightly sour notes from the sourdough with the traditional softness and olive oil richness of focaccia. The dough is typically hydrated and soft, resulting in a pillowy texture with a crisp, golden crust. The bread is often topped with olive oil, salt, herbs like rosemary, and sometimes vegetables or olives, enhancing its flavor. To make it, a sourdough starter is mixed with flour, water, and salt, left to rise slowly to develop flavor, and then shaped, dimpled, and baked after being generously drizzled with olive oil. The taste is a delicious combination of savory, tangy, and fragrant, with a chewy interior and crisp exterior.
Batch Size & Cook Time
- 1 Large Focaccia (use a large tray)
- a couple of hours of prep (dough mixing & stretch & folds)
- 23 min total cook time
What ingredients?
Sourdough Starter
- 1.75 to 2.1 cups of flour
- 1.75 to 2.1 cups of water
Focaccia Ingredients
- 3 cups of bakers flour (plain flour will also work)
- 2 to 2.25 cups of water
- drizzle of olive oil
- 2 teaspoons of salt
- 1 cup of sourdough starter
- flaked salt (to sprinkle on before baking)
- chilli oil or flakes (optional garnish on top of bread)
What Equipment?
Sourdough Starter
- 1 large glass jar (1 to 2L)
- mixing spoon or knife
- 1/4 or 1/3 measuring cup
Focaccia equipment
- large baking tray (I prefer non-stick)
- mixing spoon
- large bowl
- large container (at least twice the size of your dough before it rises)
- measuring cups (1 cup size)
Step by step process
Making the Starter
- Thoroughly clean a large glass jar (1-2L in size)
- measure out 1/4 to 1/3 of a cup of flour (depending on your jar size) and tip into the jar, then add an equal amount of water
- mix the water and flour thoroughly then loosely close the lid of the jar and set aside in a relatively warm area of the kitchen out of direct sunlight
- each day repeat this process, adding the same quantity of flour and water as day 1, and mixing
- by day 5-7 you should start to see yeast activity in your new mother yeast, it will start to look bubbly and frothy, bam! you have created a mother yeast!
- you can keep this in the fridge when you are not planning on baking for a while to keep the yeast dormant, then remove from the fridge and feed again in increments with flour and water 12 hours to 24 hours prior to baking until you see it frothing and bubbling again.
Making the Focaccia
Step 1 - Mixing the dough
- Measure out 3 cups of flour, 2 to 2.25 cups of water and 1 cup of yeast starter and add to a large mixing bowl
- proceed to thoroughly mix together with a spoon or sourdough whisk until all the flour is dissolved with the water into a shaggy sticky dough
- leave this to rest for 15 to 30 minutes (this is the autolyse period where the yeast starts to grow and munch away on the sugars of the dough and begin to build gluten networks)
- after the initial rest add in 2 teaspoons of salt and mix into the dough, you will notice the dough will start to tighten up and become less runny, now leave to rest for a further 15 to 30 minutes
Step 2 - Stretch and folds (4 sets)
- After the salt rest, wet your hands with water and grab under one side of the dough in the bowl and pull it up and stretch it over the dough itself (useful to watch our video for this step!) then rotate the bowl by 90 degrees and repeat this process until you have stretched and folded all 4 sides
- allow the dough to rest covered by a cloth or cling wrap for 15 minutes then repeat this process
- after completing 4 sets of stretch and folds with 15 minute breaks between each set you will notice the dough has built up far more strength, and is less sticky and holds more tightness than it did in the beginning.
If you can stretch out the dough without it ripping and breaking then you have healthy strong gluten networks, and its time to move onto coil folds!
Step 3 - Coil Folds (2-4 sets)
- Drizzle oil into the container (it should be at least twice as big as your current dough size) and oil all the sides of the container
- now transfer your dough from your bowl to the container and begin your coil folds
- to coil fold you can reach both hands underneath the middle of the dough and lift it up so that it stretches under its own weight, then rest the dough back down on itself so the both sides fold underneath the dough like a big coil (watch our video to see how to do this)
- If your dough is not tight or strong enough to coil fold in this way you can simply lift one side of the dough at a time and tuck it under itself
- coil fold the dough 2 to 4 times with 30 minute rests in between each fold
- by the end of your coil folds you will notice the surface of the dough is no longer sticky to the touch and its starting to fill with gas as fermentation progresses
Step 4 - Bulk Fermentation
- if you are planning on cooking this dough the next day (or same day) Close the container and allow the dough to rest for a couple of hours until the size of the dough has doubled.
- if you'd like to sour this dough for a day to a couple of days put the container into the fridge after finishing coil folds and allow it to develop complexity and flavour.
The cold of the fridge will slow down fermentation and allow wild yeasts in the dough from the mother yeast to grow and develop acidity and complexity in the flavours of the dough (hence sourdough!). - The longer you let your dough slowly ferment in the fridge the more sour it will become
Step 5 - Baking
- Begin pre-heating your oven to 230 degrees Celsius on fan forced
- whilst your oven heats oil your baking tray with a drizzle of oil and cover all the surfaces of the tray with your hand or oil brush
- Take your dough out of the fridge and gently tip it out onto the baking tray, if you want your focaccia to rise extra high you can fold the dough over itself so that it traps more gas as it rises
- Slip your fingers underneath the dough and gently stretch the dough out to fill the tray (optional not necessary)
- Just before you bake the bread its time to oil the dough, if you want to use less oil you can mix oil and a smaller amount of water together in a glass (and mixx in chili oil of flakes if you want) then pour the mixture over the top of the dough and gently spread it with your hands or a oil brush
- after coating the dough wet your fingers and poke them into the dough to dimple the bread so that it rises without splitting, this will also help create big gas bubbles and airiness in the bread
- finally just before placing in the oven sprinkle salt evenly across the surface of the dough then place in the oven
- Cook at 225°C (437°F) for 15 minutes, then spin the baking tray 180 degrees to evenly cook the bread, after spinning the tray dop the temperature to 215 to 220°C (depending on how brown you want your bread) and cook for a further 8-10 minutes for a total of 23-25 minutes
- after cook time is complete, remove the bread from the oven and allow to cool on a wire rack for at least 15 to 120 minutes before slicing open and eating!
Enjoy!!
.jpg)
So... What is it?
The Oktoberfest Märzen is a traditional German beer made using a decoction mashing process, which involves boiling a portion of the mash and returning it to the main mash to increase the temperature in stages. This technique was historically used in Bavaria to achieve certain mash steps & help extract more flavor and fermentable sugars from the malt. Märzen, meaning "March" in German, was brewed in late winter and stored in cool caves for consumption during Oktoberfest. The decoction process enhances the malt complexity and depth of flavor, giving the beer its rich amber colour, moderate bitterness and signature rich, slightly sweet finish!
What's ours like?
Wow this brewday was a fail! But this beer was worth the pain! Showcasing an awesome amber to orange colour, decent mouthfeel and rich malty character and complex sweetness, we can call this beer an Oktoberfest success! The decoction mash has paid huge dividends despite the pain, creating a very complex sweetness, with flavors of candied prunes, deep caramel and rich delicious honey! Coming in at 6.3% its on the boozier side for a fest beer, but we absolutely love it and know you will too!
Batch Size & Stats
- 19L / 5 gal finished beer
- 22L (6.8 gal) wort
- Starting gravity – 1.064
- Final gravity 1.015
- ABV – 6.4%
- Brewhouse Efficiency 84%
- EBC - 28
- IBU - 23
What ingredients?
Water
With sparging
- 16L (4.2 gal) strike water
Protein rest: 113F (55 C) — 10 min
Decoction Step - scoop out 1/3 of the mash and heat to 65C (149 F) for 15 mins, then heat up to boil for 15 mins and add back to main mash
Beta rest: 147F (64 C) — 30 min
Alpha rest: 158F (70 C) — 30 min
Mash Out — 170F - 77 °C — 10 min
- 14L (3.7 gal) sparge water at 78°C (172°F)
Without sparging
- 27L (7.1 gal) strike water approx. 64°C (147°F)
Protein rest: 113F (55 C) — 10 min
Decoction Step - scoop out 1/3 of the mash and heat to 65C (149 F) for 15 mins, then heat up to boil for 15 mins and add back to main mash
Beta rest: 147F (64 C) — 30 min
Alpha rest: 158F (70 C) — 30 min
Mash Out — 170F - 77 °C — 10 min
Malts
Total Grain Bill 6.2kg (13.67 4lb)
- Joe White Pilsner malt – 2.883kg (6.35 lb) - 46.5%
- Light Munich - 2.48kg (5.47 lb) - 40%
- Dark Munich - 620g (1.37 lb) - 10%
- Medium Crystal - 217g (0.48 lb) - 3.5%
Hops & whirlfloc tablets
Hallertauer Mittelfrueh (3% Alpha Acid)
- 28g (1 oz) 8 IBU - 60 mins
- 70g (2.5 oz) 10 IBU - 15 mins
Whirlfloc
- 0.75g (0.026 oz) / 1 tablets – 15 minutes left in the boil
Water Profile
- Ca2+21
- Mg2+ 5
- Na+ 15
- Cl- 31
- SO42- 27
- HCO3- 57
Yeast options & fermentation temperatures
- 70 ml — White Labs WLP820 Octoberfest/Marzen Lager - Ferment at 14°C (57°F)
- SafLager™ S‑23 – ferment at 14°C (57°F) 23g (0.41 oz) / (1 packets) - Fermented under 10 psi pressure (not necessary but a great option)
- Saflager W34-70 – ferment at 14°C (57°F) 23g (0.41 oz) / (1 packets) - Fermented under 10 psi pressure (not necessary but a great option)
Step by step process
Step 1 – Milling
- Mill grains to medium crush (set mill rollers to a gap of approx. 1.00mm / 0.039 inches (credit card width)
- Just keep in mind roller gap settings are not universal so as you brew more batches you will find the ideal crush size for your setup
- Alternatively if you don’t have a grain mill you can order your grains crushed from most homebrew stores, both online and in person
Step 2 – Mashing
Mash in with 16L (4.2 gal) for 95 minutes with the following step mash order (not whilst you pull out 1/3 of the mash for decoction keep the main mash going along with the set mash schedule simultaneously)
- Protein rest: 113F (55 C) — 10 min
- Decoction Step - scoop out 1/3 of the mash and heat to 65C (149 F) for 15 mins, then heat up to boil for 15 mins and add back to main mash
- Beta rest: 147F (64 C) — 30 min
- Alpha rest: 158F (70 C) — 30 min
- Mash Out — 170F - 77 °C — 10 min
- Set your strike water to a few degrees above the target mash temperature (you can use the calculator in our website for this)
- ensure you mix in the grains thoroughly with a mash paddle to prevent dough balls from forming (big spoons, spatulas or whisks will also work)
Step 3 (optional) – Sparging
- if your setup has the capability to sparge then do so with 14L (3.7 gal) sparge water at 78°C (172°F)
- if you are not sparging and using a BIAB (brew in a bag) method then remove grains from mash tun and twist and squeeze the bag to get as much liquid out of the grains as possible
- as you start sparging (or straining your BIAB bag) begin raising the temperature of your wort to a boil
Step 4 – Boiling
- once your wort begins to boil start a timer for a 90-minute boil
- After 30 mins of boiling (with 60 mins left remaining) add your bittering hops, 28g (1 oz) of Hallertauer Mittelfrueh
- at 15 minutes left in the boil add 70g (2.5 oz) of Hallertauer Mittelfrueh and 1 whirlfloc tablet (OR granulated whirlfloc 0.7g (0.025 oz))
Step 5 – Whirlpooling / cooling
- After 90 mins of boiling turn off your heat source and start cooling wort down
- Once you’ve reached yeast pitching temperature take an original gravity reading of your wort
Step 6 – Yeast Pitching
- It is best to make a yeast starter before beginning your brew day (ideally 1 day before, UNLESS you are using liquid yeast! in which case ignore the below steps!) to ensure your yeast are as active and healthy as possible before pitching, but not completely necessary – you could also just rehydrate yeast 30 minutes before pitching.
- Wort Aeration (Optional) if you have a paint mixer give your wort a quick blitz before pitching yeast to help add more dissolved oxygen into the wort to help the yeast have a healthier kick start into fermentation
- Now add your tincture of Vanilla extract! (or you can wait till end of fermentation if you prefer)
- Pitch yeast in wort a degree or two higher than the target fermentation temperature to help yeast take off more aggressively
- To make a yeast starter you can use either:
- DME (dry malt extract) at a ratio of approx. 100g per 1L water (3.5 oz per 33 fluid ounces) for gravity of approx. 1.040
- some unfermented wort kept cold and sanitary from a previous brew day
- 70g of table sugar per 1L water (2.5 oz per 33 fluid ounces) – however, it is best to use malt sugar (wort / DME) whenever possible to reduce the chance of shocking the yeast with a different food source from starter to wort pitching
- To rehydrate yeast
- Add yeast to approx. 10 times as much room temperature water as the weight of the yeast e.g. 10g yeast in 100 ml water (0.35 oz yeast in 3.5 fluid ounces water)
Step 7 – Fermentation
- Allow yeast to ferment over the next two weeks (aprox)
- If you have a temperature-controlled system keep the fermenter temperature to the recommended fermentation temperature for each yeast strain (stated in the yeast ingredients section above)
- It's important to note that fermentation times will vary based on your circumstances like temperature, amount of yeast pitched, the healthiness of yeast, the gravity of the wort, pH, etc. so don’t stress be patient and know that these times are just a rough guide
- If you have temp control then when there are 2 days left of fermentation raise the temperature by 2 degrees for a diacetyl rest (once gravity reaches roughly 1.01) & gravity is the same 3 days in a row move onto cold crashing and adding gelatin! (Dont worry cold crashing & gelatin are both optional steps to help clarify your beer)
Step 8 (optional) – Cold crashing & Gelatin
- begin cold crashing your fermenter (bring the temperature of your fermenter down to as close to 0°C (32°F) as possible, for 2 days to a week depending on how patient you are, and add 1-2 teaspoons of gelatin dissolved in boiling water and allowed to cool a bit to your fermenter
- If you don’t have a temp-controlled fermenter, you can cold crash by putting your fermenter in a fridge or temp-controlled chest freezer
- After you have finished cold crashing it's time to keg/bottle your beer! If you are bottling your beer from the fermenter uncarbonated, remember to add about 5-7 grams (0.17 - 0.24 oz) of priming sugar to your bottles to carbonate your beer.

So... What is it?
The Helles Lager (primarily produced in Bavaria - southern Germany) is much maltier and breadier than a classic style pilsner, and “Helles” translates to “brightness” and “light” describing the golden-hued colour of the lager. It typically sits between 4.5% to 5.5% in abv and is made as a refreshing and crisp style summer beer with a balanced malty bready base and fresh zesty hoppiness.
What's ours like?
Coming in at 5.4% with a beautiful golden hugh and frothy head it makes a cracker Fest bier for the Oktoberfest season! By using a combo of noble hop varieties with modern German variants its holds a floral and fruity aroma! But the star of the show is the complex malty character, giving layers of fresh baked sourdough, pretzels, nuttiness and a subtle honey finish to round it out and make it so bloody delicious!
Batch Size & Stats
- 38L (2 19L corny kegs) / 10 gal finished beer
- 48L (12.6 gal) wort
- For a smaller 19L (5 gal) batch size simply half the ingredients of this recipe
- Starting gravity – 1.052
- Final gravity 1.009
- ABV – 5.4%
- IBU - 21
- Colour - 9.7 EBC
- Mash Efficiency - 88%
What ingredients?
Water
With sparging
- 30L (7.9 gal) Mash temp 65°C (149°F) 1 hour. Strike water approx. 71°C (160°F) use our calculator to determine your strike water temp
- 32.5L (8.6 gal) sparge water at 78°C (172°F)
Without sparging
- 60L (7.9 gal) Mash temp 65°C (149°F) 1 hour. Strike water approx. 72°C (161.6°F) use our calculator to determine your strike water temp
Malts: 9.18kg (20.2 lb)
- Pilsner – 7.711kg (17.1 lb) - 84%
- Light Munich – 1.377kg (3 lb) - 15%
- Supernova (or other melanoidin malt) – 92g (3.2 oz) - 1%
Hops & whirlfloc tablets
Spalt Spatler
- 28g (1 oz) - 60 minutes left in the boil
- 50g (1.76 oz) - 15 minutes left in the boil
Huell Melon
- 50g (1.76 oz) - 15 minutes left in the boil
Whirlfloc tablets
- 1.5g (0.052 oz) / 2 tablets – 15 minutes left in the boil
Yeast options & fermentation temperatures
- 23g SafLager S-23 – ferment at 14°C (57 F)
- 23g SafLager W-34/70 – ferment at 14°C (57 F)
Water Profile
- Ca2+23
- Mg2+ 5
- Na+ 15
- Cl- 31
- SO42- 32
- HCO3- 57
Step by step process
Step 1 – Milling
- Mill grains to medium crush (set mill rollers to a gap of approx. 1.05mm / 0.041 inches)
- Just keep in mind roller gap settings are not universal so as you brew more batches you will find the ideal crush size for your setup
- Alternatively if you don’t have a grain mill you can order your grains crushed from most homebrew stores, both online and in person
Step 2 – Mashing
- Mash for 60 minutes at 65°C (149°F)
- Set your strike water to a few degrees above the target mash temperature, you can use our calculator to determine what your strike temperature should be
- ensure you mix in the grains thoroughly with a mash paddle to prevent dough balls from forming (big spoons, spatulas or whisks will also work)
- its easier to mash the grains and prevent dough balls if you add a little grain at a time, mix, add more grain and repeat until all the grains are mixed
- if you don’t have a mash tun with heating then ensure after you have finished mixing the grains in to insulate your mash tun (thick neoprene or heavy blankets both work well)
Step 3 (optional) – Sparging
- if your setup has the capability to sparge then do so with 35L (9.2 gal) sparge water at 78°C (172°F)
- if you are not sparging and using a BIAB (brew in a bag) method then remove grains from mash tun and twist and squeeze the bag to get as much liquid out of the grains as possible
- as you start sparging (or straining your BIAB bag) begin raising the temperature of your wort to a boil
Step 4 – Boiling
- once your wort begins to boil start a timer for a 60-minute boil and add your bittering hops, 28g (1 oz) of Spalt Spalter
- at 15 minutes left in the boil add 2 whirlfloc tablets and 50g (1.76 oz) each of Spalt Spalter and Huell Melon
Step 5 – Whirlpooling / cooling
- once wort has been boiling for 60 minutes in total turn off your heat source and begin chilling wort down to yeast pitching temperature
- once you’ve reached yeast pitching temperature take an original gravity reading of your wort
Step 6 – Yeast Pitching
- It is best to make a yeast starter before beginning your brew day (ideally 1 day before) to ensure your yeast are as active and healthy as possible before pitching, but not completely necessary – you could also just rehydrate yeast 30 minutes before pitching.
- Pitch yeast in wort a degree or two higher than the target fermentation temperature to help yeast take off more aggressively
- To make a yeast starter you can use either:
- DME (dry malt extract) at a ratio of approx. 100g per 1L water (3.5 oz per 33 fluid ounces) for gravity of approx. 1.040
- some unfermented wort kept cold and sanitary from a previous brew day
- 70g of table sugar per 1L water (2.5 oz per 33 fluid ounces) – however, it is best to use malt sugar (wort / DME) whenever possible to reduce the chance of shocking the yeast with a different food source from starter to wort pitching
- To rehydrate yeast
- Add yeast to approx. 10 times as much room temperature water as the weight of the yeast e.g. 10g yeast in 100 ml water (0.35 oz yeast in 3.5 fluid ounces water)
Step 7 – Fermentation & dry hopping
- Allow yeast to ferment over the next two weeks (aprox)
- If you have a temperature-controlled system keep the fermenter temperature to the recommended fermentation temperature for each yeast strain (stated in the yeast ingredients section above)
- Monitor the fermentation activity over the first 10-12 days by the bubbling of the blow-off tube/airlock of your fermenter, as the bubbling slows down (roughly around day 10-12) take a gravity reading. When the gravity reaches around 1.010 raise the temperature of your fermenter by 1-2 degrees for 2-3 days for a diacetyl rest (if you don’t have temperature control don’t worry about this step, it's not the end of the world!)
- It's important to note that fermentation times will vary based on your circumstances like temperature, amount of yeast pitched, the healthiness of yeast, the gravity of the wort, pH, etc. so don’t stress be patient and know that these times are just a rough guide
- On day 2 of the diacetyl rest (once gravity reaches roughly 1.009) & gravity is the same 2 days in a row move onto cold crashing! (If you can’t / don’t want to cold crash go straight to kegging/bottling your beer!)
Step 8 (optional) – Cold crashing
- begin cold crashing your fermenter (bring the temperature of your fermenter down to as close to 0°C (32°F) as possible, for 2 days to a week depending on how patient you are
- If you don’t have a temp-controlled fermenter, you can cold crash by putting your fermenter in a fridge or temp-controlled chest freezer
- After you have finished cold crashing it's time to keg/bottle your beer! If you are bottling your beer from the fermenter uncarbonated remember to add about 5-7 grams (0.17 - 0.24 oz) of priming sugar to your bottles to carbonate your beer.